A Sub-$1000, Non-X86 Motherboard

If you’re building a computer, your options are nearly limitless. You can get a motherboard with red LEDs, with blue LEDs, green LEDs, or if you’re feeling spendy, RGB LEDs. You can get custom-milled heat spreaders in any shape you want, as long as it’s angular and screams ‘gamer’. If you want a motherboard that doesn’t use x86 — either AMD or Intel — you’re kind of out of luck. Either it doesn’t exist, or it’s going to cost a small fortune.

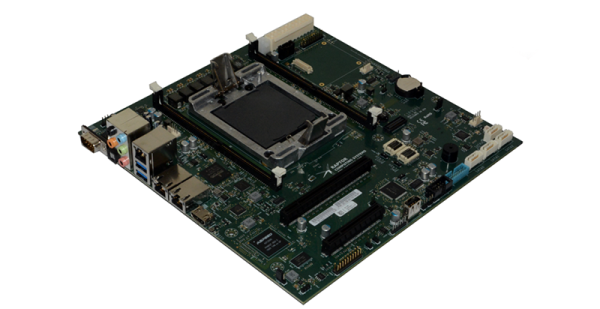
Raptor Engineering have just released a motherboard that isn’t x86 and doesn’t cost as much as a cheap car. The Blackbird mainboard is designed for an IBM Power9 CPU and it only costs $800. Add in a four-core CPU and the total cost comes out to about $1200. Add in some ECC RAM and you’re still under two grand. Building with a non-x86 CPU has never been cheaper. This is a significant change from earlier releases from Raptor Engineering, where just the motherboard cost $3700.

The Blackbird mainboard features dual DDR4 ECC DIMM slots, one PCI Express 4.0 x16 slot, one PCI Express 4.0 x8 slot, dual Gigabit Ethernet ports, 4 x SATA 3.0 ports, 4 x USB 3.0 ports, 1 x USB 2.0 port, and an HDMI display output.

The only reason you would build a Power9-based computer is simply to get around the black box that has become Intel and AMD CPUs. No one is really sure what’s going on in the Intel Management Engine, AMD has similar black boxes littered around. However, using a Power9 CPU has a secure boot mode and provided your computer is physically secure, you’re more or less assured you’re running your firmware and your kernel and your userspace apps. It’s security for the security-minded. RISC architecture is going to change everything.

Applied Science Rolls An Electroluminescent Controller

After LEDs and TFTs and OLEDs and liquid crystals, there’s another display technology that doesn’t get a lot of attention. Electroluminescent displays have been around for ages, and there still aren’t a whole lot of applications for them. That might change soon, because Applied Science a.k.a. [Ben Krasnow] figured out an easy way to build EL displays on anything, and created a simple circuit that’s capable of driving video on a remarkable blue phosphor EL display.

For this build, [Ben] is using a specialty product from Lumilor consisting of a copper-ish conductive base layer, a clear dielectric, the ‘lumicolor’ phosphor, and a clear conductive top coat. All of these layers are applied with an airbrush, and the patterns are made with a desktop vinyl cutter.  This is an entire system designed to put electroluminescent displays on motorcycle gas tanks and to have doors that go like *this* and glow. That said, the system isn’t very dependent on the substrate, and [Ben] has had successful experiments in creating EL displays on plastic sheets, 3D printed parts, and even paper.

Compared to previous (and ongoing) efforts to create EL displays such as [Fran]’s recreation of the Apollo DSKY, the Lumilor system seems extraordinarily easy and clean. Current efforts as with [Fran]’s example are using a silkscreen process, which is a mess no matter how you look at it and can’t be applied to non-flat surfaces.

But EL displays are more than just putting a few layers of chemicals on a substrate — you need to drive these displays with high-frequency, high-voltage AC. For this, [Ben] designed a multi-channel electroluminescent driver based on the Adafruit Trinket M0, two LT3468 ICs to generate a high voltage, and either a an HV507 or HV513 to drive 8 or 64 channels.

With the ability to create EL displays and drive 64 channels, there really was only one thing to do: a 32×32 display. Even seeing a few lines scan across a 32×32 EL display is magical, but it’s got another trick up its sleeve: it also plays a low-resolution video of Never Gonna Give You Up.

This isn’t a video to be missed, check it out below.

Continue reading “Applied Science Rolls An Electroluminescent Controller”

Hackaday Links Column Banner

Hackaday Links: November 25, 2018

Bad Obsession Motorsport have been stuffing the engine and suspension from a 4WD Celica into an old Mini since forever. It is a wonderful homage to Police Squad and some of the best machining and fabrication you’ll see on YouTube. The latest episode tackled the electrical system and how to drive an alternator in an extremely cramped engine bay. The solution was a strange flex-shaft confabulation, and now the Bad Obsession Motorsport guys have a video on how they attached an alternator to a car where no alternator should go. It’s forty minutes of machining, go watch it.

Last Friday was Black Friday, and that means it’s time to CONSUME CONSUME CONSUME. Tindie’s having a sale right now, so check that out.

I’m the future of autonomous flight! This week, I got a market research survey in my email from Uber, wanting me to give my thoughts on autonomous ridesharing VTOL aircraft. Uber’s current plan for ridesharing small aircraft involves buying whatever Embraer comes up with (Uber is not developing their own aircraft), not having pilots (this will never get past the FAA), and turning a random parking lot in LA into the busiest airport in the world (by aircraft movements, which again is something that will never get past the FAA). Needless to say, this is criminally dumb, and I’m more than happy to give my thoughts. Below are the relevant screencaps of the survey:

The crux of this survey is basic market research; how much would I pay for a VTOL ride sharing service versus buying a new (autonomous) car versus using an autonomous Uber. You’ve also got a Likert scale thingy asking me if I’m comfortable flying in a battery-powered aircraft. Protip: I highly doubt anyone given this survey has flown in a battery-powered aircraft. Proprotip: the easiest way to screw up the scoring for a Likert scale is to answer ‘1’ for the first question, ‘2’ for the second, etc., and wrap back around to ‘1’ for the sixth question.

Don’t worry, though: I answered all the questions truthfully, but Uber Air will never happen. The FAA won’t let this one fly, and no company will ever carry passengers without a licensed pilot on board.

Adding Vector Art To Your Eagle Boards

Badgelife and the rise of artistic PCBs are pushing the envelope of what can be done with printed circuit boards. And if you’re doing PCB art, you really want to do it with vectors. This is a surprisingly hard problem, because very few software tools can actually do DXFs and SVGs properly. Never fear, because [TallDarknWeirdo] has the solution for you. It’s in Eagle, and it uses Illustrator and Inkscape, but then again this is a hard problem.

The demonstration article for this example is just a Christmas tree. It’s somewhat topical green soldermask is standard, FR4 looks like wood, and silver and gold and all that. [TallDarknWeirdo] first split up this vector art into its component pieces — soldermask, bare FR4, and copper — then imported it into Inkscape to make the SVGs. This was then thrown into an online tool that creates something Eagle can understand. The results are better than importing bitmaps, resulting in much cleaner lines in the finished board.

Quick word of warning before we get into this, though: if you’re reading this in 2019 or later, this info might be out of date. Autodesk should be releasing a vector import utility for Eagle shortly, and we’re going to be taking a deep dive into this tool and complaining until it works. Until then, this is the best way to get vector art into Eagle.

Oh, and [TallDarknWeirdo] is none other than [Bradley Gawthrop], who’s put more time in crimping wires than anyone else we know.

The Best Laptop Gets Even Better

The ThinkPad is the greatest laptop ever created. It doesn’t come in rose gold, it comes in black. It doesn’t have a weird screen instead of an escape key. For less than half the price of a MacBook, you can have a capable laptop that will somehow fit three drives inside. It’s madness, but it’s still not the perfect tool for hacking. To get there, you’re going to need to load that thing up with an independent Linux system, and maybe a solderless breadboard. That’s what [ollie242] is doing with his ThinkPad, and the results are the perfect addition to the perfect laptop.

This build is really just a 3D printed drive caddy for the Thinkpad UltraBay, the modular standard that allows you to add a CD drive, SATA drive, or even a serial and parallel port to your laptop. [ollie242] is modeling this off the CD drive taken from a ThinkPad T420, so we’re looking at a ‘Serial Ultrabay Enhanced’ version of this standard, which is compatible with a T430, which is still the best laptop you can possibly buy.

Inside this 3D printed drive caddy is a Raspberry Pi Zero W, powered by the ThinkPad through the internal SATA connector. The Pi Zero has right-angle headers attached, giving access to the GPIO pins from the outside. Just to add a little flair, [ollie242] added an OLED display to show the IP address, the CPU load, and the memory availability of the Pi.

This is a great project, if only because no one has any use for a CD drive anymore. Since these UltraBay drives are huge, it would be a simple matter to add a much more powerful computer to the drive like the recently announced Raspberry Pi 3 Model A+. There are — or at least there should be — some interesting internal connections on that UltraBay port, and it’s not inconceivable this Raspberry Pi UltraBay could be used as a coprocessor of sorts for its host laptop.

LED-ifying A Guitar, Part Two

An electric guitar is all about stage presence. Need to be cooler than a single guitar? No problem — there are double neck guitars. Need to be cooler than that? No problem, the guy from Cheap Trick has a five-neck guitar. Need to be cooler than that? Robbie Robertson played a guitar with an extra mandolin neck on The Last Waltz. Where do you go from there? Obviously, the solution is putting a TV in your guitar with a boatload of individually addressable LEDs in a guitar. That’s what [Englandsaurus] is doing, and the build thread is now getting into how to turn a bunch of LEDs into a display.

In the first installment of this build thread, [Englandsaurus] went over the construction of the guitar itself and how a hundred individually addressable RGB LEDs were installed inside two pieces of plexiglass. When the guitar is displaying white at full brightness, the power draw is 500 W. This, in itself, is remarkable; no sane person would ever plug a guitar into a 500 W amp, and even 100 Watts is just too damn loud. There’s more power going to the lights here than the amplifier, and that’s awesome.

Simply sticking LEDs in a guitar does not a build log make, so how are these pixels addressed? How do you make a display out of a bunch of LEDs? This is a hell of a problem, but with Artnet and Resolume Arena 6 these pixels can be mapped into a cartesian grid, and from there it’s just putting video on the guitar.

While the first installment of this build is great and shows you how far you can take electronics in a guitar, this installment is a great demo of turning a bunch of LEDs into a display, something that applies to more than just a gigantic glowey guitar.

This Bitcoin Price Tracking Traffic Light Isn’t Just A Red LED

Quick, what’s the price of Bitcoin? Is it lower today than yesterday? Are you overdrafting your Lamborghini account? What if you had an easy way to tell at a glance how much you could have made if you sold in December of last year? That’s what this Bitcoin price tracking traffic light is all about, and it’s a great use of existing electronics.

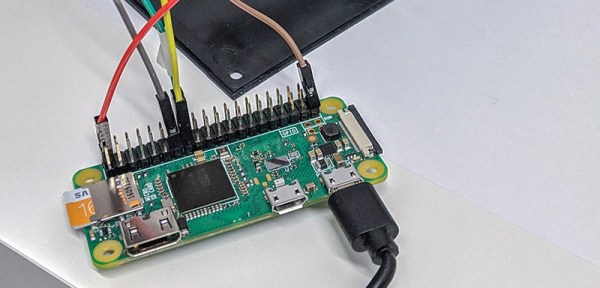
The hardware for this build is a traffic light table lamp available on Amazon for twenty bucks. Inside this traffic light, you get a PCB with three LEDs and a small microcontroller to control the LEDs. The microcontroller isn’t used in this case, instead the microcontroller is removed and a few wires are soldered up to the base of the transistors used to drive the LEDs. The other ends of these wires are attached to a trio of pins on a Raspberry Pi Zero W, giving this traffic light table lamp Linux and a connection to the Internet.

On the software side of things, we’re looking at a Docker container running a Python script that fetches the latest Bitcoin price from Coindesk and calculates the change from the previous fetch of the price of Bitcoin. This data is shuffled off to another Python script that actually changes the LEDs on the lamp.

Sure, these days a ‘bitcoin price tracking traffic light’ is as simple as connecting a red LED to a battery, and if you’re feeling extra fancy you can add a 220 Ω resistor. But this is a project that’s so well executed that we’ve got to give it a tip ‘o our hat.