Lazing With A Ruby

ruby

[Ben Krasnow], builder of amazingly complex and technical devices, is finally starting work on his ruby laser. He’s been collecting parts for this project for the past few years, but only recently has he started recreating the first visible light laser.

While the design and manufacture of the first ruby laser was astonishingly complex, the basic idea behind it is pretty simple. [Ben]’s laser uses a synthetic ruby rhod with the ends ground optically flat. This rod is placed inside a flash tube. When the flash tube lights up, the rod absorbs the light and re-emits it as a coherent beam for several milliseconds. This beam bounces between two mirrors – one fully reflective and another partially reflective – and emits a constant stream of coherent photons. It’s tremendously more complex than simply connecting a laser diode to a power source, but replicating a build that graced the covers of Time and Newsweek only fifty years ago is pretty impressive

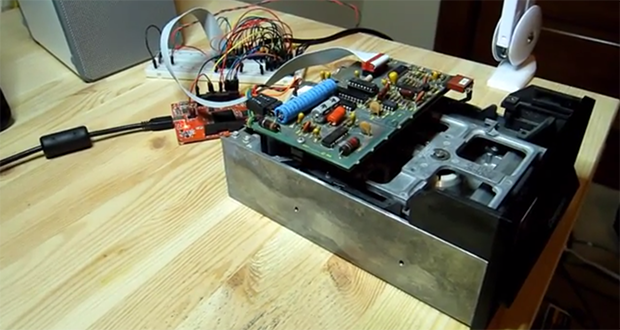
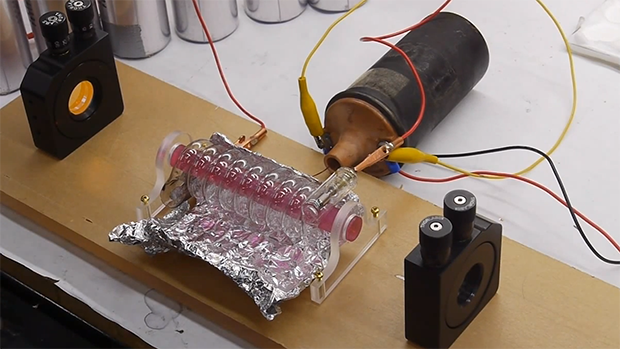
Right now, [Ben] has most of the mechanical and optical parts of his ruby laser on his workbench. The next step is constructing a huge capacitor bank to charge the flash tube every millisecond or so. What [Ben] will end up using his laser for remains up in the air, but if we come across some erbium or neodymium rods we’ll be sure to send them his way.

Continue reading “Lazing With A Ruby”

A DiskVaccuum For Obsolete Disk Formats

drive

[Jim] has a box of disks for a very old Compucolor II computer, and with bit rot slowly setting in he figured it might be time to dump all those disks to a more permanent format. After reviewing the existing tools to read these disks, he decided to build his own floppy disk interface that he calls the DiskVaccuum.

The DiskVaccuum is based on a Papilio Pro FPGA board and a few chips worth of level conversion. The FPGA is able to read bits and move the head of the disk with ease, saving everything to the drive of a much more modern computer.

On the USB side of the Papilio board, [Jim] wrote a shell of sorts in Python to capture tracks on the disk, read out the track listing, save an image file, and do all the things a proper DOS should. Right now the project is only for the Compucolor II disk drive, but [Jim] played around with KiCAD enough to create a Papilio-to-disk-drive interface board with connectors for most of the disk drives of this particular vintage. The hope is to generalize the hardware and software to read disks for other systems, including those with 8-inch drives.

[Jim] put up a video describing the hardware and demoing his Python capture utility. You can check that out below.

Continue reading “A DiskVaccuum For Obsolete Disk Formats”

3D Printering: Making A Thing With Blender, Part II

printering

So you have a 3D printer and need to print something of your own design. That’s a problem if you don’t know how to create and edit 3D objects.  In this post, we’re continuing our previous misadventures with Blender by making a ‘thing’ torn from a very old book on drafting.

Previously, we’ve made the same part in other 3D design packages. Here’s some links to those other ‘Making a Thing’ posts:

We’ve already done half the work to make a ‘thing’ in Blender, so now it’s time to finish the job. Check out the rest of the tutorial below.

Continue reading “3D Printering: Making A Thing With Blender, Part II”

Mooshimeter: The ‘Why Didn’t I Think Of That’ Multimeter

Despite how useful multimeters are, there are a lot of limitations you just don’t think about because they’re the way electronic measurement has always been done. Want to measure voltage and current simultaneously? Better get two meters. Measuring something in a dangerous, inaccessible, or mobile place? You could rig up a camera system to show the meter’s display on a monitor, you know.

Mooshimeter is the better way of doing things. It’s a multichannel multimeter that communicates with your cell phone over a Bluetooth connection. With two channels. the Mooshimeter makes it easy to graph voltage against current to plot a beautiful IV curve on your smart phone. Being a wireless multimeter means you can stick the Mooshi inside a robot and get instantaneous feedback of how hard you’re driving your motors.

Far from being a two-trick pony, the Mooshimeter is actually a pretty good multimeter by itself. It can handle 600V and 10A with 24 bits of resolution. Here are the complete specs. The Mooshimeter is available for preorder here for $100 USD.

Controlling Cheap, Awesome Christmas Lights

LEDs

[James] was wandering around Walgreens after Christmas and found something very interesting – RGB LED Christmas lights that were individually addressable. At $6.50 for a strand of 15 lights, he just had to buy a few and figure out the control protocol. After all, who can turn down a big, cheap, controllable RGB LED strip?

The packaging for these lights – apparently manufactured by BriteStar – includes a ‘try me’ button that cycles through different light patterns. This button is what initially tipped [James] off to the fact the lights on this strand could be individually controllable. Opening up one of the lights, he found exactly what he wanted: an epoxy blob, two wires for power, and three wires for the signaling.

After checking out this light with a scope and logic analyzer, [James] realized there was a very, very simple protocol going on. Essentially, the entire string functioned as a gigantic shift register, taking the values for one light and pushing it down the string. In looking at the protocol, [James] also discovered] these lights support 16 levels of brightness. Yep, RGB LED Christmas Lights with PWM for under $7. Can’t beat that.

[James] wrote an Arduino library to control these strings and put it up on Github. While your local Walgreens has probably already hidden these lights away in the back of the store, it might be worth asking around to see if they have any left.

Acoustic Delay Line Memory

Back in the olden days  when computers were both analog and digital, making RAM was actually very hard. Without transistors, the only purely electronic means of building a memory system was vacuum tubes; It could have been done, but for any appreciable amount of RAM means an insane amount of tubes, power, and high failure rates.

One of the solutions for early RAM was something called a delay line. This device used ultrasonic transducers to send a pulse through a medium (usually mercury filled tubes heated to 40°C) and reads it out at the other end. The time between the pulse being sent and received is just enough to serve as a very large, small capacity RAM.

Heated tubes filled with hundreds of pounds of mercury isn’t something you’d want sitting around for a simple electronics project. You can, however, build one out of a Radio Shack Electronics Learning Lab, a speaker, and a microphone.

[Joe] designed his delay line using an op-amp to amplify the train of acoustic pulses traveling through the air. A compactor picks up these pulses and sends them into a flip-flop. A decade counter and oscillator provide the timing of the pulses and a way to put each bit in the delay line. When a button on the electronics lab is pressed, a ‘tick’ is sent into the speaker where it travels across [Joe]’s basement, into the microphone, and back into the circuit.

The entire setup is able to store ten bits of information in the air, with the data conveniently visualized on an oscilloscope. It’s not a practical way to store data in any way, shape, or form, but it is an interesting peek into the world before digital everything.

Video below.

Continue reading “Acoustic Delay Line Memory”

Intel Edison: A Desktop From 1998 In An SD Card

According to the barrage of press releases hitting the Hackaday tip line, the Consumer Electronics Show is upon us with announcements of amazing new technologies such as jackets with a cell phone pocket, alarm clocks with Bluetooth, and iPhone cases with a kickstand. What an age to live in.

Among the more interesting announcements at CES is the Intel Edison, a tiny device that combines a dual core Intel SoC with ‘a Pentium instruction set’, WiFi and Bluetooth adapter, and some amount of storage into an SD card form factor. Apart from that, little else is known about the Intel Edison and the only other primary source for this announcement appears to be Intel CEO [Brian Krzanich]’s CES keynote address.

The Edison will be able to run Linux, ‘other operating systems’, and will support Wolfram, the Mathematica-esque programming language where everything is a data type. Edison will also have an app store. Because that’s a thing now, apparently.

If you can’t wait for Edison to be released sometime in the middle of 2014, we’d suggest you check out the Intel Galileo. It’s an Arduino compatible board based on the same Quark SoC found in the Edison but in a significantly more convenient form factor. The Galileo doesn’t have on board WiFi or Bluetooth, but at least you don’t have to wait for the release of the Edison and the complications of a purpose-built breakout board for whatever application you’re thinking of.