From EPaper Badge To Weather Station

ePaper Weather Station

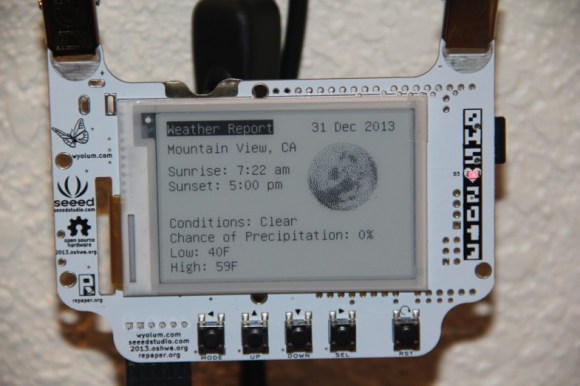
[Jeremy Blum] converted his 2013 Open Hardware Summit badge, also known as the BADGEr, into an ePaper weather station. We’ve looked at the 2013 OHS badge in the past, and the included open source RePaper display makes it an interesting platform to hack.

To fetch weather data, the badge is connected to a Raspberry Pi using an FTDI cable. A Python script uses the Python Weather API to poll for weather data. It then sends a series of commands to the BADGEr using pySerial which selects the correct image, and inserts the current weather data. Finally, a cronjob is used to run the script periodically, providing regular weather updates.

If you happen to have one of the badges, [Jeremy] has provided all of the files you’ll need to build your own weather station on Github. Otherwise, you can take a look at the RePaper project and WyoLum’s eReader Arduino Library to build your own ePaper project.

A Blindingly Bright Larson Scanner

craylarsonscanner

This hulking monument to illumination is [DJJules’s] 6-foot-long Ultimate Larson Scanner. If you’re scratching your head in confusion, the Larson Scanner is the ever-popular scrolling LEDs seen on KITT (the car) from Knight Rider and on Cylons in Battlestar Galactica (1978), named after the creator of the series.

[DJJules’s] iteration consists of sixteen 10W LEDs, each mounted on a heat sink which bolt on to a 6′ long piece of angle aluminum sourced from a local hardware store. He used a basic MOSFET constant current driver for each LED, attaching the MOSFETS to the heat sink with 4-40 screws. Each LED module then connects to a TLC5940 LED driver breakout board from Sparkfun, which plugs into an Arduino Pro Mini.

Check out the Instructables page for the source code and other important details, including safely powering the build (the LEDs can draw around 1A each), then grab your sunglasses and stick around for a quick video below.

Continue reading “A Blindingly Bright Larson Scanner”

A Tiny Clock With A Retro Display

After having ported Contiki to his TI Launchpad platform, [Marcus] was eager to do something with it. He therefore built a simple clock with a vintage HPDL-1414 “smart four-character 16-segment alphanumeric display” and a msp430g2553.

The result that you can see above is powered over USB, includes a 3.3V LDO linear voltage regulator as well as a button, a LED, a crystal, and several passive components. Fortunately enough, the 5V-powered HPDL-1414 display accepts 3.3V logic at its inputs, avoiding the need for level translators.

The clock program is running on the ported Contiki 2.6 that you can find on his Github repository. [Marcus] is considering using a vibration motor to buzz every 20 minutes during work hours as a reminder for the 20-20-20 rule to battle eye fatigue: every 20 minutes, look at something 20 feet away for 20 seconds. A video of the system in action is embedded after the break.

Continue reading “A Tiny Clock With A Retro Display”

3D Printering: Making A Thing With Blender, Part II

printering

So you have a 3D printer and need to print something of your own design. That’s a problem if you don’t know how to create and edit 3D objects.  In this post, we’re continuing our previous misadventures with Blender by making a ‘thing’ torn from a very old book on drafting.

Previously, we’ve made the same part in other 3D design packages. Here’s some links to those other ‘Making a Thing’ posts:

We’ve already done half the work to make a ‘thing’ in Blender, so now it’s time to finish the job. Check out the rest of the tutorial below.

Continue reading “3D Printering: Making A Thing With Blender, Part II”

Mooshimeter: The ‘Why Didn’t I Think Of That’ Multimeter

Despite how useful multimeters are, there are a lot of limitations you just don’t think about because they’re the way electronic measurement has always been done. Want to measure voltage and current simultaneously? Better get two meters. Measuring something in a dangerous, inaccessible, or mobile place? You could rig up a camera system to show the meter’s display on a monitor, you know.

Mooshimeter is the better way of doing things. It’s a multichannel multimeter that communicates with your cell phone over a Bluetooth connection. With two channels. the Mooshimeter makes it easy to graph voltage against current to plot a beautiful IV curve on your smart phone. Being a wireless multimeter means you can stick the Mooshi inside a robot and get instantaneous feedback of how hard you’re driving your motors.

Far from being a two-trick pony, the Mooshimeter is actually a pretty good multimeter by itself. It can handle 600V and 10A with 24 bits of resolution. Here are the complete specs. The Mooshimeter is available for preorder here for $100 USD.

Ride, Captain, Ride Aboard Your Arduino-Controlled Autopiloted Sailboat

[Jack], a mechanical engineer, loom builder, and avid sailor wanted an autopilot system for his 1983 Robert Perry Nordic 40 sailboat with more modern capabilities than the one it came with. He knew a PC-based solution would work, but it was a bit out of reach. Once his son showed him an Arduino, though, he was on his way. He sallied forth and built this Arduino-based autopilot system for his sloop, the Wile E. Coyote.

He’s using two Arduino Megas. One is solely for the GPS, and the other controls everything else. [Jack]’s autopilot has three modes. In the one he calls knob steering, a potentiometer drives the existing hydraulic pump, which he controls with a Polulu Qik serial DC motor controller. In compass steering mode, a Pololu IMU locks in the heading to steer (HTS).  GPS mode uses a predetermined waypoint, and sets the course to steer (CTS) to the same bearing as the waypoint.

[Jack]’s system also uses cross track error (XTE) correction to calculate a new HTS when necessary. He has fantastic documentation and several Fritzing and Arduino files available on Dropbox.

Autopilot sailboat rigs must be all the rage right now. We just saw a different one back in November.

Continue reading “Ride, Captain, Ride Aboard Your Arduino-Controlled Autopiloted Sailboat”

Clever Reed Switch Catches Thief

When [Abhimanyu Kumar] noticed money going missing from his small bookshop, he decided to set up a little trap to catch the thief.

The problem was that the bookshop’s money was stored inside a cupboard in their house (back end of the shop), which meant that the culprit was likely one of their own employees. They already have a CCTV system installed in the actual store, and although he could simply add another camera in the house, [Abhimanyu] didn’t really want to do that.

He instead devised a simple security trap: dubbed the Jugaad Security System. In Hindi, Jugaad quite literally means “hack”. He added a small magnetic reed switch to the cupboard where the money is stored—well, was stored—which is then linked directly to an intervalometer. This then connects to an inconspicuous DSLR sitting on one of the work benches. He aimed the camera at the cupboard and, in case the lights are out when the system is tripped, set it to an extremely high ISO.

Continue reading “Clever Reed Switch Catches Thief”