3D Printering: Making A Thing With OpenSCAD

This week, we’re starting off with OpenSCAD, a 3D modelling program that’s more like programming than drawing. A lot of useful 3D printable objects – including the parts for a lot of RepRaps – are designed in OpenSCAD, so hopefully by the end of this you’ll be able to design your own parts.

This isn’t meant to be a complete tutorial for OpenSCAD; I’m just demoing SCAD enough to build a simple part. Next week I’ll most likely be designing a part with AutoCAD, but if you have an idea of what software tools I should use as a tutorial to make a part, leave a note in the comments. Check out the 3D Printering guide to making a part with OpenSCAD below.

Continue reading “3D Printering: Making A Thing With OpenSCAD”

A Really Big Extruder For Exotic Filaments

extruder

Even with ABS, PLA, Nylon, HIPS, and a bunch of Taulman filaments, the world of 3D printers is missing out on a great supply of spools of plastic filament. Plastic welding rod is available from just about every plastics supplier, and in more variety than even the most well-stocked filament web shop.

This Kickstarter hopes to put all those exotic plastic welding rods to good use. Instead of being designed to only use 1.75 and 3mm filaments, this guy will extrude welding rods up to 4.76mm in diameter. This opens the door for 3D printed objects made out of PDPF, PVC, Polypropylene, Polyethylene and other high molecular weight plastics.

Because these welding rods are much bigger than the usual plastic filament, this extruder also has the option for a very beefy NEMA 23 motor. It’s the perfect solution if you’re planning on building a homebrew ludicrous-sized printer, or you just to show off just how awesome you are.

VFD And Nixie Clock Twofer

Clocks

Sometimes the stars align and we get two somewhat similar builds hitting the Hackaday tip line at the same time. Recently, the build of note was clocks using some sort of display tube, so here we go.

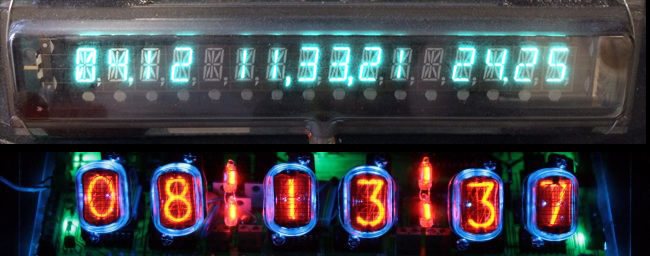
First up is [Pyrofer]’s VFD network time clock (pic, above). The build started as a vacuum flourescent display tube he salvaged from an old fruit machine – whatever that is. The VFD was a 16 character, 14 segment display, all controlled via serial input.

The main control board is, of course, an Arduino with a WizNet 5100 Ethernet board. The clock connects to the Internet via DHCP so there’s no need to set an IP address. Once connected, the clock sets itself via network time and displays the current date, time, and temperature provided by a Dallas 1-wire temperature probe.

Next up is [Andrew]’s beautiful Nixie clock with enough LEDs to satiate the desires of even the most discerning technophile. The board is based on a PIC microcontroller with two switching power supplies – one for the 170VDC for the Nixies, and 5V for the rest of the board.

A battery backed DS1307 is the real-time clock for this board, and two MCP23017 I/O expanders are used to run the old-school Nixie drivers

All this is pretty standard for a Nixie clock build, if a little excessive. It wasn’t enough for [Andrew], though: he used the USB support on his PIC to throw a USB port on his board and wrote an awesome bit of software for his PC to set the time, upload new firmware, and set the color fade and speed. With this many LEDs, it’s not something you want in your bedroom with all the lights on full blast, so he implemented a ‘sleep’ mode to turn off most of the lights and all the Nixie tubes. It’s a great piece of work that could easily be successfully funded on Kickstarter.

A Kinect Controlled Robotic Hand

hand

It’s that time of year again when the senior design projects come rolling in. [Ben], along with his partners [Cameron], [Carlton] and [Chris] have been working on something very ambitious since September: a robotic arm and hand controlled by a Kinect that copies the user’s movements.

The arm is a Lynxmotion AL5D, but instead of the included software suite the guys rolled their own means of controlling this arm with the help of an Arduino. The Kinect captures the user’s arm position and turns that into data for the arm’s servos.

A Kinect’s resolution is limited, of course, so for everything beyond the wrist, the team turned to another technology – flex resistors. A glove combined with these flex resistors and an accelerometer provides all the data of the position of the hand and fingers in space.

This data is sent over to another Arduino on the build for orienting the wrist and fingers of the robotic arm. As shown in the videos below, the arm performs remarkably well, just like the best Waldos you’ve ever seen.

Continue reading “A Kinect Controlled Robotic Hand”

8-Track Tapes As A Storage Medium

OLYMPUS DIGITAL CAMERA

Before [Woz] created the elegant Disk II interface for the Apple II, and before Commodore brute-forced the creation of the C64 5 1/4″ drive, just about every home computer used cassette tapes for storage. Cassette tapes, mind you, not 8-track tapes. [Alec] thought this was a gross oversight of late 1970s engineers, so he built a 8-track tape drive.

This actually isn’t the first instance of using 8-tracks to store data on a computer. The Compucolor 8001 had a dual external 8-track drive, and the Exidy Sorcerer had a tape drive built in to the ‘the keyboard is the computer’ form factor. It should be noted that nearly no one has heard about these two computers – the Compucolor sold about 25 units, for example – so we’ll just let that be a testament to the success of 8-track tape drives.

[Alec] installed an 8-track drive inside an old external SCSI hard drive enclosure. Inside is an Arduino that controls the track select, tape insertion and end of tape signals. Data is encoded with DTMF with an FSK encoding, just like the proper cassette data tapes of the early days.

On the computer side of things, [Alec] is using a simple UNIX-style, pipe-based I/O. By encoding four bits on each track, he’s able to put an entire byte on two stereo tracks. The read/write speed is terribly slow – from the video after the break, we’re assuming [Alec] is running his tape drive right around 100 bits/second – much slower than actually typing in data. This is probably a problem with the 40-year-old 8-track tape he’s using, but as a proof of concept it’s not too bad.

Continue reading “8-Track Tapes As A Storage Medium”

Ultrasonic Data Transmission With GNU Radio

When we hear GNU Radio was used in a build, the first thing we think of is, obviously, radio. Whether it’s a using extremely expensive gear or just a USB TV tuner dongle, GNU Radio is the perfect tool for just about everything in the tail end of the electromagnetic spectrum.

There’s no reason GNU Radio can’t be used with other mediums, though, as [Chris] shows us with his ultrasound data transmission between two laptops. He’s transmitting audio from the speakers of one laptop at 23 kHz. It’s outside the range of human hearing, but surprisingly able to be picked up by a cheap desktop mic connected to another laptop. His GNU Radio setup first converts a string of text to a 5-bit packet, modulates it with FSK, and bumps up the signal to 23 kHz. On the other end, the data is decoded by doing the same thing in reverse.

The setup is easily able to reject all audio that isn’t in the specified frequency range; in the video after the break, [Chris] successfully transmits a ‘hello world’ while narrating what he’s doing.

Continue reading “Ultrasonic Data Transmission With GNU Radio”

Disk-O-Mat: A Photobooth For Records

record

A photo booth is a simple concept – drop in a coin and get a few pictures in a couple of minutes. That’s only a visual record, though. What if you wanted to record audio? Thus the disk-o-mat was born.

The disk-o-mat is one of [flo]’s projects. In place of the miniaturized dark room found in a photo booth, [flo] put a record cutting setup. The 7″ records are polycarbonate sheets, each transferred to the turntable by a vacuum gripper. When the plastic disk is loaded, a stylus is set down on the disk and the record light goes on.

There isn’t a computer or any other digital means of saving audio and playing it back later. Everything is done just as how 45s – or more specifically, really old 78s – were cut; whatever goes into the microphone is cut directly into plastic.

The disk-o-mat was originally built in 2009, and has traveled to a few venues. [flo] is working on speeding up the process and making the machine a bit more reliable. Still, an awesome build and an awesome concept.

Videos below.

Continue reading “Disk-O-Mat: A Photobooth For Records”