Steampunk Battleship Complete With Steam Engine!

steampunk fortress

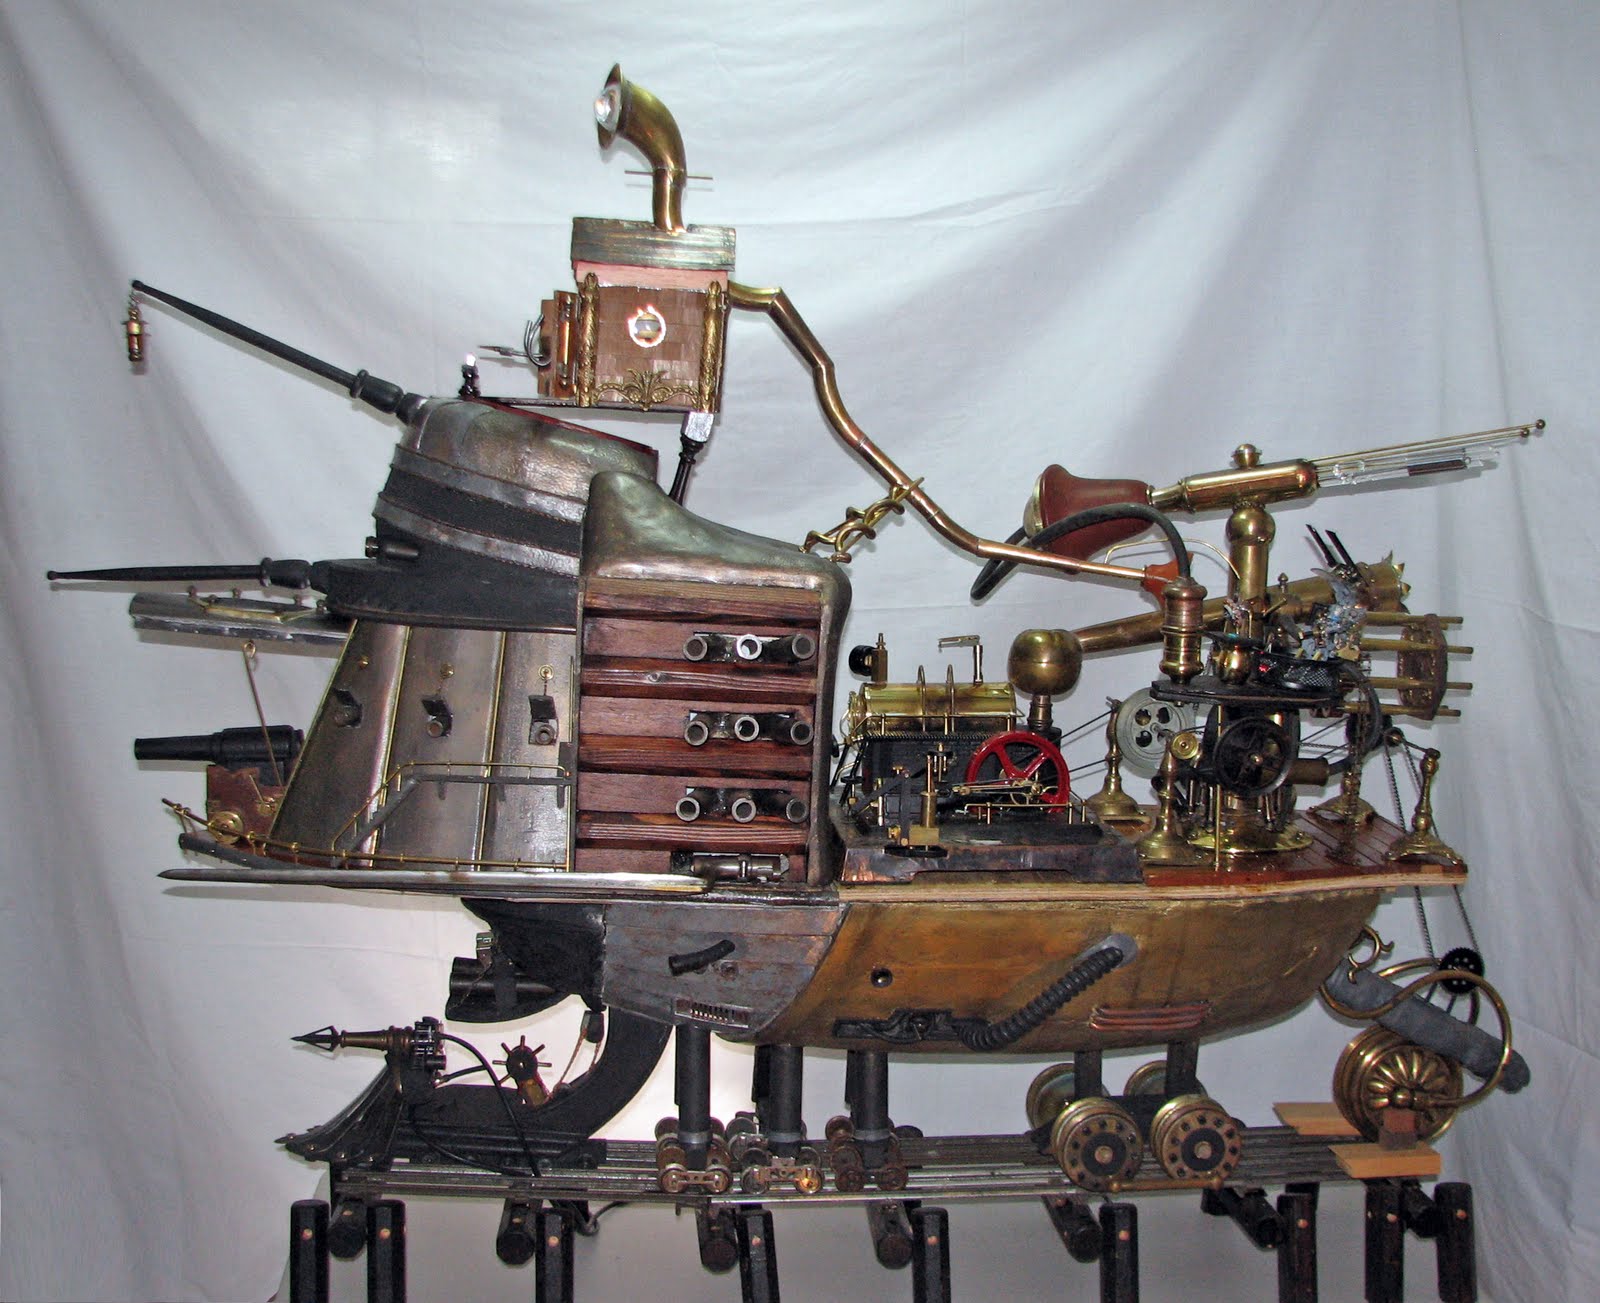
The photo above doesn’t do this huge and whimsical Steampunk Battleship justice. It’s an amazing project that took its creator, [Ed Ross], over 2500 hours to complete.

Called Barnum’s Dream, it was said to be originally commissioned by Queen Victoria as a ship for the Crimean war, and was the largest paddle wheel steam warship ever built. It was then retrofitted with a massive train carriage to be used in the Franco-Prussian war (that’s right, on land!).

The model is just over 4 feet long and just under 4 feet tall. Aside from the steam engine (which was modified) it was completely build by hand. Almost all of the mechanical linkages and powered by the internal steam engine. The level of detail that went into this is absolutely awe-inspiring. 

If you enjoyed the background history of the ship, there’s a delightful tale of the ship’s apparent origins on [Ed’s] blog which is thoroughly enjoyable. Make sure to check it out after watching the video after the break.

Continue reading “Steampunk Battleship Complete With Steam Engine!”

The 3D Printed Ukulele

uke

The creator of everyone’s favorite slic3r – [Alessandro Ranellucci] – has been hard at work putting his 3D modeling skills to the test. He’s created a ukulele that’s nearly entirely 3D printed (Google translation). Everything on the uke, short of the strings and tuning pegs came from a MendelMax 3D printer, all without any support material at all.

In the video, [Alessandro] and uke virtuoso [Jontom] show off how this instrument was put together and how good it can sound. The body of the uke is made of two parts, and the neck – three parts including the headstock and fretboard – all fit together with surprisingly traditional methods. A dovetail joint connects the neck to the body and a tongue and groove-like joint holds the headstock to the neck.

[Allessandro] puts the print time of all the uke parts at about 120 under 20 hours and about 20 Euros worth of plastic. As far as ukuleles go, this sounds just as good as the average instrument, but [Jontom] says the action is a little bit high. That’s why files were invented, we guess.

Thanks [iant] for sending this one in.

Continue reading “The 3D Printed Ukulele”

[Ben Heck] Builds The Ultimate Glue Gun

glue

For how many can be found on the workbenches and in the toolboxes of makers and hackers the world over, finding a glue gun that does more than just heat up and drip glue everywhere can be a challenge. [Ben Heck] finally solved this problem with a hot glue gun that’s more like an extruder from a 3D printer than a piece of junk you can pick up at Walmart for a few dollars.

By far, the most difficult part of this project was the glue stick extruder. For this, [Ben] used a DC motor with a two-stage planetary gear system. This drives a homemade hobbed bolt, just like the extruder in 99% of 3D printers. The glue stick is wedged up against the hobbed bolt with a few 3D printed parts and a spring making for a very compact glue stick extruder.

The electronics are a small AVR board [Ben] made for a previous episode, a thermistor attached to the hot end of the glue gun, a solid state relay for the heater, and analog controls for speed and temperature settings. After finishing the mechanics and electronics, [Ben] took everything apart and put it back together in a glue gun-shaped object.

The finished product is actually pretty nice. It lays down constistant beads of hot glue and thanks to a little bit of motor retraction won’t drip.

You can check out both parts of [Ben]’s build below.

Continue reading “[Ben Heck] Builds The Ultimate Glue Gun”

Hackaday Twitter Hits 40,000 Followers!

hackaday-40k-twitter-followers

I’m not sure exactly how many readers keep an eye on our Twitter account: @hackaday. We hit a new milestone today at 40,000 followers. For those of you who have been watching the Twitter feed recently, you’ve probably noticed it’s no longer limited to simply announcing each new post as it hits the front page. Madness, right?

A little over a week ago [Mike] promoted me to the role of Community Editor; a new position here aimed at directly engaging readers. For now, that means helping to guide conversations in the comments toward a degree of helpfulness and productivity. I’ve also sent out a handful of tweets to sort of test the waters, but considering my job is to engage the community, I thought I’d just ask! What can we at Hackaday be doing differently with social media (particularly Twitter) that you would find valuable? Hit up the comments and let us know, or join the conversation on Twitter: #HaDSuggestionBox

Veronica Gets A Pair Of Gamepads And A Bugged Chip

veronica

[Quinn Dunki]’s awesome 6502-based computer is coming right along, and she decided it’s time to add one of the most important features found in the 80s microcomputers she’s inspired by – gamepads.

There were two ways of implementing gamepads back in the 80s. The Apple II analog joysticks used a potentiometer for each joystick axis along with a 556 timer chip to convert the resistance of a pot into a digital value. Analog controls are awesome, but a lot of hardware is required. The other option is the Atari/Commodore joystick that uses buttons for each direction. Surprisingly, these joysticks are inordinately expensive on the vintage market but a similar hardware setup – NES gamepads – are common, dirt cheap, and extremely well documented.

[Quinn] wrote a few bits of 6502 assembly to read these Nintendo controllers with Veronica’s 6522 VIA with the help of an ATMega168, and then everything went to crap.

In testing her setup, she found that sometimes the data line from the controller would be out of sync with the clock line. For four months, [Quinn] struggled with this problem and came up with one of two possible problems: either her circuit was bad, or the 6522 chip in Veronica was bad. You can guess which option is correct, but you’ll probably be wrong.

The problem turned out to be the 6522. It turns out this chip has a bug when it’s used with an external clock. In 40 years of production this hasn’t been fixed, but luckily 6502 wizard [Garth Wilson] has a solution for this problem: just add a flip-flop and everything’s kosher. If only this bug were mentioned in the current datasheets…

Now Veronica has two NES controller inputs and the requisite circuitry to make everything work. Video evidence below.

Continue reading “Veronica Gets A Pair Of Gamepads And A Bugged Chip”

3D Printering: Making A Thing With OpenSCAD

This week, we’re starting off with OpenSCAD, a 3D modelling program that’s more like programming than drawing. A lot of useful 3D printable objects – including the parts for a lot of RepRaps – are designed in OpenSCAD, so hopefully by the end of this you’ll be able to design your own parts.

This isn’t meant to be a complete tutorial for OpenSCAD; I’m just demoing SCAD enough to build a simple part. Next week I’ll most likely be designing a part with AutoCAD, but if you have an idea of what software tools I should use as a tutorial to make a part, leave a note in the comments. Check out the 3D Printering guide to making a part with OpenSCAD below.

Continue reading “3D Printering: Making A Thing With OpenSCAD”

A Really Big Extruder For Exotic Filaments

extruder

Even with ABS, PLA, Nylon, HIPS, and a bunch of Taulman filaments, the world of 3D printers is missing out on a great supply of spools of plastic filament. Plastic welding rod is available from just about every plastics supplier, and in more variety than even the most well-stocked filament web shop.

This Kickstarter hopes to put all those exotic plastic welding rods to good use. Instead of being designed to only use 1.75 and 3mm filaments, this guy will extrude welding rods up to 4.76mm in diameter. This opens the door for 3D printed objects made out of PDPF, PVC, Polypropylene, Polyethylene and other high molecular weight plastics.

Because these welding rods are much bigger than the usual plastic filament, this extruder also has the option for a very beefy NEMA 23 motor. It’s the perfect solution if you’re planning on building a homebrew ludicrous-sized printer, or you just to show off just how awesome you are.