Belgrade Badge Hacks

We’re still coming off the Hackaday Belgrade conference right now. If you were there, you know it was the greatest hardware conference ever. If you weren’t there, you missed out. Sorry. (Make sure you get in on the Hackaday Superconference in November.)

One of the many highlights of the Belgrade conference was, of course, the badge. The 2018 Hackaday Belgrade Badge is a masterpiece of hardware with a 55-key keyboard, RGB TFT LED, speaker, and a BASIC interpreter.

This badge is a masterpiece of electronic design by Voja Antonic. Just to take one small example from the design, check out the placement of the buttons. Think the slightly rotated buttons that make up the keyboard is only a stylistic choice? It’s not; by carefully rotating each button, the legs of each switch can fit in between each other. It’s brilliant.

Starting hardware this good, adding amazing software by Jaromir Sukuba to bring it to life, and distributing a badge to each hacker through the door is the perfect recipe for some amazing hacks. What were the best badge hacking tricks we saw at the 2018 Hackaday Belgrade conference? Check out the video of the badge hacking ceremonies and then join us below for a few of our favorites.

Continue reading “Belgrade Badge Hacks”

A Slightly Scientific Examination Of Epoxies

Two-part epoxy is one of those must-have items in your toolbox, albeit kept in a ziploc bag to keep all that goo off the rest of your tools. It’s a glue with a million uses, but which brand is best? Should you keep some cheap five-minute epoxy around, or should you splurge for the fancy, long-setting JB Weld. It’s not a perfect analysis, but at least [Project Farm] has done the experiment. This is a test of which two-part epoxy you can find at your local home supply store is strongest.

The epoxies tested include Gorilla epoxy, Devcon Plastic Steel, Loctite Epoxy Weld, JB Weld original, JB Weld Kwik Weld, and JB ExtremeHeat. This more or less covers the entire gamut of epoxies you would find in the glue aisle of your local home supply store; the Gorilla epoxy is your basic 5-minute epoxy that comes in a double barrel syringe, and the JB Welds are the cream of the crop.

The testing protocol for this experiment consisted of grinding a piece of steel clean, applying a liberal blob of each epoxy, and placing three bolts, head down, in each puddle. The first test was simply suspending weights in 2.5-pound increments to each bolt as a quick test of shear strength. Here, the losers in order were the JB Weld ExtremeHeat, JB Weld KwikWeld, Loctite, Gorilla Epoxy, Devcon Plastic Steel, and finally the JB Weld Original. Your suspicions are confirmed: those fancy new versions of JB Weld aren’t as good as the original. The fact that they’re worse than 5-minute epoxy is surprising, though. The second test — torquing the bolts out of the epoxy — gave similar results, with Devcon Plastic Steel beating the JB Weld Original just barely.

So, what do these results tell us? Cheap five-minute epoxy isn’t terrible, and actually better than the fancy new versions of JB Weld. Loctite is okay, and the Devcon and original JB Weld are at the top of their game. That’s not that surprising, as you can cast cylinder heads for engines out of JB Weld.

Continue reading “A Slightly Scientific Examination Of Epoxies”

Using Pad Printers To Add Color To Artistic PCBs

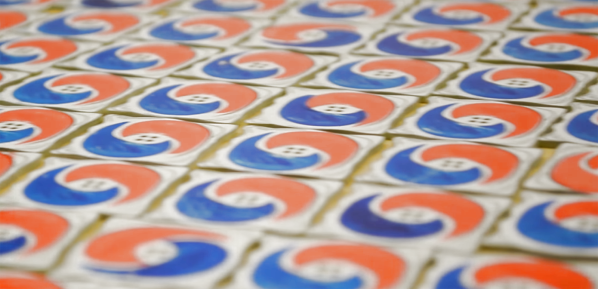
I’ve done a few experiments in adding color to printed circuit boards. These experiments used a process known as pad printing, and so far all indications are that pad printing is a viable process for truly multicolor artistic PCBs. For this year’s DEF CON, I’m stepping things up and taking them to their logical conclusion. I’m making true multicolor PCBs with orange and blue ink. This is, I believe, the first time this has ever been done with printed circuit board art, and it is certainly the first time it has ever been documented.

You may be wondering why I need more color on my boards. It’s that time of year again where PCB artisans all around the world are gearing up for badgecon DEF CON. For the last few years, independent badge makers have come together to form a demoscene of hardware creation. This year, add-ons for badges are a thing, and everyone is getting in on the game. Tindie is filled with amazing electronic badges and add-ons that will be found at this year’s DEF CON. There are badges featuring the Cromulon from Rick and Morty, baby Benders from Futurama, pikachus, and glowing tacos.

This is all about badge art, but when it comes to rendering an image in fiberglass and soldermask, everyone is working with a limited palette. Yes, you can get pink and orange soldermask, but I can’t find a place that will do it inexpensively. For any PCB, your choice of colors are only green, red, yellow, blue, purple, black, or white. No, you can’t mix them.

But I want both orange and blue, on the same board, cheaply and easily — here’s how I did it.

Continue reading “Using Pad Printers To Add Color To Artistic PCBs”

Expanding The K40 Laser Cutter With Aluminum Extrusion

The K40 laser cutter is an excellent option if you need to laze some plywood or acrylic. It’s ubiquitous, it’s cheap, and there’s a vast community out there that will help you support any issue you could have. Unfortunately, the K40 laser cutter is lacking. It has a small bed, and it doesn’t have the latest technology like ‘switches’ that turn off the laser when you open the door.

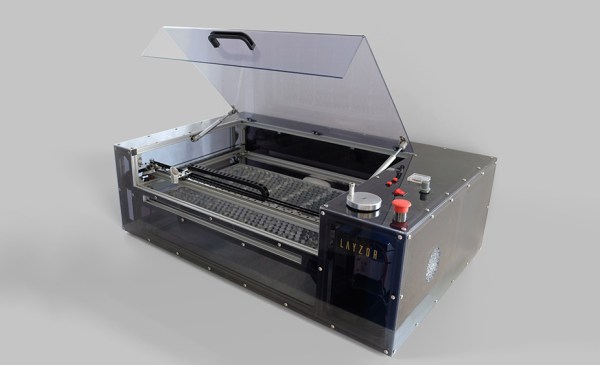
[frederik] recently upgraded his K40 to something great. He’s calling it the Layzor, and it has a huge 600×400 mm bed area, a feed-through slot for even wider workpieces, and fancy technology [frederik] is calling an ‘E-stop’. Sounds expensive, doesn’t it?

The build began by scavenging the K40 laser cutter for the electronics and laser tube, then building a new frame out of aluminum extrusion. A few parts had to be custom made, including a few stepper motor mounts and something to hold the laser tube. All of this was tied up in a box with acrylic panels, and went together as easily as any other CNC machine.

The finished project is great. It’s a relatively powerful laser cutter capable of most hobby work, and it was cheap. The total cost for this build was under €500. That’s not including the scavenged K40, but that’s still an amazing price for a very capable laser cutter.

What’s Inside A Scientology E-Meter?

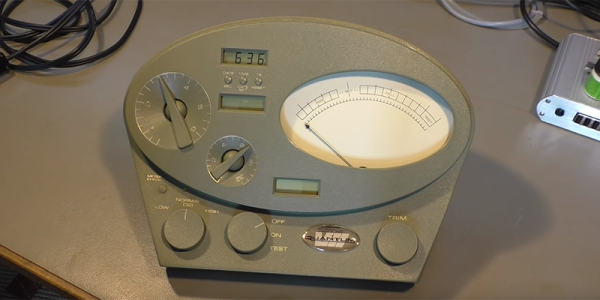
This is something we’ve been waiting a very long time for. The Church of Scientology uses devices called E-Meters to measure Thetans in the body. We’re not going to discuss this further, because we don’t want to be murdered. In reality, the E-Meter is simply a device that costs five thousand dollars and only measures the resistance of the human body. It does this by having the subject hold two copper cylinders and a simple Wheatstone bridge. Why does the E-Meter cost five thousand dollars? As [Play With Junk] found out, it’s an exquisitely engineered piece of hardware.

[Play With Junk] acquired this E-Meter from eBay for something around $100, and from a system-level analysis, it’s really not anything special. There’s a fancy analog meter, yes, but most of this wouldn’t be out of place in any 90s-era piece of test equipment. There’s an 8051 microcontroller reading what are probably some fancy ADCs, and there’s an LCD driver on board. Slap it in a fancy injection-molded case, and you have an E-Meter.

What’s most impressive is the quality of the components that go into a machine that effectively only measures the resistance of the human body. The ‘trim’ pot is a Vishay wire-wound precision potentiometer that costs somewhere between $20 and $60. The power switch is an over-specced switch that probably costs $5. The control pots look and feel great, and the wiring is wrapped around chokes.

This is an exceptionally well-engineered device, and it shows. There’s an incredible amount of work that went into the electronics, and a massive amount of money that went into the fancy injection molded enclosure. If you’re looking for an example of a well-engineered tool, price be damned, you need only look at an E-Meter.

Check out the video below of the entire teardown.

Continue reading “What’s Inside A Scientology E-Meter?”

Hot Camera Contest: Build A Battery Powered Thermal Camera

Here’s a challenge for all you hardware hackers out there. Peter Jansen has opened up the Hot Camera Contest on Hackaday.io to use a thermal imaging camera in a battery-powered project.

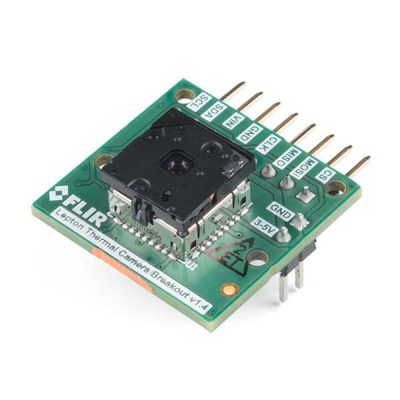
The challenge here is simple. Use a Flir Lepton thermal imaging camera module in a battery-powered configuration. There’s a catch, though: this is a project to use the Lepton in radiometric mode, where the camera spits out an actual temperature value for each pixel. Yes, this is a documented feature in the Flir Lepton module, but so far very few people are using it, and no one has done it with a small, battery-powered device.

The rules for this challenge are to use the Flir Lepton 2.5 in radiometric mode using either the Raspberry Pi Zero W or ESP32. Any software in this challenge must spit out absolute temperature values in a text format, and there must be a demonstration of putting the Flir Lepton into low-power mode. There are two challenges here, one for the Raspi and one for the ESP32; and winner will be named for each.

Getting More from a Fascinating Sensor

The Flir Lepton is a tiny little thermal camera that’s been available to the Maker community for some time now, first through GroupGets and now through Sparkfun. For a pair of Benjamins, the specs are very impressive: the Lepton has a resolution of 60×80 pixels and everything is can be read over an SPI port. The Lepton gives any project thermal imaging, and the PureThermal board turns the Lepton into a USB device.

Peter Jansen is the creator of the Open Source Science Tricorder (yes, it’s a tricorder) which took Fourth Prize in the 2014 Hackaday Prize. You can understand how he became interested in portable, and we’re sure whatever project he has in mind for this battery-powered Flir will be awesome.

This really is a great example of what the Hackaday.io community is capable of. The goal here is to create useful Open Source drivers for some very interesting hardware, and there’s some prizes to sweeten the pot. Peter has a $125 Sparkfun gift card on offer for each of the two winners. And the challenge of solving a tricky problem and making designs easier for others is a powerful motivator. Who doesn’t like a challenge?

Hackaday Links Column Banner

Hackaday Links: July 15, 2018

Have you tried Altium CircuitMaker? Uh, you probably shouldn’t. [Dave] of EEVBlog fame informs us via a reliable source that CircuitMaker is intentionally crippled by adding a random sleep on high pad-count boards. The hilarious pseudocode suggested on the forum is if ((time.secs % 3) == 0) delayMicroseconds(padCount * ((rand() % 20) + 1));.Now, this is a rumor, however, I would assume [Dave] has a few back channels to Altium. Also, this assertation is supported by the documentation for CircuitStudio, which says, “While there are no ‘hard limits’ per se, the software has been engineered to make it impractical for use with large designs. To this end, the PCB Editor will start to exibit [sic] performance degradation when editing designs containing 5000 pads”. Chalk this up to another win for Fritzing; Fritzing will not slow down your computer on purpose.

Here’s an open challenge to everyone. As reported by [SexyCyborg], XYZPrinting (makers of the da Vinci printer) are patent trolling. This US patent is being used to take 3D printers off of the Amazon marketplace. Here’s the problem: no one can figure out what this patent is actually claiming. There’s something about multiple nozzles, and it might be about reducing nozzle travel, but I’m getting a ‘snap to bed’ vibe from this thing. Experts in 3D printing have no idea what this patent is claiming. The printer in question is the Ender 3, one of the first (actually the third…) China-based Open Source Hardware certified products, and it’s actually the best selling printer on Amazon at this time. I’m talking with Comgrow (the sellers of the Ender 3 on Amazon), and the entire situation is a mess. Look for an update soon.

Tired: Congress shall make no law… abridging the freedom of speech. Wired: But what if that speech is a gun? Wired‘s own Andy Greenberg advances the argument that computer code is not speech, contrary to many court rulings over the past 30 years (see Bernstein v. United States). Here’s the EFF’s amicus brief from the case. Read it. Understand it. Here’s a glowing Stephen Levy piece from 1994 on the export-controlled PGP for reference.

Like integrated circuits and microprocessors? Sure you do. Like drama? Oh boy have we got the thing for you. A week or so ago, ARM launched a website called RISC-V Basics (now unavailable, even from the Internet Archive, but you can try it here). It purports to settle the record on those new chips based on the capital-O Open RISC-V instruction set. In reality, it’s a lot of Fear, Uncertainty, and Doubt. This was an attempt by ARM Holdings to kneecap the upstart RISC-V architecture, but a lot of ARM engineers didn’t like it.