Open Source Laboratory Rocker Is Super Smooth

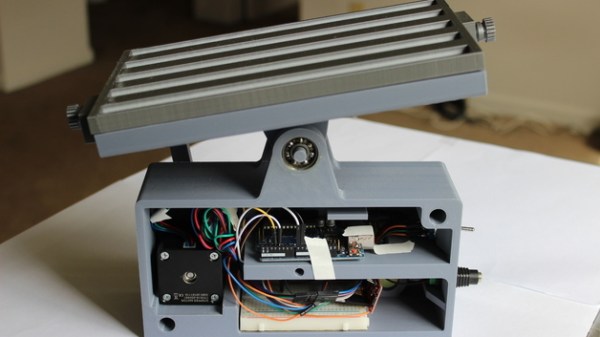
Lab equipment is often expensive, but budgets can be tight and not always up to getting small labs or researchers what they need. That’s why [akshay_d21] designed an Open Source Lab Rocker with a modular tray that uses commonly available hardware and 3D printed parts. The device generates precisely controlled, smooth motion to perform automated mild to moderately aggressive mixing of samples by tilting the attached tray in a see-saw motion. It can accommodate either a beaker or test tubes, but since the tray is modular, different trays can be designed to fit specific needs.

Source code and schematics are available from [akshay_d21]’s Google Drive and the 3D models are also available from the National Institute of Health’s 3D Print Exchange. A demonstration video is embedded below, in which you can see how smooth and controlled the motions are.

Continue reading “Open Source Laboratory Rocker Is Super Smooth”

Failed 3D Print Saved With Manual Coding

Toast falls face down. Your car always breaks after the warranty period. A 3D print only fails after it is has been printing for 12 hours. Those things might not always be true, but they are true often enough. Another pessimistic adage is “no good deed goes unpunished.” [Shippey123] did a good deed. He agreed to make a 3D printed mask for his friend to give as a gift. It was his first print he attempted for someone else after about four months’ experience printing at all. After 20 hours of printing, he noticed the head was moving around in the air doing nothing — a feeling most of us are all too familiar with. But he decided not to give up, but to recover the print.

Luckily, he’s a CNC machinist and is perfectly capable of reading G-code. The first thing he did was to shut everything down and clear the head. Then he rehomed the printer and used the head to determine what layer the printer had been working on when it failed. He did that by moving over a hidden part of the print and lowering the head by 100 microns. Then he’d move the head a few millimeters in the X direction to see if the head was touching.

Continue reading “Failed 3D Print Saved With Manual Coding”

Arduino Powered Arcade Button Lighting Effects

As if you already weren’t agonizing over whether or not you should build your own arcade cabinet, add this one to the list of compelling reasons why you should dedicate an unreasonable amount of physical space to playing games you’ve probably already got emulated on your phone. [Rodrigo] writes in to show off his project to add some flair to the lighted buttons on his arcade controller. (Google Translate)

The wiring for this project is about as easy as you’d expect: the buttons connect to the digital inputs on the Arduino, and the LEDs on the digital outputs. When the Arduino code sees the button getting pressed, it brings the corresponding LED pin high and starts a fade out timer using the SoftPWM library by [Brett Hagman].

It’s worth noting that the actual USB interface is being done with a stand-alone controller, so the Arduino here is being used purely to drive the lighting effects. The more critical reader might argue that you could do both with a single microcontroller, but [Rodrigo] was in a classic “Use what you’ve got” situation, and already had a USB controller on hand.

Of course, fancy lit arcade buttons won’t do you much good without something to put them in. Luckily we’ve covered some fantastic looking arcade cabinets to get you inspired.

Continue reading “Arduino Powered Arcade Button Lighting Effects”

Bucky Glow: Have A Ball While You Practice Coding

About a year ago, [Jonathan Bumstead] built a giant, touch-sensitive, interactive RGB LED geodesic dome that somehow escaped our attention entirely. For this year’s Hackaday Prize, he’s designed a smaller version that’s just as awesome, but a lot faster and easier to build.

The Bucky Glow is great way for hackers of all ages to expand their coding and problem solving skills. This interactive dodecahedron consists of 11 RGB LEDs and a Nano inside 12-sided laser-cut MDF sculpture. The breakout header means you’re free to add interactive bits like a DIY capacitive touch keyboard, IR sensor/emitter pairs, motors, or whatever you want.

When it’s time to relax, Bucky Glow puts on a light show. It comes ready to party without any programming necessary, but if you wanna put on some Pink Floyd and get your hands dirty, [Jonathan]’s custom Processing app makes it easy to program complex light shows.

[Jonathan] is currently working on some different Bucky Glow dissemination methods, such as a kit version. For now, you can buy a fully assembled Bucky Glow through the One Bit Kit store. Interact with the break to try it before you buy it.

Continue reading “Bucky Glow: Have A Ball While You Practice Coding”

Belgrade Badge Hacks

We’re still coming off the Hackaday Belgrade conference right now. If you were there, you know it was the greatest hardware conference ever. If you weren’t there, you missed out. Sorry. (Make sure you get in on the Hackaday Superconference in November.)

One of the many highlights of the Belgrade conference was, of course, the badge. The 2018 Hackaday Belgrade Badge is a masterpiece of hardware with a 55-key keyboard, RGB TFT LED, speaker, and a BASIC interpreter.

This badge is a masterpiece of electronic design by Voja Antonic. Just to take one small example from the design, check out the placement of the buttons. Think the slightly rotated buttons that make up the keyboard is only a stylistic choice? It’s not; by carefully rotating each button, the legs of each switch can fit in between each other. It’s brilliant.

Starting hardware this good, adding amazing software by Jaromir Sukuba to bring it to life, and distributing a badge to each hacker through the door is the perfect recipe for some amazing hacks. What were the best badge hacking tricks we saw at the 2018 Hackaday Belgrade conference? Check out the video of the badge hacking ceremonies and then join us below for a few of our favorites.

Continue reading “Belgrade Badge Hacks”