Everyone Needs A Personal Supercomputer

When you think of supercomputers, visions of big boxes and blinkenlights filling server rooms immediately appear. Since the 90s or thereabouts, these supercomputers have been clusters of computers, all working together on a single problem. For the last twenty years, people have been building their own ‘supercomputers’ in their homes, and now we have cheap ARM single board computers to play with. What does this mean? Personal supercomputers. That’s what [Jason Gullickson] is building for his entry to the Hackaday Prize.

The goal of [Jason]’s project isn’t to break into the Top 500, and it’s doubtful it’ll be more powerful than a sufficiently modern desktop workstation. The goal for this project is to give anyone a system that has the same architecture as a large-scale cluster to facilitate learning about high-performance applications. It also has a front panel covered in LEDs.

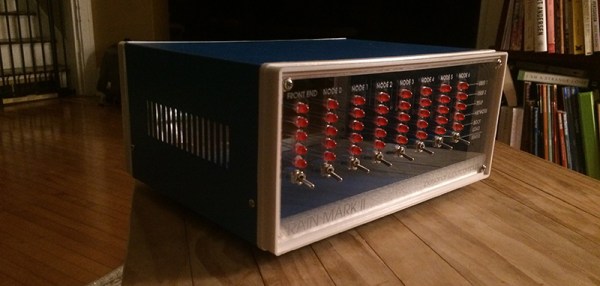
The design of this system is built around a the PINE64 SOPINE module, or basically a 64-bit quad-core CPU stuck onto a board that fits in an SODIMM socket. If that sounds like the Raspberry Pi Computer Module, you get a cookie. Unlike the Pi Compute Module, the people behind the SOPINE have created something called a ‘Clusterboard’, or eight vertical SODIMM sockets tied together with a single controller, power supply, and an Ethernet jack. Yes, it’s a board meant for cluster computing.

To this, [Jason] is adding his own twist on a standard, off-the-shelf breakout board. This Clusterboard is mounted to a beautiful aluminum enclosure, and the front panel is loaded up with a whole bunch of almost vintage-looking red LEDs. These LEDs indicate the current load on each bit of the cluster, providing immediate visual feedback on how those computations are going. With the right art — perhaps something in harvest gold, brown, and avocado — this supercomputer would look like it’s right out of the era of beautiful computers. At any rate, it’s a great entry for the Hackaday Prize.

Friday Hack Chat: All About The Hackaday Prize

For this week’s Hack Chat, we’re talking all about the Hackaday Prize. Our guests for this week’s Hack Chat are Alberto Molina and Elecia White.

Elecia White was a Hackaday Prize judge in 2015 and 2016, and she’ll be discussing what makes a standout entry from a judging perspective. Elecia is an embedded software engineer at Logical Elegance, Inc., author of Making Embedded Systems, and host of the Embedded.fm podcast.

Alberto Molina won the Grand Prize of the 2016 Hackaday Prize with Dtto, an Open Source, self-reconfiguring rescue robot that Alberto is continuing to develop.  Alberto is an Electronic engineer who wants to design the next generation of robots and he will share his insights on putting together a fantastic entry for your project.

The Hackaday Prize is the greatest hardware competition ever. It’s the Academy Awards of Open Hardware (and will remain so until we get a cease and desist). The Hackaday Prize is a competition where thousands of hardware hackers, makers, and artists compete to build a better future.

The Hackaday Prize is in its fifth year in 2018, and the theme this year is Build Hope. We’re challenging everyone to put your ideas and creativity to use and Build Something That Matters. Do this, and you’ll be in the running for the Grand Prize of $50,000. In total we’re giving away $200,000 in total cash prizes to build hardware, something no other hardware competition can match.

Also on board for this Hack Chat, like all Hack Chats, will be Stephen Tranovich, Technical Community Leader at Hackaday.io. Steven has been working hard on the logistics for the Prize this year, and will field any and all questions about entering the 2018 Hackaday Prize.

In this Hack Chat, we’ll be discussing how the Prize is judged, the new challenges for the 2018 Hackaday Prize, the achievements the winners of the Hackaday Prize have already seen, and of course, your questions. We know there’s a lot of interest in the Hackaday Prize, and we want you to ask what’s on your mind. If you have a question, just add it to the Hack Chat event page as a comment, and we’ll answer it.

join-hack-chat

Our Hack Chats are live community events on the Hackaday.io Hack Chat group messaging. This week it’s going down at the usual time, on noon, Pacific, Friday, March 23rd  Want to know what time this is happening in your neck of the woods? Have a countdown timer!

Click that speech bubble to the right, and you’ll be taken directly to the Hack Chat group on Hackaday.io.

You don’t have to wait until Friday; join whenever you want and you can see what the community is talking about.

Repurposing Inkjet Technology For 3D Printing

You would be forgiven for thinking that 3D printing is only about plastic filament and UV-curing resin. In fact, there are dozens of technologies that can be used to create 3D printed parts, ranging from welders mounted to CNC machines to the very careful application of inkjet cartridges. For this year’s Hackaday Prize, [Yvo de Haas] is modifying inkjet technology to create 3D objects. If he gets this working with off-the-shelf parts, this will be one of the most interesting advances for 3D printing in recent memory.

The core of this build is a modification of HP45 inkjet print heads to squirt something other than overpriced ink. To turn this into a 3D printer, [Yvo] is filling these ink cartridges with water or alcohol. This is then printed on a bed of powder, either gypsum, sugar, sand, or ceramic, with each layer printed, then covered with a fine layer of powder. All of this is built around a 3D printer with an X/Y axis gantry, a piston to lower the print volume, and a roller to draw more powder over the print.

The hardest part of this build is controlling the inkjet cartridge itself, but there’s prior work that makes this job easier. [Yvo] is successfully printing on paper with the HP45 cartridges, managing to spit out 150 x 150 pixel images, just by running the cartridge over a piece of paper. Already that’s exceptionally cool, great for graffiti, and something we can’t wait to see in a real, working printer.

You can check out [Yvo]’s handheld printing efforts below.

Continue reading “Repurposing Inkjet Technology For 3D Printing”

Emulating Handheld History

There’s a certain class of hardware only millennials will cherish. Those cheap ‘LCD Video Games’ from Tiger Electronics were sold in the toy aisle of your old department store. There was an MC Hammer video game. There was a Stargate video game. There was a Back To The Future video game. All of these used the same plastic enclosure, all of them had Up, Down, Left, Right, and two extra buttons, and all of them used a custom liquid crystal display. All of them were just slightly disappointing.

Now, there’s an effort to digitize and preserve these video games on archive.org, along with every other variety of ancient handheld and battery powered video game from ages past.

Double Dragon. You remember this, don’t you?

This is an effort from volunteers of the MAME team, who are now in the process of bringing these ‘LCD Video Games’ to the Internet Archive. Unlike other games which are just bits and bytes along with a few other relatively easily-digitized manuals and Peril Sensitive Sunglasses, preserving these games requires a complete teardown of the device. These are custom LCDs, after all. [Sean Riddle] and [hap] have been busy tearing apart these LCDs, vectorizing the segments (the game The Shadow is seen above), and preserving the art behind the LCD. It’s an immense amount of work, but the process has been refined somewhat over the years.

Some of these games, and some other earlier games featuring VFD and LED displays, are now hosted on the Internet Archive for anyone to play in a browser. The Handheld History collection joins the rest of the emulated games on the archive, with the hope they’ll be preserved for years to come.

Hackaday Links Column Banner

Hackaday Links: March 18, 2018

Oh, boy. You know what’s happening next weekend? The Midwest RepRap Festival. The greatest 3D printing festival on the planet is going down next Friday afternoon until Sunday afternoon in beautiful Goshen, Indiana. Why should you go? Check this one out. To recap from last year, E3D released a new extruder, open source filaments will be a thing, true color filament printing in CMYKW is awesome, and we got the world’s first look at the infinite build volume printer. This year, The Part Daddy, a 20-foot-tall delta bot will be there once again. It’s awesome and you should come.

We launched the 2018 Hackaday Prize this week. Why should you care? Because we’re giving away $200,000 in prizes. There are five challenges: the Open Hardware Design Challenge, Robotics Module, Power Harvesting, Human-Computer Interface, and Musical Instrument Challenge. That last one is something I’m especially interested in for one very specific reason. This is a guitorgan.

Building a computer soon? Buy your SSD now. Someone fell asleep on the e-stop at a Samsung fab, and now 3.5% of global NAND production for March has been lost.

Need to put an Arduino in the cloud? Here’s a shield for that. It’s a shield for SIMCom’s SIM7000-series module, providing LTE for a microcontroller. Why would you ever need this? Because 2G is dead, for various values of ‘dead’. 3G is eventually going to go the same way.

A bridge collapsed in Florida this week. A pedestrian walkway at Florida International University collapsed this week, killing several. The engineering efforts are still underway to determine the cause of the accident, but some guy from Canukistan posted a pair of informative videos discussing I-beams and pre-tensioned concrete. It’s going to be months until the fault (and responsibility) will be determined, but until then we have the best footage yet of this collapse. It’s dash cam footage from a truck that rolled up to the red light just before the collapse. This is one that’s going to go down in engineering history along with the Hyatt Regency collapse.

Need to test your app? Here’s a delta robot designed for phones. You would be shocked at how popular this robot is.

Capacitive And Resistive Touch Sensors For Wearables

When you look at switching solutions for electronic wearables, your options are limited. With a clever application of conductive fabric and thread, you can cobble together a simple switch, but the vast array of switch solutions is much more than that. This one is different. The zPatch from [Paul Strohmeier], [Jarrod Knibbe], [Sebastian Boring], and [Kasper Hornæk] at the Human-Centred Computing Section at the University of Copenhagen gives eTextiles capacitive and resistive input. It’s a force sensor, a pressure sensor, and a switch, all made completely out of fabric.

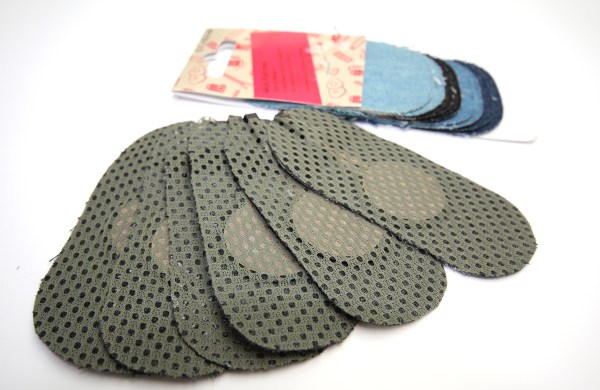
The design of this fabric touch sensor is based around a non-woven resistive fabric made by Eeonyx. This fabric is piezo-resistive when compressed. This material is sandwiched between two layers of silver-plated polyamide fabric, which is then connected to the analog input of a microcontroller. On top of all this is a polyester mesh, with everything held together with iron-on sheets.

Reading this sensor with a microcontroller is extremely similar to a capacitive touch sensor made out of copper and FR4. All the code is available in a repo, and all the materials to reproduce this work can be found in the various links provided by the team. That last point — reproducibility — is huge for an academic work. Not only did the team manage to come up with something interesting, they actually provided enough documentation to reproduce their build.

In the video below, you can see how this sensor can be used to sense a hand hovering, a light touch, a hard press, or anything in between. Only two analog pins are required for each sensor, making the routing and layout of this eTextile should be relatively easy to integrate into clothing. It’s a great build, and we can’t wait to see the community pick up on these really cool sensors.

Continue reading “Capacitive And Resistive Touch Sensors For Wearables”

Google Builds A Synthesizer With Neural Nets And Raspberry Pis.

AI is the new hotness! It’s 1965 or 1985 all over again! We’re in the AI Rennisance Mk. 2, and Google, in an attempt to showcase how AI can allow creators to be more… creative has released a synthesizer built around neural networks.

The NSynth Super is an experimental physical interface from Magenta, a research group within the Big G that explores how machine learning tools can create art and music in new ways. The NSynth Super does this by mashing together a Kaoss Pad, samples that sound like General MIDI patches, and a neural network.

Here’s how the NSynth works: The NSynth hardware accepts MIDI signals from a keyboard, DAW, or whatever. These MIDI commands are fed into an openFrameworks app that uses pre-compiled (with Machine Learning™!) samples from various instruments. This openFrameworks app combines and mixes these samples in relation to whatever the user inputs via the NSynth controller. If you’ve ever wanted to hear what the combination of a snare drum and a bassoon sounds like, this does it. Basically, you’re looking at a Kaoss pad controlling rompler that takes four samples and combines them, with the power of Neural Networks. The project comes with a set of pre-compiled and neural networked samples, but you can use this interface to mix your own samples, provided you have a beefy computer with an expensive GPU.

Not to undermine the work that went into this project, but thousands of synth heads will be disappointed by this project. The creation of new audio samples requires training with a GPU; the hardest and most computationally expensive part of neural networks is the training, not the performance. Without a nice graphics card, you’re limited to whatever samples Google has provided here.

Since this is Open Source, all the files are available, and it’s a project that uses a Raspberry Pi with a laser-cut enclosure, there is a huge demand for this machine learning Kaoss pad. The good news is that there’s a group buy on Hackaday.io, and there’s already a seller on Tindie should you want a bare PCB. You can, of course, roll your own, and the Digikey cart for all the SMD parts comes to about $40 USD. This doesn’t include the OLED ($2 from China), the Raspberry Pi, or the laser cut enclosure, but it’s a start. Of course, for those of you who haven’t passed the 0805 SMD solder test, it looks like a few people will be selling assembled versions (less Pi) for $50-$60.

Is it cool? Yes, but a basement-bound producer that wants to add this to a track will quickly learn that training machine learning algorithms cost far more than playing with machine algorithms. The hardware is neat, but brace yourself for disappointment. Just like AI suffered in the late 60s and the late 80s. We’re in the AI Renaissance Mk. 2, after all.

Continue reading “Google Builds A Synthesizer With Neural Nets And Raspberry Pis.”