Happy Late Lit Acrylic Valentines Day

Although [Danman] was right on time with his home-hacked Valentines day gift, this article comes to you a little late. With the message on the heart changed, however, it could be a perfect “Sorry I forgot Valentines Day again” gift, so it may still be useful.

The concept isn’t that complicated, simply a strip of LED lights around a piece of acrylic. A battery holder and switch rounds out this build. It’s a neat way to light things up, but what we thought was especially interesting was the way it was engraved and cut out with a minimum of traditional tools.

Sure, [Danman] had access to a bandsaw, but as for actually engraving the outline he used a modified electric toothbrush! We’d love to see that build written up. If that wasn’t enough, the lettering was “ghetto blasted”, as he puts it, using a compressed air nozzle, a pen tube, and a styrofoam cup full of ceramic dust! Macgyver would be proud!

CNC Light Painting

Light painting is a technique where a shape is drawn with a light source while a camera is taking a very long exposure shot of it. To do this well by hand would take a lot of skill, so I naturally decided to make my “light art” with a CNC router.

Using this technique, the LED light is treated just like an engraving bit would be under normal circumstances. The difference is that the Y axis is swapped with the Z axis allowing for easy movement in the plane that you see displayed in the picture above. This allows the old Y axis to switch the light on and off in the same way that an engraving bit is lifted to stop engraving and lowered to start (explained here). Instead of a bit though, it’s a switch.

Be sure to check out the video of the router in action (with the lights on) after the break: Continue reading “CNC Light Painting”

Make A Wind Turbine From 55 Gallon Drums

vertical axis wind turbine

Although there are several vertical axis wind turbines listed on greenterrafirma’s page, the one built with 55 gallon drums was especially interesting to us.  Although the spouse approval factor of any of these designs is debatable, at $100, the 55 gallon drum design could provide a very good return on investment.  The tools required to make one of these are relatively simple, so this could make this experiment accessible to those without a vast arsenal of equipment.

If large blue barrels aren’t your thing, the post also features several other turbine designs, including one made with wood and aluminium foil, and one constructed out of PVC pipe.  The video after the break does a good job of explaining the “blue barrel” construction process, but if you’d rather just see this [VAWT] in action, fast forward to 5:25.

Continue reading “Make A Wind Turbine From 55 Gallon Drums”

Reverse Engineering An AC Signal Protocol

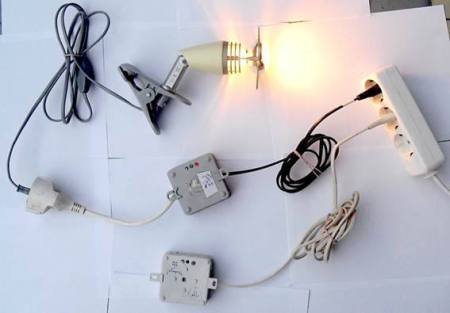
[Arpad] has spent quite a bit of time reverse-engineering a home automation system, and, as he is quick to point out, presents the information learned for informational purposes only. He’s really done his homework (and documented it well), looking into the US patent application, and figuring out how the protocol works.

If you’re wondering how someone is able to send a signal over an AC sine wave, at least one technique is the proprietary [Universal Powerline Bus]. This works by sending precisely times pulses in conjunction with the wave that would exist normally. Given the correct software on the other end, this can then be decoded and used for whatever data transfer is necessary.

Although as engineers and technologists, we certainly don’t condone stealing patents,  part of point of one is that others are allowed to learn your secrets in exchange for some legal protection. [Arpad]’s motivation in doing this is that the technology is only widely available in the US with our puny 120 VAC 60Hz power. With this knowledge, he’s been able to transfer it to work with European 230 VAC 50Hz.

Continue reading “Reverse Engineering An AC Signal Protocol”

A USB-controlled Solder Reflow Oven

[Joel] of [Helion Microsystems] is at it again with his USB controlled solder reflow oven.  You may remember him from his crazy twitter-enabled Ewok model. Although these two projects are quite different, they both use the HU-320 USB breakout board that he’s in the process of getting funding for via [Pozible], or Australian Kickstarter for Yanks.

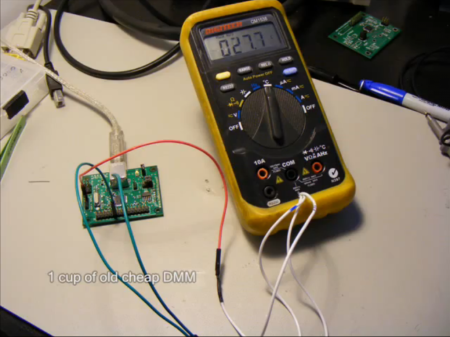
The reflow oven works using a thermocouple-enabled RS-232 voltmeter to output the temperature to the HU-320 board. [Joel] has been nice enough to provide us with the C# code to interface with many multimeters if you want to implement a similar project.  Temperature is controlled with a mechanical relay for what would appear to be a poor man’s PID controller.

Sadly, Fluke meters don’t seem to be listed, but your place of work probably wants their meter back anyway!  For another toaster reflow oven implementation, check out this [HAD] article.  Be sure to check out the video after the break for a video of the setup! (heat treat engineers may find the “recipe” format humorous).

Continue reading “A USB-controlled Solder Reflow Oven”

The Fukushima Robot Diaries

After the terrible tragedy in Fukushima, the cleanup and damage assessment has begun. A robot operator, known only as [S.H.] has decided to write a blog about their efforts.  As pictured above, they are using iRobot models, including the [510 Packbot], and the [710 Warrior].

Since cleanup efforts started, [S.H.] was posting on his or her blog daily.  After word of this blog started getting out via various social media outlets, the blog was mysteriously taken down. The blog was at times critical of elements of the cleanup effort, but it’s unknown why the disappearance happened. Efforts to reach [S.H.] were unsuccessfull according to [IEEE].

Fortunately, before the takedown, [IEEE]’s [Erico Guizzo] decided to make a copy of the posts. These have been translated into English and portions are now available at the link listed above. Be sure to check out robot training video after the break. Continue reading “The Fukushima Robot Diaries”

A More Awesome Way To Play Jenga

How many of you have started playing Jenga, and thought, “If only I had a pistol that would punch the blocks out violently for me, that would be much more fun?” Your presumed request has been answered with the [Jenga Pistol 2]! There is also the [Jenga Pistol 1], which would be impressive if the second one wasn’t already made and functioning! There’s a great video of the second one working after the break, so be sure to check that out!

The pistol works by hurling a bolt forward using a rubber band for power.  This bolt can then be pulled back, and the clever trigger mechanism automatically locks it in place for another shot.  This mechanism by itself could serve as inspiration for any number of other pistol-powered hacks. As for the entire project, [Matthias] gives lots of excellent pictures of his work in the post that will let you understand the concept.  For well-written plans though, you’ll have to cough up a very reasonable $6. You’ll also need a reasonably well equipped wood shop if you want to make one which is rather more expensive. Continue reading “A More Awesome Way To Play Jenga”