Drill Press For Through-hole PCB Manufacturing

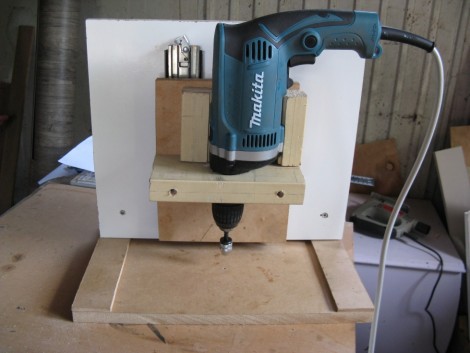
This drill press was built to drill through-hole printed circuit boards. [Rhys Goodwin] didn’t want to shell out for new equipment, so he dug through his scraps to see what he could accomplish. He already had the power drill, and there was no shortage of wood and fasteners. Once he had a mounting platform for the power tool he grabbed a pair of slides from and old rack-mount server rail. This provides smooth and precise movement, along with a tension sprint to keep the rig elevated above the work surface. Turns out the only thing he didn’t already have was the mini-chuck for gripping the 0.8 mm drill bit.

It seems as if [Rhys] is hacking up a storm lately. This drill press is for use with his Inkjet/Toner PCB process from two weeks ago. We also covered his bulk component salvaging system in Sunday’s Links post.

Climbing Bike Storage Thwarts Thieves?

If you’ve got an expensive bike and don’t mind carrying around a whole bunch of extra weight in your courier bag you’ll like this concept. A design team built a pole-climbing bike rack in about 14 days. The video after the break shows the prototyping process as well as the finished “lock” in use. It’s a commercial for the company that employs the designers, but this is one kind of advert we don’t mind watching.

Square channel makes up the body of the device, with a set of Rollerblade wheels which grab a light pole and use three 12V gear motors for climbing. The controller is a wireless fob similar to those used for keyless entry on cars. In the video you can hear the cliché sound of a car alarm being set once the carrier reaches its finished height. Nice.

Continue reading “Climbing Bike Storage Thwarts Thieves?”

Warm Tube Clock

The Warm Tube Clock is the new kid on the block of Nixie Tube clocks. It takes inspiration from, and uses the same voltage driver circuit as the Ice Tube Clock. But this one uses four tubes instead of that hard-to-find single tube. It has a few other tricks up its sleeve. The shield that hosts the tubes has been designed for two different types. It also hosts an RGB LED for each tube, which adds the green glow seen above, and has a couple of small neon indicator bulbs which serve as the colon between hours and minutes.

The driver board centers around an ATmega328 running about three thousand lines of code. The firmware offers a lot of options including sound feedback, and a setting for every clock, calendar, alarm, and LED color toggle imaginable. See for yourself as the settings video, embedded after the break, walks you through each stage of the menu. We can’t help but think you need an instruction manual to set this thing up.

Continue reading “Warm Tube Clock”

Chumby Webserver Using Upgraded Internal Storage

The Chumby One has an internal SD card offering a fair amount of storage. [Kenneth Finnegan’s] came with a 1 GB card that had about 500 MB left over which he filled with a collection of MP3s. But he wanted to do more and so installed a pre-compiled version of lighttpd to act as a web server. The problem is that this binary requires a thumb drive to be plugged in because it maps the storage directory to the mounted USB folder. He wasn’t happy with that so he upgraded the internal SD card and rolled his own webserver to run from the internal SD card.

The upgrade involved going from a 1 GB to an 8 GB microSD card. In order to run the webserver internally he needed to recompile lighttpd to use a different root directory. This meant setting up an ARM cross-compiler and eventually finding a new place for the start up script. The location change for the ‘lighty’ directory leaves us wondering if a symlink couldn’t have solve the problem without recompilation. But we don’t have the hardware on hand to try this out ourselves.

But if you want to give it a shot, check out [Bunnie’s] post about Chumby-based hardware. Looks like you can head out to the big-box store and have one in hand without shelling out too many clams.

Wiffletree: A Mechanical Digital To Analog Converter

This isn’t a hack. But it is a decidedly interesting piece of mechanical technology. The Whiffletree shown above is a way to turn binary data into a mechanical analog value. [Bill Hammack] explains how this assembly is used in a typewriter and how a whiffletree can convert binary data to a set of analog outputs.

These linkages are what makes an IBM Selectrix Typewriter work. You know, the one with the globe stylus instead of individual hammers for each key? [Bill] uses the typewriter as the example in his illustrations that show how each bit of data positions the output in a predictably different location. We’re familiar with other mechanical representations of binary data but converting to an analog value mechanically is a new concept for us. Lukily, the videos that [Bill] put together are fantastic at explaining the concepts. Not surprising, since he is a professor at the University of Illinois at Urbana-Champaign . See them both after the break.

Continue reading “Wiffletree: A Mechanical Digital To Analog Converter”

Audio Controlled Party Lights

[Thibault Brevet] wanted his own party lighting that pulsed and faded along with the tunes. He ended up building a system based on an Arduino and a PC running Processing. The output from a mixing board is fed into a PC and measured by the Processing script. From there, the calculated light levels are sent to the Arduino to address the LEDs via the control board seen above. [Thibault] built four LED modules that each have two 4-channel LEDs (red, green, blue, white) separated by a few feet. This means 32 PWM signals are necessary to drive the system. To get there, he utilized a pair of TLC5940 16-channel PWM chips, which function like cascading shift registers but have some fantastic current limiting and dot correction features. Take a look at the demo after the break to see what he’s accomplished.

The TLC5940 is a popular choice for driving RGB LEDs, and would be a nice part to use if you decide to make yourself a Ping Pong LED Wall.

Continue reading “Audio Controlled Party Lights”

RFID Spoofer With Code And Instructions

Here’s a field-programmable RFID spoofer developed by [Doug Jackson]. He was inspired by the spoofers we looked at near the end of September that didn’t have source code available. With the idea seeded in his mind he figured he could develop his own version, and then decided to share the build details with the rest of us.

The tags that he purchased for testing and developing the spoofer have a code printed on the back of them. A bit of sleuthing at the data from a tag reader and he managed to crack the code. From there he built this tag spoofer with a keypad on which you enter the number from the back of any 125 kHz tag and the device becomes that tag. If you have been waiting to test your RFID hacking skills there should be nothing holding you back now that [Doug] shared the details of his own adventure.