kaleidoscope

Arduino Powered Digital Kaleidoscope

[Jose’s] latest project brings an old visual effect toy up to date with digital electronics. Most of us are familiar with inexpensive kaleidoscope toys. Some of us have even built cheap versions of them with paper tubes, mirrors, and beads. [Jose] wanted to try to recreate the colorful pattern effects created by a kaleidoscope using an Arduino and an addressable LED strip.

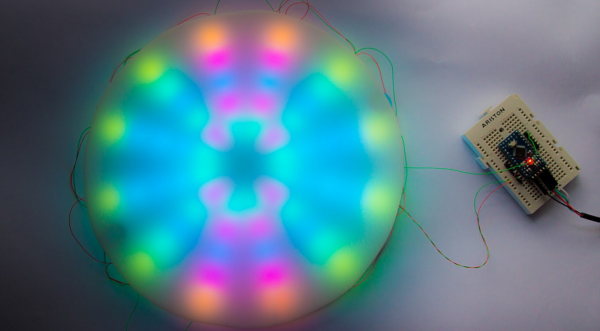
The build is actually pretty simple. The base is a disc of PVC cut to just a few inches in diameter. [Jose] started with an addressable LED strip containing 60 LEDs. He then cut it into 12 sections, each containing five LEDs. The smaller strips were then mounted to the disc, similar to spokes on a bicycle wheel. The LED strip already has an adhesive backing, so that part was trivial.

The final step was to add some kind of diffuser screen. The LED strips on their own are not all that interesting. The diffuser allows the light to blend together, forming interesting patterns that are more reminiscent of the patterns you might see in a real kaleidoscope. Without the diffuser you would just see individual points of light, rather than blended color patterns.

The whole thing is controlled by a small Arduino. [Jose] has made the code available at the bottom of his blog post. Be sure to watch the video of the system in action below. Continue reading “Arduino Powered Digital Kaleidoscope”

Voice Controlled RGB LED Lamp

Voice Controlled Lamp

[Saurabh] wanted a quick project to demonstrate how easy it can be to build devices that are voice controlled. His latest Instructable does just that using an Arduino and Visual Basic .Net.

[Saurabh] decided to build a voice controlled lamp. He knew he wanted it to change colors as well as be energy-efficient. It also had to be easy to control. The obvious choice was to use an RGB LED. The LED on its own wouldn’t be very interesting. He needed something to diffuse the light, like a lampshade. [Saurabh] decided to start with an empty glass jar. He filled the jar with gel wax, which provides a nice surface to diffuse the light.

The RGB LED was mounted underneath the jar’s screw-on cover. [Saurabh] soldered a 220 ohm current limiting resistor to each of the three anodes of the LED. A hole was drilled in the cap so he’d have a place to run the wires. The LED was then hooked up to an Arduino Leonardo.

The Arduino sketch has several built-in functions to set all of the colors, and also fade. [Saurabh] then wrote a control interface using Visual Basic .Net. The interface allows you to directly manipulate the lamp, but it also has built-in voice recognition functionality. This allows [Saurabh] to use his voice to change the color of the lamp, turn it off, or initiate a fading routing. You can watch a video demonstration of the voice controls below. Continue reading “Voice Controlled RGB LED Lamp”

Raspberry Pi Backup Scripts

Raspberry Pi

[Matthew’s] recent blog post does a good job explaining the basics of the Raspberry Pi’s file system. The Linux operating system installed on a Pi is generally installed on two different partitions on an SD card. The first partition is a small FAT partition. All of the files on this partition are used for the initial booting of the Pi. This partition also includes the kernel images. The second partition is the root file system and is generally formatted as ext4. This partition contains the rest of the operating system, user files, installed programs, etc.

With that in mind you can deduce that in order to backup your Pi, all you really need to do is backup all of these files. [Matt] has written some scripts to make this a piece of cake (or pie). The first script will simply copy all of the files into a gzipped archive. You can save this to an external SD card, USB drive, or network share.

The second script is perhaps more interesting. This script requires that you have one free USB port and a USB SD card reader. The script will automatically format the extra SD card to contain the two critical partitions. It will then copy the “boot” files to the new boot partition and the root file system files to the new SD card’s root partition. When all is said and done, you will end up with an SD card that is an exact copy of your current running file system.

This can be very handy if you have multiple Pi’s that you want to run the same software, such as in a Pi cluster. Another good example is if you have spent a lot of time tweaking your Pi installation and you want to make a copy for a friend. Of course there are many ways to skin this cat, but it’s always fun to see something custom-built by a creative hacker.

A Beverage Cooler With A Stereo

Cooler

If you are looking for a way to spice up your summertime parties, try following [Pastryboy’s] lead. After letting the idea rattle around in his head for a few years, he finally built himself the cooler he always dreamed of.

[Pastryboy] was originally inspired by a YouTube video he found a few years ago. He took the basic concept and rolled with it. He started out with a mini fridge he found for $10. He removed the compressor and other plumbing bits. He also removed all of the internal shelving. Any leftover holes were patched up with silicone. Now when the fridge is laid on its back, it’s essentially the same as an ordinary cooler.

Next [Pastryboy] purchased two 6.5″ Boss speakers and an inexpensive head unit. He drilled a few pilot holes in the side of the refrigerator and then used a jigsaw to cut the holes to the proper sizes. Once the speakers were mounted in place, he needed to find a way to waterproof the inside. This was accomplished by using some small plastic bowls. The edges of the bowls were attached to the cooler wall using silicone.

[Pastryboy] was able to run most of the cabling through the inside of the cooler’s walls. The system is powered by a 12V lead acid battery. He chose a specific model of battery that can be stored in any orientation and that can handle being knocked around a little bit.

Next he added a couple of handles to the sides to make it easier to transport. A small bit of ski rope was attached to the inside of the lid, preventing the lid from flopping completely open. [Pastryboy] also added a drain to the bottom to make it easier for one person to empty the cooler. The final touch was to pretty it up a bit. He sanded down the entire thing and gave it several coats of red paint. The end result looks very slick.

[via Reddit]

The Science Of Strengthening Glass

Strengthen Glass

[Ben Krasnow] is at it again. This time he’s explaining a simple method for strengthening glass. As usual, he does a fantastic job of first demonstrating and explaining the problem and then following it up with a solution.

[Ben] first uses a simple rig to place a controlled amount of force against a glass microscope slide. His experiment shows that the slide shatters once about 30psi of force has been applied to the center of the slide.

[Ben] then goes on to explain that current methods for producing glass leave many tiny impurities, or cracks, in the glass. As the glass slide flexes, the inside edge is placed into a compression force while the outside edge is under tension. The glass is more easily able to handle the compression force. The tension is where things start to break down. The tension force eventually causes those tiny impurities to spread, resulting in the shattering glass.

One possible solution to this problem is to find a way to fill in those tiny impurities. According to [Ben], most glass has sodium added to it in order to lower the melting temperature. [Ben] explains that if you could replace some of these smaller sodium atoms with larger atoms, you could essentially “fill” many of the tiny impurities in the glass.

[Ben] does this himself by heating up a small vat of potassium nitrate. Once the powder becomes molten, he submerges the glass slides in the solution for several hours. During this time, some of the sodium atoms are replaced by potassium atoms due to the natural process of diffusion.

Once the slides have cooled down, [Ben] demonstrates that they become much stronger. When placed in the testing rig, the stronger slides do not break until the pressure gets between 60psi and 70psi. That’s twice as strong as the original glass. All that extra strength from such a simple process. Be sure to watch the full video below. Continue reading “The Science Of Strengthening Glass”

NFC Ring Lock Box

NFC Ring Lock Box

[Nairod785] wanted to build a lock box that would lock from the inside. He started with an inexpensive, plain wooden box. This kept the cost down but would also allow him to easily decorate the box later on using a wood burning tool.

To keep the box locked, he installed a simple latch on the inside. The latch is connected to a servo with string. When the servo rotates in one direction, it pulls the string and releases the latch. When the servo is rotated in the opposite direction, the latch closes and locks the box once again.

If you are going to have a locked box, then you are also going to need a key to open it. [Nairod785] used a ring with a built-in NFC tag, similar to the ring featured back in March. Inside of the box is a PN532 NFC module. The walls of the box were a little too thick for the reader to detect the ring, so [Nairod785] had to scratch the wall thickness down a bit. The NFC module is connected to an Arduino Nano. Communications are handled with I2C.

The NFC ring actually has two different NFC tags in it; one on each side. [Nairod785] had to program both of the tag ID’s into the Arduino to ensure that the ring would work no matter the orientation.

The system is powered by a small rechargeable 5V battery. [Nairod785] wired up a USB plug flush with the box wall so he can easily charge up the battery while the box is locked. It also allows him to reprogram the Arduino if he feels so inclined. There is also a power switch on the side to conserve energy.

ASTROGUN Is Like Asteroids On Steroids

Astrogun

As the Jerusalem mini Makerfaire approached, [Avishay] had to come up with something to build. His final project is something he calls ASTROGUN. The ASTROGUN is a sort of augmented reality game that has the player attempting to blast quickly approaching asteroids before being hit.

It’s definitely reminiscent of the arcade classic, Asteroids. The primary difference is that the player has no space ship and does not move through space. Instead, the player has a first person view and can rotate 360 degrees and look up and down. The radar screen in the corner will give you a rough idea of where the asteroids are coming from. Then it’s up to you to actually locate them and blast them into oblivion before they destroy you.

The game is built around a Raspberry Pi computer. This acts as the brains of the operation. The Pi interfaces with an MPU-9150 inertial measurement unit (IMU). You commonly see IMU’s used in drones to help them keep their orientation. In this case, [Avishay] is using it to track the motion and orientation of the blaster. He claims nine degrees of freedom with this setup.

The Pi generates the graphics and sends the output to a small, high-brightness LCD screen. The screen is mounted perpendicular to the player’s view so the screen is facing “up”. There is a small piece of beam splitting glass mounted above the display at approximately a 45 degree angle. This is a special kind of glass that is partially reflective and partially translucent. The result is that the player sees the real-world background coming through the glass, with the digital graphics overlaid on top of that. It’s similar to some heads-up display technologies.

All of the electronics fit either inside or mounted around a toy gun. The display system was attached with a custom-made fiberglass mount. The code appears to be available via Github. Be sure to watch the video of the system in action below. Continue reading “ASTROGUN Is Like Asteroids On Steroids”