Spherical Quadruped Arduino Robot

[Greg06] started learning electronics the same way most of us did: buy a few kits, read a few tutorials, and try your hardest to put a few things together. Sound familiar? After a while, you noticed your skills started increasing, and your comfort level with different projects improved as well. Eventually, you try your hand at making your own custom projects and publishing your own tutorials.

Few are lucky to have a first-project as elaborate as [Greg06’s] quadruped robot. We don’t know about you, but for some of us, we were satisfied with blinking two LEDs instead of just one.

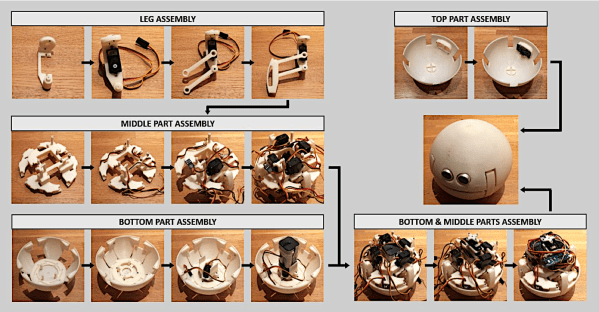
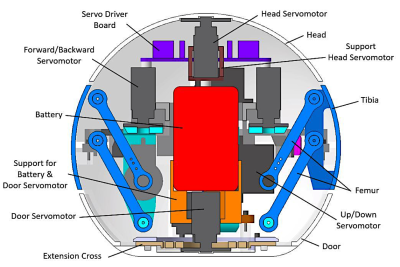
[Greg06’s] robot has a quadruped based, housed within a 3D printed spherical body. The legs are retractable and are actuated by tiny servo motors inside the body. [Greg06] even included an ultrasonic distance sensor for the obstacle avoidance mechanism. Honestly, if it weren’t for the ultrasonic distance sensor protruding from the spherical body, you might think that the entire robot was just a little Wiffle ball. This reminds us of another design we’ve seen before.

If that weren’t enough, the spherical head can rotate, widening the range of the ultrasonic distance sensor and obstacle avoidance mechanism. This is accomplished by attaching another servo motor to the head.

Pretty neat design if you ask us. Definitely one of the coolest quadrupeds we’ve seen.

Secret Book Light Switch

You enter a study and see a lightbulb hanging on the bookshelf. You try all the switches in the room — nothing is turning it on. Remembering you’re in [lonesoulsurfer]’s home, you realize that you’re going to have to start yanking on every book in sight.

While often associated with the likes of Bat-caves and other complicated hidden passageways, turning a shelved book into a secret switch isn’t complex in its own right. [lonesoulsurfer] is basing their build on one by B.Light Design revolving around a fan switch, some aluminium strips, a block terminal, fishing line, a hinge, and — of course — a book with a dust jacket and something to trigger.

Bend the aluminium into an angle bracket and drill a hole to attach the fan switch — ensuring the whole is small enough to fit behind and not distinguish the book you’re using. Cutting the hinge to the size of the book and screwing a strip of aluminium to it, both this lever and the fan switch’s bracket are then mounted on the shelf. Once a length of fishing twine is tethered to the lever and fitted through the book’s pages to the fan switch — ensuring the line is taut — sliding the dust jacket back onto the book completes the disguised switch!

Continue reading “Secret Book Light Switch”

Solar Power In A Can!

When spending time camping, people often bring lanterns, flashlights, and the like — you might even bring along a solar charger. Instructables user [bennelson] is combining all your electrical powered needs by cramming solar power into a can.

Already designed to resist the elements, [bennelson] is using a 50cal. ammo can for a portable enclosure. Inside, he’s siliconed a 15AH, 12V lead-acid battery in the centre to maintain balance and to leave room for the wiring and storage. One cardboard mockup later, he laser-cut the top panel from 1/8″ plywood and secured a 20A solar charge controller, a four-in-one socket panel, and two banana plugs on its top face.

[bennelson] is using 12 AWG wire to match the 20A rating of the solar charge controller — including a fuse for safety — and lever lock-nut connectors to resolve some wiring complications. Industrial velcro keeps the top panel in place and easily removed should the need arise. When he’s out camping, he uses an 18V, 1A solar panel to charge, but can still use a DC power adapter to charge from the grid. Check out the full build video after the break!

Continue reading “Solar Power In A Can!”

Giving Stranger Things For Christmas

[rudolph] was at a loss on what to get his niece for Christmas. It turns out she’s a huge fan of Stranger Things, so the answer was obvious: make her an alphabet wall she can control!

Downsizing the scale to fit inside a document frame, [rudolph] calls their gift rudLights, and a key parameter of this build was to make it able to display any phrases sent from their niece’s Amazon Fire tablet instead of constantly displaying hard-coded phrases. To do so, it has a HC-05 Bluetooth module to forward the commands to the NeoPixel LEDs running on a 5V DC power supply.

[rudolph] enlisted the help of their son to draw up the alphabet display — printed straight onto thematically decorative wallpaper — and cut out holes in the light bulbs for the LEDs.  Next up was cut some fibre board as a firm backing to mount the electronics inside the frame and drill holes for the NeoPixels. It was a small odyssey to cut and solder all the wires to the LEDs, but once done, [rudolph] divided their rudLight alphabet into three rows and added capacitors to receive power directly.

Continue reading “Giving Stranger Things For Christmas”

The Smartest Air Freshener In The Room

Many automatic air fresheners are wasteful in that they either ceaselessly spritz the room, and manual ones need to be — well — manually operated. This will not do in an era of smart products, so Instructables user [IgorF2] has put together an air freshener that does more than check if you’re around before freshening things up.

The air freshener uses a NodeMCU LoLin and an MG 995 servomotor, with a NeoPixel ring acting as a status light. Be aware — when the servo is triggered there is a significant spike in current, so be sure you aren’t powering the air freshener from a PC USB port or another device. After modeling the air freshener’s case in Fusion 360 — files available here — [IgorF2] wired the components together and mounted them inside the 3D printed case.

Hardware work completed, [IgorF2] has detailed how to set up the Arduino IDE and ESP8266 support for a first-time-user, as well as adding a few libraries to his sketch. A combination of an Adafruit.IO feed and ITTT — once again, showing the setup steps — handles how the air freshener operates: location detection, time specific spritzing, and after tapping a software button on your phone for those particularly lazy moments.

Continue reading “The Smartest Air Freshener In The Room”

Light Switch For The Lazy

[Will Donaldson] has whipped up a quick hack for anyone thinking of dipping their toe into home automation — or otherwise detest flicking off the bedroom light before navigating their way to their bed: a remote control light switch!

This remote switch uses a sg90 servo, an Arduino Uno, and pairs of ATtiny85s with HC-05 Bluetooth modules assembled on protoboards. The 3D printed mount screws easily on top of a standard light switch cover while still allowing the switch to be flipped the old-fashioned way. It’s also perfect as a temporary solution — [Donaldson] is presently renting his apartment — or for those unwilling to mess with the mains power of their abode.

Continue reading “Light Switch For The Lazy”

We Are Now At DEFCON 2

If you had a working DEFCON meter that reported on real data, would it be cool or distressing?

Before we get ahead of ourselves: no, not that DEF CON. Instructables user [ArthurGuy] is a fan of the 1983 movie  War Games, and following a recent viewing –hacker senses a-tingling — he set to work building his own real-time display.

Making use of some spare wood, [ArthurGuy] glued and nailed together a 10x10x50cm box for the sign. Having been painted white already at some point, the paint brilliantly acted as a reflector for the lights inside each section. The five DEF CON level panels were cut from 3mm pieces of coloured acrylic with the numbers slapped on after a bit of work from a vinyl cutter.

Deviating from a proper, screen-accurate replica, [ArthurGuy] cheated a little and used WS2812 NeoPixel LED strips — 12 per level — and used a Particle Photon to control them. A quick bit of code polls the MI5 terrorism RSS feed and displays its current level — sadly, it’s currently at DEFCON 2.

Continue reading “We Are Now At DEFCON 2”