DIY Keyboard Backlighting Takes Forever, Worth It

LED Keyboard with Custom Lights

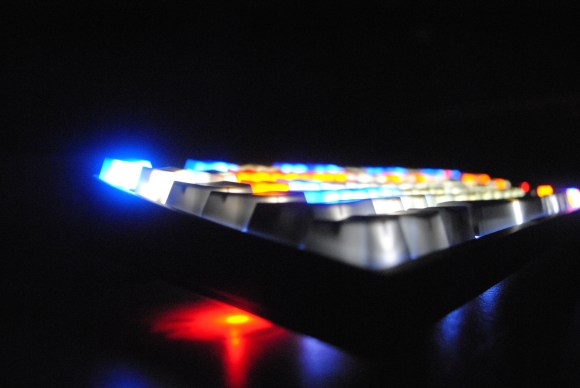
Want a back-lit keyboard? Make one yourself. Though you may not want to after seeing this build by [prodigydoo], who devoted 40 hours to upgrade his mechanical keyboard with a smattering of shiny.

No eye rolling just yet, though, because [prodigydoo’s] work is a monument to meticulous craftsmanship and dedication. So what if he accidentally dropped the keyboard’s PCB and cracked it? He patched that up with a few wires in true hacker-problem-solving fashion and no one will ever know.

With the electronics “safely” removed, [prodigydoo] set about desoldering every single key switch, then carefully detaching and disassembling the Cherry MX Blues. He then inserted an LED into each switch’s backplate, reassembled them, mounted the keys back on the board, then added some current-limiting resistors and heat shrink to the circuit. [prodigydoo] cut a few necessary holes for a power switch, state indicator LEDs (Caps Lock, etc.) and some under-the-board lighting, then rounded off the build by hooking up a power supply capable of running all the lights.

No microcontroller? No RGBLEDs? We like it anyway, and it seems [prodigydoo] is glad he kept it simple. Go check out the gallery for gritty details, an explanation of the circuit, and more pictures than your family vacation album.

The RC White House Robot

IMG_20140726_124812_164

This remote controlled, Arduino-based robot was created by a young student named [Quin] who likes to teach electronics classes at hackerspaces. It is an adaptation of this awesome, fast, fully autonomous mini Roomba that has since driven its way into the Presidential building during the 1st ever White House Maker Faire.

The quick, little device uses a robot chassis kit with an XBee wireless module so that the controller and the robot can be connected together. An NFC Shield was hacked and split in half so that the wires could be soldered in place.

[Quin]’s goal was to develop a fun game that records the number of times the robot drives over NFC tags laid across a flat surface. Points are shown in the form of blinking lights that illuminate when the device goes over the sensors, keeping track of the score.

The controller container was made with an open source 3D printer called a Bukobot. The enclosure holds an Arduino and another XBee shield along with a joystick and a neopixel ring, giving it a nice polished look complete with a circle of beautiful, flashing LED’s.

Continue reading “The RC White House Robot”

Hackaday Links: July 27, 2014

hackaday-links-chain

Taking apart printers to salvage their motors and rods is a common occurrence in hacker circles, but how about salvaging the electronics? A lot of printers come with WiFi modules, and these can be repurposed as USB WiFi dongles. Tools required? And old printer, 3.3 V regulator, and a USB cable. Couldn’t be simpler.

The Raspberry Pi has a connector for a webcam, and it’s a very good solution if you need a programmable IP webcam with GPIOs. How about four cameras?. This Indiegogo is for a four-port camera connector for the Raspi. Someone has a use for this, we’re sure.

The one flexible funding campaign that isn’t a scam. [Kyle] maintains most of the software defined radio stack for Arch Linux, and he’s looking for some funds to improve his work. Yes, it’s basically a ‘fund my life’ crowdfunding campaign, but you’re funding someone to work full-time on open source software.

Calibration tools for Delta 3D printers. It’s just a few tools that speed up calibration, made for MATLAB and Octave.

[Oona] is doing her usual, ‘lets look at everything radio’ thing again, and has a plan to map microwave relay links. If you’ve ever seen a dish or other highly directional antenna on top of a cell phone tower, you’ve seen this sort of thing before. [Oona] is planning on mapping them by flying a quadcopter around, extracting the video and GPS data, and figuring out where all the other microwave links are.

PowerPoint presentations for the Raspberry Pi and BeagleBone Black. Yes, PowerPoint presentations are the tool of the devil and the leading cause of death for astronauts*, but someone should find this useful.


* Yes, PowerPoint presentations are the leading cause of death for astronauts. The root cause of the Columbia disaster was organizational factors that neglected engineer’s requests to use DOD space assets to inspect the wing, after which they could have been rescued. These are organizational factors were, at least in part, caused by PowerPoint.

Challenger was the same story, and although PowerPoint didn’t exist in 1986, “bulletized thinking” in engineering reports was cited as a major factor in the disaster. If “bulletized thinking” doesn’t perfectly describe PowerPoint, I don’t know what does.

As far as PowerPoint being the leading cause of death for astronauts, 14 died on two shuttles, while a total of 30 astronauts died either in training or in flight.

Original Gameboy Gets Stuffed Full Of Cool Parts

Raspberry Pi Gameboy

One day at Good Will, [microbyter] came across an original Gameboy for $5. Who reading this post wouldn’t jump on a deal like that? [microbyter] was a little disappointed when he got home and found out that this retro portable did not work. He tried to revive it but it was a lost cause. To turn lemons into lemonade, the Gameboy was gutted and rebuilt into a pretty amazing project.

Looking at the modified and unmodified units, it is extremely obvious that there is a new LCD screen. It measures 3.5″ on the diagonal and is way larger than the 2.6″ of the original screen. Plus, it can display colors unlike the monochrome original. Flipping the unit over will show a couple of buttons have been added to the battery compartment door to act as shoulder buttons.

The brains of the project is a Raspberry Pi running Retropie video game system emulation software which will emulate a bunch of consoles, including the original Gameboy. The video is sent to the LCD screen via the composite video output. The Pi’s headphone jack is connected to a small audio amplifier that powers the original speaker that still resides in the stock location. Connecting the controller buttons got a little more complicated since the original board was removed. Luckily there is a replacement board available for just this type of project that bolts into the stock location, allows the use of the original iconic buttons and has easily accessible solder points. This board is wired up to the Pi’s GPIO pins.

Continue reading “Original Gameboy Gets Stuffed Full Of Cool Parts”

An Automated Flappy Bird Player

game 
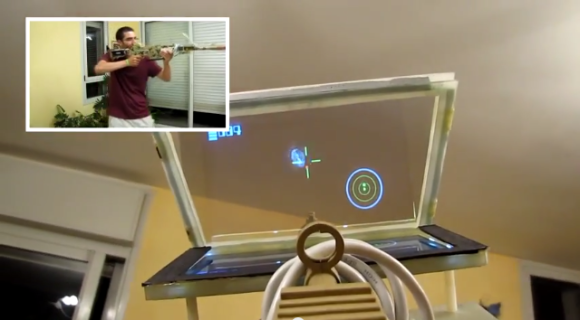
Flappy Bird has been ported to just about every system imaginable, including but not limited to the Apple II, Commodores, pretty much every version of the Atari, and serves as a really great demonstration of the TI-99’s graphics capabilities. Porting is one thing, but having a computer automate Flappy Bird is another thing entirely. [Ankur], [Sai], and [Ackerly] in [Dr. Bruce Land]’s advanced microcontroller design class at Cornell have done just that. They’re playing Flappy Bird with a camera, FPGA, and a penny wired up to a GPIO pin to guide the little 8-bit-bird through Mario pipes.

The setup the team is using consists of a webcam that records the screen of a smartphone, an FPGA, and a little bit of circuitry to emulate screen taps. Inside the FPGA, the team is looking at the video stream from the phone to detect the bird, pipes, and gaps. The ‘tapper’ unit is a US penny, placed right above the ‘tap’ button, wired to a GPIO port. This was found to be the ideal contact for a capacitive touch screen – taps that were too small weren’t registered, and taps that were too big registered as two taps.

For spending an entire semester on automating Flappy Bird, the team has a lot of knowledge to show for it, but not the high score: the bird only makes it through the first pipe 10% of the time, and the second pipe 1% of the time. The high score is three. That’s alright – getting the algorithm right to play the game correctly was very, very difficult, and to nail that problem down, they estimate it would take at least another semester.

ASTROGUN Is Like Asteroids On Steroids

Astrogun

As the Jerusalem mini Makerfaire approached, [Avishay] had to come up with something to build. His final project is something he calls ASTROGUN. The ASTROGUN is a sort of augmented reality game that has the player attempting to blast quickly approaching asteroids before being hit.

It’s definitely reminiscent of the arcade classic, Asteroids. The primary difference is that the player has no space ship and does not move through space. Instead, the player has a first person view and can rotate 360 degrees and look up and down. The radar screen in the corner will give you a rough idea of where the asteroids are coming from. Then it’s up to you to actually locate them and blast them into oblivion before they destroy you.

The game is built around a Raspberry Pi computer. This acts as the brains of the operation. The Pi interfaces with an MPU-9150 inertial measurement unit (IMU). You commonly see IMU’s used in drones to help them keep their orientation. In this case, [Avishay] is using it to track the motion and orientation of the blaster. He claims nine degrees of freedom with this setup.

The Pi generates the graphics and sends the output to a small, high-brightness LCD screen. The screen is mounted perpendicular to the player’s view so the screen is facing “up”. There is a small piece of beam splitting glass mounted above the display at approximately a 45 degree angle. This is a special kind of glass that is partially reflective and partially translucent. The result is that the player sees the real-world background coming through the glass, with the digital graphics overlaid on top of that. It’s similar to some heads-up display technologies.

All of the electronics fit either inside or mounted around a toy gun. The display system was attached with a custom-made fiberglass mount. The code appears to be available via Github. Be sure to watch the video of the system in action below. Continue reading “ASTROGUN Is Like Asteroids On Steroids”

Enjoying The Sunrise Every Single Day

Exif_JPEG_PICTURE

[Andy] wanted to take a few at sunrise, but waking up before sunrise has obvious problems associated with it. Instead, he built a device that calculates the local sunrise time, snaps a picture, and goes to sleep until the next morning.

The camera used for the project was an old Canon point and shoot, chosen for the ability to load CHDK firmware. Other electronics included an Arduino pro mini, a LiPo battery and charger board, real time clock, and an old Nokia LCD for the user interface.

There’s quite a bit of code that goes into figuring out when the sun will rise each day, but once that’s figured out, all [Andy] has to do is take the camera somewhere pretty, point it East, and record a few days worth of sunrises. When put into a ‘game camera’ enclosure, its rugged enough to stand up to everything except a thief, and has enough battery power for a few weeks worth of sunrises.

Video demonstrating the local sunrise time below.

Continue reading “Enjoying The Sunrise Every Single Day”