If you’ve ever used an NE602 or similar IC to build a radio, you might have noticed that the datasheet has a “gilbert cell” mixer. What is that? [Electronics for the Inquisitive Experimenter] explains them in a recent video. The gilbert cell is a multiplier, and multiplying two waveforms will work to mix them together.
At the heart of the gilbert cell is essentially three differential amplifiers that share a common current source. The video shows LTSpice simulations of the circuits as he explains them.
When you’re like [Wes] from Watch Wes Work fame, you don’t have a CNC machine hoarding issue, you just have a healthy interest in going down CNC machine repair rabbit holes. Such too was the case with a recently acquired 2001 Milltronics ML15 lathe, that at first glance appeared to be in pristine condition. Yet despite – or because of – living a cushy life at a college’s workshop, it had a number of serious issues, with a busted Z-axis drive board being the first to be tackled.
The Glentek servo board that caused so much grief. (Credit: Watch Wes Work, YouTube)
The identical servo control board next to it worked fine, so it had to be an issue on the board itself. A quick test showed that the H-bridge IGBTs had suffered the typical fate that IGBTs suffer, violently taking out another IC along with them. Enjoyably, this board by one Glentek Inc. did the rebranding thing of components like said IGBTs, which made tracking down suitable replacements an utter pain that was eased only by the desperate communications on forums which provided some clues. Of course, desoldering and testing one of the good IGBTs on the second board showed the exact type of IGBT to get.
After replacing said IGBTs, as well as an optocoupler and other bits and pieces, the servo board was good as new. Next, the CNC lathe also had a busted optical encoder, an unusable tool post and a number of other smaller and larger issues that required addressing. Along the way the term ‘pin-to-pin compatible’ for a replacement driver IC was also found to mean that you still have to read the full datasheet.
Of the whole ordeal, the Glentek servo board definitely caused the most trouble, with the manufacturer providing incomplete schematics, rebranding parts to make generic replacements very hard to find and overall just going for a design that’s interesting but hard to diagnose and fix. To help out anyone else who got cursed with a Glentek servo board like this, [Wes] has made the board files and related info available in a GitHub repository.
[Zack], in addition to being a snappy dresser, has a thing for strange 3D printing filament. How strange? Well, in a recent video, he looks at filaments that require 445 C. Even the build plate has to be super hot. He also looks at filament that seems like iron, one that makes you think it is rubber, and a bunch of others.
As you might expect, he’s not using a conventional 3D printer. Although you might be able to get your more conventional printer to handle some of these, especially with some hacking. There is filament with carbon fiber, glass fiber, and more exotic add-ons.
Most of the filaments need special code to get everything working. While you might think you can’t print these engineering filaments, it stands to reason that hobby-grade printers are going to get better over time (as they already have). If the day is coming when folks will be able to print any of these on their out-of-the-box printer, we might as well start researching them now.
If you fancy a drinking game, have a shot every time he changes shots and a double when the Hackaday Prize T-shirt shows up.
If you take a look around you, chances are pretty good that within a few seconds, your eyes will fall on some kind of electrical connector. In this day and age, it’s as likely as not to be a USB connector, given their ubiquity as the charger of choice for everything from phones to flashlights. But there are plenty of other connectors, from mains outlets in the wall to Ethernet connectors, and if you’re anything like us, you’ve got a bench full of DuPonts, banana plugs, BNCs, SMAs, and all the rest of the alphabet soup of connectors.
Given their propensity for failure and their general reputation as a necessary evil in electrical designs, it may seem controversial to say that all connectors are engineered to last. But it’s true; they’re engineered to last, but only for as long as necessary. Some are built for only a few cycles of mating, while others are built for the long haul. Either way, connectors are a great case study in engineering compromise, one that loops physics, chemistry, and materials science into the process.
There’s a tactile joy to the humble 3.5″ floppy that no USB stick will ever match. It’s not just the way they thunk into place in a well-made drive, the eject button, too, is a tactile experience not to be missed. If you were a child in disk-drive days, you may have popped a disk in-and-out repeatedly just for the fun of it — and if you weren’t a child, and did it anyway, we’re not going to judge. [igor] has come up with a physical game called “Floppy Flopper” that provides an excuse to do just that en masse, and it looks like lots of fun.
It consists of nine working floppy drives in a 3×3 grid, all mounted on a hefty welded-steel frame. Each drive has an RGB LED above it. The name of the game is to swap floppies as quickly as possible so that the color of the floppy in the drive matches the color flashing above it. Each successful insertion is worth thirteen points, tracked on a lovely matrix display. Each round is faster than the last, until you miss the window or mix up colors in haste. That might make more sense if you watch the demo video below.
Amidst the glossy marketing for VPN services, it can be tempting to believe that the moment you flick on the VPN connection you can browse the internet with full privacy. Unfortunately this is quite far from the truth, as interacting with internet services like websites leaves a significant fingerprint. In a study by [RTINGS.com] this browser fingerprinting was investigated in detail, showing just how easy it is to uniquely identify a visitor across the 83 laptops used in the study.
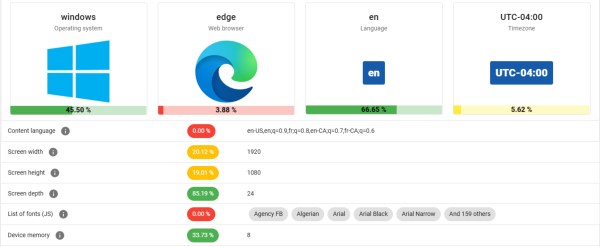
As summarized in the related video (also embedded below), the start of the study involved the Am I Unique? website which provides you with an overview of your browser fingerprint. With over 4.5 million fingerprints in their database as of writing, even using Edge on Windows 10 marks you as unique, which is telling.
In the study multiple VPN services were used, each of which resulted in exactly the same fingerprint hash. This is based on properties retrieved from the browser, via JavaScript and other capabilities exposed by the browser, including WebGL and HTML5 Canvas.
When Stranger Things premiered in 2016, it was a cultural force. Foreign DJs gushed over the lush 80s soundtrack, fashionistas loved the clothing, and the world became obsessed with the idea of using Christmas lights to communicate across material planes. [kyjohnso] has recreated that experience with the technology of today.
If you haven’t watched the show — Joyce Byers is trying to communicate with her son Will, who just so happens to be stuck in another plane of existence called the Upside Down. She screams questions at her living room wall, upon which hangs a series of Christmas lights, marked with the letters A to Z. Will is able to communicate back by causing the lights to flash, one letter at a time.
This build works a little differently. You basically type a message into a terminal on a Raspberry Pi, and it gets sent to a large language model—namely, the Claude API. The response from Claude (or Will Byers, if you’re imagining) is then flashed out on a WS2812B set of LED Christmas lights on the wall. [kyjohnso] added dramatic pauses whenever there’s a space in the output, somewhat replicating the dramatic elements of the show itself. Files are on GitHub for the spooky and curious.
It’s a neat build that would be a hit at any Halloween party. We can’t imagine how much more immersive it would be if paired with a speech-to-text engine so you could actually scream at the thing like a distraught Midwestern parent who has just lost her youngest child. It’s all about committing to the bit; if you build such a thing, don’t hesitate to notify the tipsline!