Mario Doorbell Guaranteed To Drive A-You A-Crazy

marioDoorbell

Is your doorbell not exciting enough for your guests? [Joe] wanted to provide a little entertainment for his visitors, so he redesigned his doorbell with a Mario theme.

Whenever someone presses the button—which carries the Mario coin image—the segment display increments and the Mario coin sound plays. To add variety, the life-up sound plays at every 10 coins and the mushroom upgrade sound plays upon reaching 100. [Joe] tried putting the life-up sound at its appropriate 100’s place and the mushroom sound at every 10, but he decided the brevity of life-up was more tolerable in the 10’s slot.

The project was divided into two components. The door button has a PIC16F628A microcontroller with a dual 7-segment LED display, a button, and a homemade circuit board. All this lives in a simple box covered by a Yoshi’s Island-themed decal. The button’s board connects to a separate ringer board—based around a PIC16F87—with a MCP4822 DAC and a 25LC1024 EEPROM. Button presses on the first board prompt a request for a sound clip read on the EEPROM. Keep clicking for a demo video below.

Continue reading “Mario Doorbell Guaranteed To Drive A-You A-Crazy”

Kitchen Computer Hides In Pantry Door

hidden-kitchen-pantry-computer

You might look at the images above and think “oh neat” and then go about your business. But you’d be missing a great motorized hidden computer build. We simply must insist that you click on that link and look at all that went into it. Do it. DO. IT.

Still here? Okay, we’ll give you the gist and then you won’t be able to help yourself. First off, [Designforhire] built that door completely from scratch using skills that your average hacker wields. At first glance you’d think it was a retrofit or done with serious woodworking tools (quality table saw, router table, etc.). This actually started with a simple frame out of 2″x3″ pine studs. This is faced with Masonite which was affixed with glue and brads. From there the upper half was outfitted with a dry-erase panel, and trim pieces were added.

Now the hack really starts to get interesting. The opening for the monitor and the keyboard are both motorized. An old cordless drill (borked handle and dead battery) was cannibalized for its motor which is run using the two black switches just above the left corner of the monitor. When closed, a dry-erase calendar covers the monitor and a blank panel keeps the keyboard secret. The computer itself is actually in the basement, with cables running down the hinged side of the door and through a hole in the jamb.

We didn’t see a video showing off the build, but you can satisfy that craving by looking back at the Kitchen HAL installation from a few years back.

The K9 Curfew Door

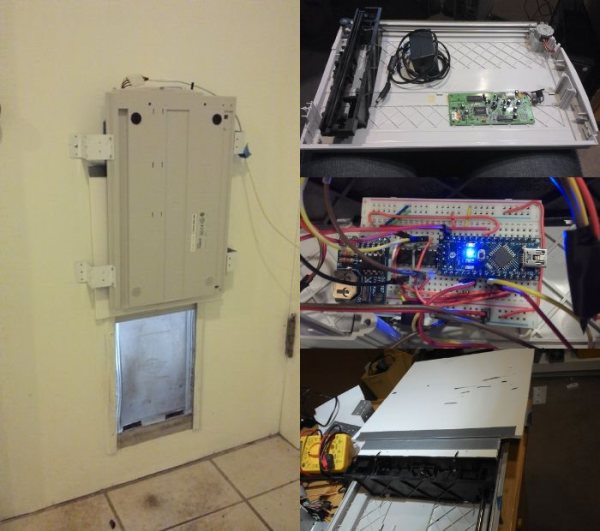
[Kenbob] is an awesome pet owner. He has two small dogs that have free access to the backyard through a doggy door. It’s great during the day, but they have to close it at night to stop the dogs from bothering the neighbors. So he decided to make an automatic curfew based doggy door!

Before setting out on his project, he determined some design goals that had to be met. Namely, he couldn’t have it lock the dogs outside by accident! The hack makes use of an old large format flat-bed scanner that had stopped working a while ago. As it so happened, this scanner had just enough carriage travel to be able to actuate a cover for the doggy door. After reinforcing the sliding cover, he hooked it up to an Arduino Nano, a RTC and a H-Bridge motor driver in order to control it.

In order to add scheduling ability and to program the door remotely, he has also hooked it into his existing x10 control infrastructure in his house — not too shabby! It also features a manual 3-position switch to lock it open, closed, or to leave it on automatic. The question is, can a raccoon get in?

He’s been testing it for a few weeks and it works quite well, although he admits it is not the most rugged solution — lucky for him, his dogs aren’t the type to run headfirst into things. Stick around after the break to see it in action.

Continue reading “The K9 Curfew Door”

AVR Barn Door Tracker For Astrophotography

zzjBarnDoorTracker

[ZigZagJoe’s] first foray into astrophotography is this impressive AVR barn door tracker, which steps up his night sky photo game without emptying his bank account. If you’ve never heard of astrophotography, you should skim over its Wikipedia page and/or the subreddit. The idea is to capture images otherwise undetectable by the human eye through longer exposures. Unfortunately, the big ball of rock we all inhabit has a tendency to rotate, which means you need to move the camera to keep the night sky framed up.

Most trackers require precision parts and fabrication, which was out of [ZigZagJoe’s] grasp. Instead, he found a solution with the Cloudbait Observatory model, which as best as we can tell looks vaguely similar to the tracker we featured last year. Unlike last year’s build—which uses an ATmega32u4 breakout board— [ZigZagJoe’s] tracker uses an ATTiny85 for the brains, running a pre-configured table that determines step rate against time.

Continue reading “AVR Barn Door Tracker For Astrophotography”

Sniffing Wired Garage Door Opener Signals

sniffing-garage-door-signals

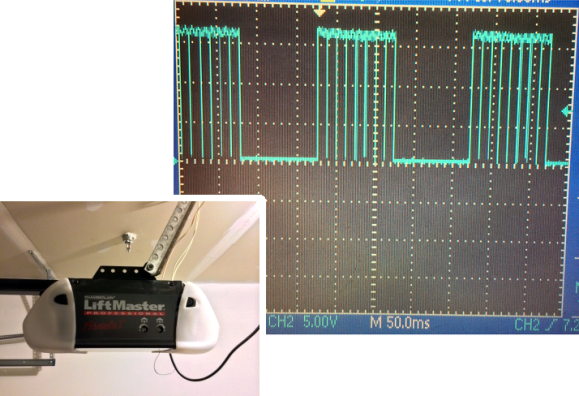
In addition to being something fun to do with an oscilloscope, this could be a valuable time-saver for anyone looking to tap into the wired communications on a garage door opener. If you own an older model you might be scratching your head. But newer units have more than just one button operation, usually extending to at least two extra buttons that control the lights on the motor unit and lock out wireless control. A quick probing turned up the communication scheme used by the button unit mounted next to the door into the house.

We’ve patched into our own garage door using a simple relay to interface with a microcontroller which will still work for opening and closing the door But if you’re looking for extended control you need to spoof one of the timing signals detailed in this post. We like the stated examples for future hacks: building a better wired button unit, or adding some type of RFID integration. We could see this approach for hacking in motion light control for door openers that don’t have it.

[Thanks Victor]

Keeping The Family Off The Net With An Undocumented Backdoor

memetics

When [Eloi] was home for Christmas, he faced one of the most difficult problems man has ever faced: his entire family, equipped with smartphones and laptops, siphoning all the Internet through a 1Mb/s connection. For any technically minded person, the fix for this problem is to limit the bandwith for all those Facebook and Twitter-heads, while leaving [Eloi]’s battlestation unaffected. [Eloi] had originally set up the Linksys WAG200G router in the family home a few years ago but had since forgotten the overly complex admin password. No worries, then, because apparently the WAG200G is open as wide as a barn door with a completely undocumented backdoor.

Without the password to the admin panel of the router, [Eloi] needed a way in. After pointing nmap at the router, he found an undocumented service running on port 32764. Googling this observation resulted in a lot of speculation, so the only option was to download the router’s firmware, look for the service, and figure out a way in.

[Eloi] eventually got a shell on the router and wrote a very short Python script to automate the process for all WAG200G routers. As for where this backdoor came from, it appears a SerComm device on the router is responsible. This means a whole bunch of routers with this specific SerComm module also have this backdoor, and we’d assume anything with a service running on port 32764 is suspect.

If you’re looking for a fix for this backdoor, your best bet is probably installing OpenWRT or Tomato. The OpenWAG200 project, an open firmware specifically designed for [Eloi]’s router, still has this vulnerability, though.

Fubarino Contest: Network Nodes, Door Lock, And Smoker Controller

fubarino-contest-nodes-lock-smoker

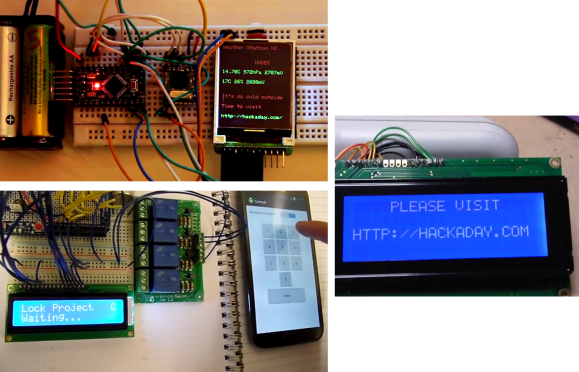
Here’s a round-up of three different Fubarino Contest entries; a video of each is available after the break.

On the upper left are the beginnings of a network node monitoring system developed by [Stephane]. When the network checks the weather, it may determine that it’s far too harsh outside and time to go in to see what’s new on Hackaday. There’s only sparse information available on the hardware. Each node uses an ATtiny84 and an RFM12B—different sensors connected to each are used to build up the network’s data collection capabilities.

In the lower left is [Brett’s] Bluetooth door lock controller. The Arduino, a cheap Bluetooth module, and a relay board make up the base station which will eventually connect to an electronic lock. [Brett] uses a smart phone to punch in the access code, and entering “1337” four times in a row unlocks the Easter egg, displaying our URL on the character LCD. Here’s the code repository for his project.

To the right is the display for [Andy’s] smoker controller used for cooking. He already had some hidden features on the controller used to calibrate the thermocouple. For the contest, he simply added an additional button to extend the original menu access method.


This is an entry in the Fubarino Contest for a chance at one of the 20 Fubarino SD boards which Microchip has put up as prizes!

Continue reading “Fubarino Contest: Network Nodes, Door Lock, And Smoker Controller”