The Tiniest SD Card Locker

sdlocker-tiny

In case you weren’t aware, that little ‘write protect’ switch on your SD cards probably doesn’t do anything. It’s only a switch, really, and if an SD card reader doesn’t bother to send that signal to your computer, it’s completely ineffective. Then there’s the question of your OS actually doing something with that write protect signal.

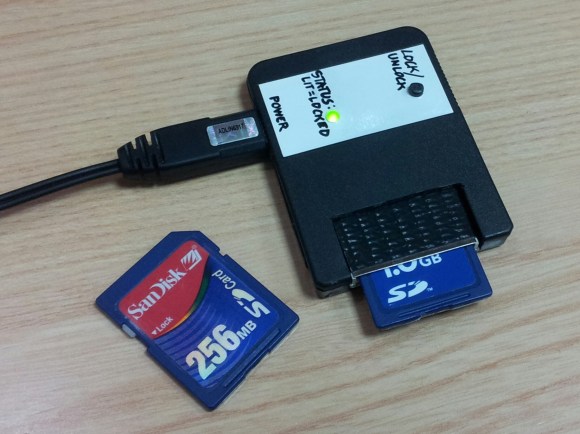
The better way to go about write protecting an SD card is using the TMP_WRITE_PROTECT bit on the SD card’s controller. [Nephiel] came up with an amazingly small device to set that bit, with the entire circuit fitting inside an old Playstation memory card.

[Nephiel] based his project on [Karl Lunt]’s SD Card Locker we saw late last year. [Karl]’s SD Locker uses an ATMega328 microcontroller, a pair of AA batteries, and an SD card socket to perform the bit toggling. This is still a very small device that fits inside an Altoids tin, but [Nephiel] thought he could make it smaller.

The new and improved version uses an ATTiny85 for SPI access to the SD card. A single button and LED serves as the user interface: with the LED off, the SD card is writable. Press the button, the card is locked, and the LED lights up.

0.19 Leagues Under The Sea

ROV

[Doug] and [Kay] have been building a steel 70-foot sailboat for the last few years, and since it’s a little too cold to work outside their home/shop in Oklahoma, they’re bringing their projects inside for the winter. Until it warms up a bit, they’re working on an underwater ROV capable of diving to 3000 feet below the waves, maneuvering on the ocean floor, and sending video and side-scan sonar back to their homebuilt ship.

Like [Doug] and [Kay]’s adventures in shipbuilding, they’re documenting the entire build process of ROV construction via YouTube videos. The first video covers the construction of a pressure vessel out of a huge piece of 10″ ID, half inch wall steel pipe. The design of the ROV will look somewhat like a torpedo, towed by the ship with cameras pointing in all directions.

For communication with the surface everything is passing over a single Cat5 cable. They’re using an Ethernet extender that uses a twisted wire pair to bring Ethernet to the ocean bottom. With that, a few IP webcams relay video up to the ship and a simple Arduino setup allows for control of the ships thrusters.

The thrusters? Instead of an expensive custom solution they’re using off the shelf brushless motors for RC cars and planes. By potting the coils of a brushless outrunner motor, [Doug] and [Kay] found this solution makes an awful lot of sense; it’s cheap, fairly reliable, doesn’t require a whole lot of engineering, and most importantly cheap.

Bunch of videos below, or just check out [Doug] and [Kay]’s progress on their slightly out-of-date blog.

Continue reading “0.19 Leagues Under The Sea”

Peristaltic Pump Moves Fluids Uphill Both Ways

Here’s a skill we should all probably have for after the apocalypse—the ability to build a cheap peristaltic pump that can transport highly viscous fluids, chunky fluids, or just plain water from point A to point B with no priming necessary. That’s exactly what [Jack Ruby] has done with some fairly common items.

He started with a springform cake pan from a thrift store, the kind where the bottom drops out like that centripetal force ride at the carnival. He’s using 2″ casters from Harbor Freight mounted to a block of wood. The casters go round and squeeze fluid through the hose, which is a nice length of heat-resistant silicone from a local homebrew shop. He’s currently using a drill to run the pump, but intends to attach a motor in the future.

[Jack]’s write-up is very thorough and amusing. Stick around to see the pump in action as well as a complete tour. You can also pump colored goo if you’re out of beer materials.

Continue reading “Peristaltic Pump Moves Fluids Uphill Both Ways”

USB Datalogging With Arduino Using V-USB

Adding USB functionality to your Arduino projects used to be a pain, but thankfully, the V-USB project came along and gave your ATMEGA328 the ability to control the USB lines directly and mimic simple (low-speed) USB peripherals. [Ray] shows an implementation of the V-USB project by logging the status of the Arduino’s I/O pins to an open Excel spreadsheet

V-USB (Virtual USB) is especially useful for those of us who build standalone Arduino projects with the ATMEGA328. Unlike the Arduino Leonardo and its ATMEGA32U4, the ATMEGA328 does not have a built-in USB controller. The circuit required to tie into the USB lines is made up of just a few basic components, and [Ray] provides a reference schematic and BOM to get you started. The Arduino is programmed to mimic a keyboard, so the datalogging is achieved by allowing the Arduino to ‘type’ the data into an open Excel spreadsheet. In this example, the status of 8 digital pins and all 6 Analog Input pins are logged.

For those of you who prefer the PIC microcontroller and are in a similar position of not having a built-in USB controller, there is the 16FUSB project to help you out.

Move Over, Google Nest: Open Source Thermostat Is Heating Up The Internet Of Things

In the wake of Google’s purchase of connected devices interest Nest, the gents at [Spark] set about to making one in roughly a day and for a fraction of the cost it took Nest to build their initial offering. [Spark]’s aim is to put connected devices within reach of the average consumer, and The Next Big Thing within the reach of the average entrepreneur.

The brain is, of course, [Spark]’s own Spark Core wi-fi dev board. The display is made of three adafruit 8×8 LED matrices driven over I²C. Also on the bus is a combination temperature and humidity sensor, the Honeywell HumidIcon. They added some status LEDs for the furnace and the fan, and a Panasonic PIR motion detector to judge whether you are home. The attractive enclosure is made of two CNC-milled wood rings. The face plate, mounting plate, and connection from the twistable wood ring to the potentiometer is laser-cut acrylic.

[Spark]’s intent is for this, like the Nest, to be a learning thermostat for the purpose of increasing energy efficiency over time, so they’ve built a web interface with a very simple UI. The interface also displays historical data, which is always nice. This project is entirely open source and totally awesome.

If you have an old Android phone lying around, you could make this open source Android thermostat.

Continue reading “Move Over, Google Nest: Open Source Thermostat Is Heating Up The Internet Of Things”

Microcorruption Embedded CTF

The folks at Matasano Security and Square have teamed up to build an online capture the flag (CTF) competition. The Microcorruption CTF focuses on embedded security and challenges players to reverse engineer a fictional “Lockitall LockIT Pro” lock system.

Each level places you in a debugging environment with a disassembly listing, live memory view, register view, and debugging console. You can set breakpoints, step through code, and modify registers like in a real debugging environment. Your goal is to figure out how to bypass the lock to collect bearer bonds.

While the device and motive may be fictional, the assembly is actual MSP430 code. The debugger is similar to GDB connected to a remote target using OpenOCD. There’s even a manual (PDF) to help you get up to speed with writing MSP430 code for the device.

This CTF looks like a great introduction to embedded security, and doesn’t require buying real hardware. It even includes a full tutorial to get you started.

Sucking PIC Firmware Out Of An Old APC Battery Backup

reverse-engineering-pic-firmware-of-APC-power-supply

Looking at this huge Uninterruptible Power Supply we are a little envious. It’s meant to hang on the wall of a utility room and power your critical devices. [Radek Hvizdos] has had it in service for quite some time, and when he started thinking of replacing the internal battery he decided to see if he could also extend the functionality. To do so he needed to get at the firmware of the chip controlling the device. And so began his adventure of dumping the firmware from the read-protected PIC 18F452.

The challenge of dumping code from a write-protected chip is in itself a fun project. But [Radek] was actually interested in fixing bugs and adding features. The wishlist feature we’d be most interested in is a kind of triage for shutting down devices as the internal battery starts to run low. Nice! But starting from scratch with the firmware is a no-go. You can see the two places where he connected to the PCB. The upper is for using a PIC programmer. The lower is an I2C connection used to dump the EEPROM with an improvised Bus Pirate.

In the end it was improper lock bit settings that opened the door to grabbing the firmware. The bootloader section of the PIC is not locked, and neither is the ability to read from FLASH at run-time. These two combined allowed him to write his own code which, when flashed to the bootloader section, dumps the rest of the firmware so that it may be combined into a complete file afterward. Since posting this fascinating article he has made a follow-up about disassembling the code.