Hackaday Links: October 20, 2013

hackaday-links-chain

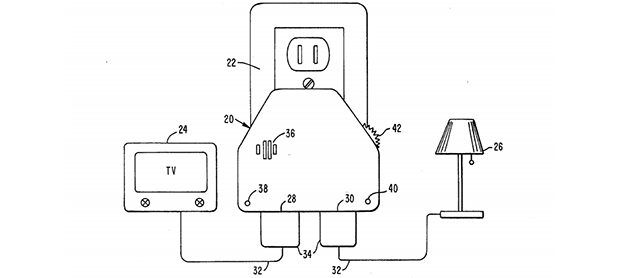
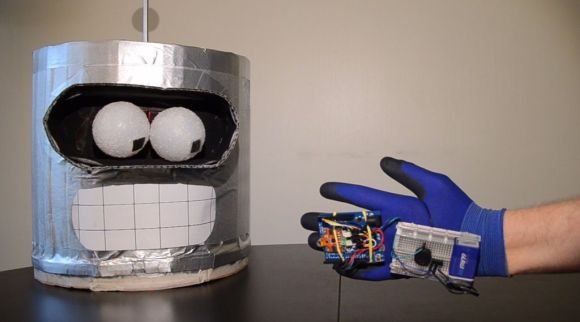
Winter is coming. We’ve see those gloves in stores made specifically to work with your smartphone. [hardsoftlucid] isn’t buying it. He made his own version using… well, you just have to see it.

Here’s an eBookmark for a real book. What? Well, you know how an eReader does a great job of keeping your place between reading sessions? This is an electronic bookmark for paper books which uses LEDs to show you where you last left off reading. [via Adafruit]

[Thomas Brittain] wrote in to share his BLE Module and Pulse sensor updates. Both were featured in a recent Fail of the Week column and the latest iteration takes them from fail to functioning!

You may be able to get a free XMOS xCORE starter kit. The company is giving away 2500 of them. [Thanks Tony]

After learning about custom labels for microcontroller pinouts from [John Meachum] we’re happy to get one more helpful tip: a breadboard trench is a great place to hide axial decoupling capacitors.

A bit of cutting, solder, and configuring lets you turn a simple gamepad into a 4-controller interface for MAME.

Many of the Hackaday Staff are into Minecraft (between Let’s Play videos, running servers, and building computers in-game it’s a wonder we get anything done around here). We restrained ourselves by not making this video of a Restone circuit Blender animation on your desktop into a full front page feature. [via Reddit]


Inside The Clapper

clapper

Hackaday readers above a certain age will probably remember the fabulously faddish products developed by Joseph Enterprises. These odd gadgets included the Ove’ Glove, VCR Co-Pilot, the Creosote Sweeping Log, and Chia Pet (Cha-Cha-Cha-Chia) as mainstays of late night commercials, but none were as popular as The Clapper, everyone’s favorite sound-activated switch from the 1980s. [Richard] put up a great virtual teardown of The Clapper, that provides a lot of insight into how this magic relay box actually works, along with some historical context for the world The Clapper was introduced to.

Sound activated switches are nothing new, but the way The Clapper did it was just slightly brilliant. Instead of listening to every sound, the mic inside the magic box sends everything through a series of filters to come up with a very narrow bandpass filter centered around 2500 Hz. This trigger is analyzed by a SGS Thompson ST6210 microcontroller ( 4MHz, ~1kB ROM, 64 bytes of RAM, and 12 I/O pins ) to listen for two repeating triggers  within 200 milliseconds. The entire system – including the source code for the MCU – can be seen in the official patent, US5493618.

The Clapper sold many millions of units at a time when a lot of homes were assuredly in a pre-microelectronics world. Yes, in 1986, a lot of TVs had microcontrollers and maybe a washer/dryer combo may have had a few thousand transistors between them. Other than that, The Clapper was many household’s introduction to the ubiquitous computing power we see today, and all with less capability than an Arduino.

Wrist-mounted Flamethrower On The Cheap

flamethrowerGlove

Everyone wants to be Iron Man these days, but without a spare arc reactor lying around, you’ll have to settle on building a backup suit component. [Xavier] documents his take on the wrist-mounted flamethrower in this dirt-cheap and unquestionably dangerous build. Cobbled together from parts found at a local hardware store, this glove has the typical “ready” setting with a small flame that, upon turning one’s wrist, erupts into a loud and large swath of flames. We suspect the mask worn in the video below doubles as identity protection and to prevent accidental hair conflagrations. Skip to the end for a demonstration.

Though not the first flamethrower build at Hackaday, [Xavier’s] is the only one with a guide and is certainly the cheapest. Be sure to look into the second generation of the Prometheus flame thrower and its subsequent third version that we featured a couple of years back. Not everyone’s flamethrower is wrist-mounted; some people put them inside a trombone. Remember, don’t try this at home.

Continue reading “Wrist-mounted Flamethrower On The Cheap”

Your Hackerspace Needs A Biology Lab; Here’s The Inspiration

biology-hackerspace

When you think of Hackerspaces what pops to mind? For us it’s electronics first, then machining related stuff (3D printing, CNC milling), followed by welding, woodworking, auto mechanical, we could go on and on. But biology hacking doesn’t really make that list. The New York based Genspace is a strong case on why we should add a biology lab as a viable hackerspace option.

What are Hackerspaces other than a collection of tools and skilled members that helps to bring the mad scientists of the world out of their basements and into the light? Pretty much every Hackerspace teaches classes that are open to the public. This is basically a requirement of being a non-profit, but is also driven by the virtue of making knowledge open and available. Offering biology themed classes is an incredible tie-in for helping to see our young learners through to a career in the sciences.

Vice-President and Co-Founder [Daniel Grushkin] was inspired by college students who hack organisms for a one semester long project. He wanted to try his hand at it, but needed help with the resources. He gathered a few others who were interested and, with encouragement from NYC Resistor, they got Genspace up and running in Brooklyn. The organization holds safety as a top priority. Each new member learns about the Biosafety Level 1 guidelines used by the space. For less involved experiments they even use tools of their own making, like a glovebox similar to this one.


Best Practices To Include In Your Final Projects

electronic-best-practices

Making that final push to button up your projects can be a bit daunting. It’s kind of like the punch list on a construction project — add switch plates, fill nail holes in baseboards, screw in light bulbs, clean windows — that stuff adds up quickly. But having a set of best practices in mind throughout the development phase will cut down on that burden. [Caleb P.] just published a quick guide using a recent project as an example.

First and foremost is the label seen on the project box lid. How many times have you pulled out a circuit board from a year or two earlier and not been able to figure out the pinout? As with ancient televisions and radios, including the service schematic will save you big time! He also mentions that the size and orientation of the components in the case was in the back of his mind the whole time. That paid off because everything fits like a glove. [Caleb] makes sure the battery is easy to get to, and the each component has some type of connector so that it may be removed and serviced/replace without soldering. There’s certainly nothing groundbreaking in this guide. But ask yourself: have I been following all of these guidelines in my own work?

Smoothing PLA Printed Parts

We’ve seen a few advances in the finishing processes of 3D prints over the last few months that result in some very attractive parts that look like they were injection molded. Smoothing ABS prints is now a necessary skill for anyone looking to produce professional parts, but those of us using PLA for our RepRaps have been left in the cold. After some experimentation, the guys over at protoparadigm have come up with a way to smooth out those PLA prints, using the same technique and a chemical that’s just as safe as acetone.

Instead of acetone, the guys at protoparadigm are using tetrahydrofuran, or THF, as a solvent for PLA. Other PLA solvents aren’t friendly to living organisms or are somewhat hard to obtain. THF has neither of these qualities; you still need to use it in a well ventilated area with nitrile gloves, but the same precautions when using acetone or MEK still apply. It’s also easy to obtain, as well: you can grab some on Amazon, even.

The process for smoothing PLA prints with THF is the same as smoothing ABS prints with acetone. Just suspend the print in a glass container, pour in a tiny amount of the solvent, and (gently) heat it. The evaporated solvent will smooth all the ridges out of the print, leaving a shiny and smooth surface. You can, of course, hand polish it by dedicating a lint-free cloth and a pair of gloves to the task.

Music Challenge Has You Flapping Your Wrist To Make Sounds

glove-based-music-challenge

This glove controller let you play a musical game. The challenge is to perform the correct wrist motions at the right tempo to play the intro to the song Where is my Mind by the Pixies. This is demonstrated in the video clip after the break.

We often see flex sensors used on the fingers of glove projects, but this one does it all with an accelerometer. That module, along with the Piezo buzzer used for playback are affixed to the small breadboard on the back side of his hand. Rubber bands connect the Arduino to his third and forth fingers. The tempo and rhythm are pre-programmed but the tone generated is based on the gravity reading at the start of each note. If you don’t have your hand positioned correctly the wrong tone will be played.

The code was published in link at the top. It would be fun to see this altered as a hacked Simon Says game.

Continue reading “Music Challenge Has You Flapping Your Wrist To Make Sounds”