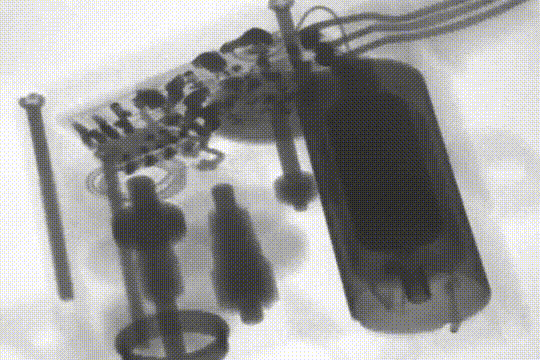
Anti-Hack: Free Automated SSL Certificates

You want to put your credit card number into a web site. You know to look for a secure web site. But what does that really prove? And now that so many electronic projects have Web servers (ok, I’ll say it… the Internet of Things), do you need to secure your web server?

There was a time when getting a secure certificate (at least one that was meaningful) cost a pretty penny. However, a new initiative backed by some major players (like Cisco, Google, Mozilla, and many others) wants to give you a free SSL certificate. One reason they can afford to do this is they have automated the verification process so the cost to provide a certificate is very low.

Continue reading “Anti-Hack: Free Automated SSL Certificates”

R2-D2 Keeps This University Bathroom Smelling Fresh

For a fun university project, [Cengizhan Can] and friends decided to make an automated air freshener for one of their bathrooms at the Utrecht University in the Netherlands. Happening to have an old R2-D2 plastic candy jar, they decided to try to see if they could make it Star Wars themed.

They loaded up the R2-D2 shell with an Arduino, a ton of sensors (don’t worry, nothing for spying) and an actuator for triggering the air freshener. During normal operation the LCD will display ambient temperature information and the approximate number of air freshener shots remaining in the canister. An external door sensor checks to see if the stall is open, and coupled with a light sensor, only sprays freshener after use, and when no one is in the stall anymore.
Continue reading “R2-D2 Keeps This University Bathroom Smelling Fresh”

5 Wide And Tall Monitors With Hacked Bezels For Wall Of Awesome

If two is better than one, what about five? [Omnicrash] has posted a nice analysis of his monitor setup, which uses 5 portrait mounted monitors side-by-side. To minimize the bezel size between them, he removed the casing and built a custom stand that placed them all closely together for a surround viewing approach. He’s been using this setup for a couple of years and has posted a nice analysis of making it work for multiple purposes. On the upside, he says it is awesome for gaming and watching videos.

On the downside, NVidia’s drivers and multi-monitor setup are a pain, and some tasks just didn’t work with the bezels. He couldn’t, for instance, run a standard-sized remote desktop screen anywhere without having the bezel get in the way. So, with large, hi-res monitors now getting cheaper, would he do it again? “If I had to do it all over again nowadays however I’d probably just go with a single 34″ ultra-wide for about the same price..though I probably wouldn’t be able to help myself and would eventually be adding at least one on top and 2 in portrait on the side.”

Better Sailing Computers With Wearable Electronics

Sailing – specifically small boats in regattas – is a hobby that requires a lot of skill. Like any hobby, there are devices and electronics to make the hobby easier. For sailing, its tactical sailing compasses and GPS units. Remember, you probably don’t want to sail in a straight line, and that means offloading decades of experience to electronics. Instead of spending hundreds of dollars on a sailing computer, [Brook] thought it would be a better idea to build his own robot sailor from a Raspberry Pi and a Pebble smartwatch.

The sensors required for a sailing computer are par for the course – a Ublox GPS unit, a magnetometer, an acceleratometer, and a gyro. Being used on a sailboat also means there’s an anemometer thrown into the mix. These parts are stuffed into a waterproof polycarbonate field box with a USB power bank battery and a Bluetooth USB dongle.

With the hardware in place, it was time to write the software. The UI for this device is a Pebble smartwatch, which means there was a lot of futzing around with C# and Mono. This device is also a sailing data recorder, meaning [Brook] can integrate this project with VisualSail, a desktop application he wrote a few years ago to create 3D replays of sailing races using GPS data.


Raspberry_Pi_LogoSmall

The Raspberry Pi Zero contest is presented by Hackaday and Adafruit. Prizes include Raspberry Pi Zeros from Adafruit and gift cards to The Hackaday Store!
See All the Entries

MRRF 3D Printing Spectacular

MRRF, the Midwest RepRap Festival, is in full swing right now. The venue is packed, attendance is way up this year, and the panorama is impressive:

Panoramamini
The 2016 Midwest RepRap Festival. Click to embiggen.

New Printers

MRRF is not really a trade show. Yes, there are companies here (Google is picking up the tab for Chinese food tonight), but this is assuredly a community-based event around open source hardware. That said, Lulzbot is here, SeeMeCNC is hosting, E3D, and Ultimachine are all here. This year, there are a few new printers.

Lulzbot’s Taz 6 – the latest update to their flagship printer made its first public appearance at MRRF this year. A product update from Lulzbot isn’t like a product announcement from a normal company. Lulzbot is using rapid prototyping for manufacturing (!). They can iterate quickly and release two new printers in the time it takes Stratasys to come up with a design. This also means the releases are incremental.

Click past the break for more photos and updates.

Continue reading “MRRF 3D Printing Spectacular”

DIY Vacuum Table Makes Lasering Even Easier

If you’ve ever tried to laser flexible rolls of material you’ll know it can be really annoying to setup in the laser cutter.

Most of the time we use magnets, but then you have to make sure the magnets are clear of the work path — and then you end up wasting extra material… It’d be amazing to have a vacuum table that just sucks down your work piece to keep it in place! As it turns out, it’s not that hard to make!

After getting frustrated lasering warped material themselves, [Martin Raynsford] and the gang decided to make their very own vacuum table — using a laser cutter of course. Continue reading “DIY Vacuum Table Makes Lasering Even Easier”

MRRF: Jellybox, A STEM-Oriented Printer

It’s the first full day of fun here at the Midwest RepRap Festival. This year’s turnout is quite impressive—as I’m writing this, we’re an hour or so in and there are already hundreds of people and a couple of R2D2 units milling about.

The talks will begin in a few hours. This year MRRF has expanded to another building, which should tell you something about the growth of this festival. We are excited to hear [Filip] and [Ladi] give a presentation about Jellybox, a STEM-driven project he started to bring 3D printing into education in a comprehensive and hands-on way. The initial idea was based on [Jean Piaget]’s theory of constructionism. [Piaget] was a clinical psychologist who helped advance the idea that human learning is greatly influenced by connecting a person’s ideas with their experiences.

Building a Jellybox printer is about as easy as it gets, and takes about 4-6 hours depending on your skill level. The laser-cut clear acrylic panels are connected with zip ties that lock around 90° plastic brackets. The back panel even has a etched diagram that shows where all the connectors should go, and the wiring is neat and tidy by design. It’s meant to be easy to tear down so that teachers can use them again and again with middle and high school-aged students. The Jellybox is open-source; both the extruder and the hot end can be swapped out in a flash.

IMade3D offers one- and two-day intensive courses in the DC area that cover building a Jellybox and learning some things about 3D modeling. The kit is included in the price of admission. Jellybox kits will be available in a few weeks, but can be preordered today for $799.