Introducing The Raspberry Pi 3

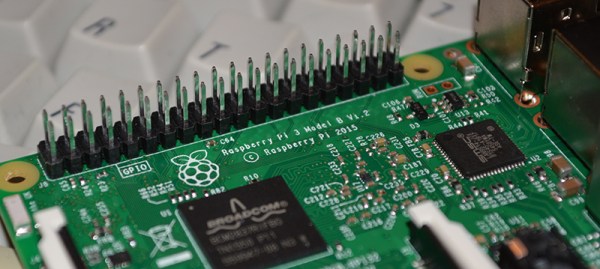
TL;DR: The Raspberry Pi 3 Model B is out now. This latest model includes 802.11n WiFi, Bluetooth 4.0, and a quad-core 64-bit ARM Cortex A53 running at 1.2 GHz. It’s a usable desktop computer. Available now at the usual Pi retailers for $35.

News of the latest Raspberry Pi swept around the Internet like wildfire this last weekend, thanks to a published FCC docs showing a Pi with on-board WiFi and Bluetooth. While we thank the dozens of Hackaday readers that wrote in to tell us about the leaked FCC documents, our lips have been sealed until now. We’ve been doing a few hands-on tests with the Pi 3 for about two weeks now, and the reality of the Pi 3 is much cooler than a few leaked FCC docs will tell you.

The Raspberry Pi 3 Model B features a quad-core 64-bit ARM Cortex A53 clocked at 1.2 GHz. This puts the Pi 3 roughly 50% faster than the Pi 2. Compared to the Pi 2, the RAM remains the same – 1GB of LPDDR2-900 SDRAM, and the graphics capabilities, provided by the VideoCore IV GPU, are the same as they ever were. As the leaked FCC docs will tell you, the Pi 3 now includes on-board 802.11n WiFi and Bluetooth 4.0. WiFi, wireless keyboards, and wireless mice now work out of the box.

Continue reading “Introducing The Raspberry Pi 3”

$79 Smart Mirror Uses Raspberry Pi

[Nathan] wanted a smart mirror that cost less than the last one he built, which was about $500. He decided that you don’t see more smart mirrors because of the high cost. His latest build came in at only $79 (you’ll have to visit the blog’s home page to find the entire series).

The most expensive piece of the build is a 7-inch monitor ($45). Any Raspberry Pi will work, although [Nathan] uses a Pi B+. Although he managed to score a free one-way mirror from a local glass shop, you can buy one for about $13.

This is the kind of project that isn’t a big technical challenge. After all, it is a one-way mirror with an LCD screen behind it. However, getting the screen blacked out and set to provide the best possible effect is the trick and [Nathan’s] techniques will give you a head start.

You can see the mirror in the video below. We’ve seen smart mirrors that sense your presence as well as wireless mirrors before.

Continue reading “$79 Smart Mirror Uses Raspberry Pi”

Hackaday Links: Leap Eve, 2016

The current Mac Pro is a masterpiece of design that looks like a trash can. We’ve been waiting for someone to take one of these computers and stuff a MiniITX board in there, but seeing as how the Mac Pro costs $3000, that probably won’t happen anytime soon. Here’s the solution. It’s a trash can computer case that is also too expensive for what it is. Now all we need is someone to put a big fan inside one and turn this computer into a wacky waving inflatable arm flailing tube man.

[Mike Harrison] recently got his hands on a $20,000 SPARC CPU module. This is an enormously thick board that must be dozens of layers thick. How many layers was an open question until he put the board in a CNC milling machine. The setup is pretty much what you would expect with a few lines of g-code repeated over and over. The real trick comes from using one of the outputs for lubricant to trigger the shutter release on a camera. How many layers were in the CPU module? About 30, or something like that.

Almost a year ago, we saw the latest advances in perfboard. It was a perfboard with each hole connected to rows and columns on a selectively solderable orthogonal busses. Something like that. Actually, we still can’t wrap our head around it. Now, it’s a crowdfunding campaign with a few new and useful features. There’s also a layout tool that will show you where to place your components and where to make solder bridges.

[Ray Wilson] started Music From Outer Spacethe place to learn about DIY analog synthesizers. Ray now has cancer, and as you can imagine, being a self-employed engineer specializing in analog synthesizers doesn’t provide great health coverage. [Ray]’s family set up a GoFundMe page to pay for the medical expenses.

We haven’t seen much in the land of 3D scanners, and we’re betting most of that is because they’re so expensive. The guys from CowTech have a kickstarter up for a 3D scanner that’s just $99. It’s based on the Ciclop scanner but designed around a custom Arduino shield and remains fully open source.

Remember the screen printed electroluminescent displays that were printed directly onto t-shirts from a few months ago? Now that company is working on a much cooler design: the Hackaday Jolly Wrencher. It works, but there are still a few problems: they’re setting the shirt on fire a little. Don’t worry, if these are ever reasonably safe and somewhat affordable, an EL Jolly Wrencher shirt will be in the Hackaday Store.

Need a rechargeable multimeter? It’s actually pretty easy. With an 18650 Lithium Ion cell and a 9V boost converter, this circuit will fit in most devices that need a 9V battery. To do this right, you’ll also need a USB charging port, to be used once every couple of years when the battery needs charging.

A Wooden Performance Is Fine WIth This Sequencer

You could sometimes be forgiven for thinking that making popular music has become too easy. With a laptop and suitable software almost anybody can now assemble something that had they secured the services of a canny promoter would be in with a shot at stardom. So many performances have been reduced to tightly choreographed dance acts to mask the absence of musicians or indeed musical talent, and our culture is poorer for it. It’s not that music made with modern technology or outside the performance is an indicator of lack of talent, indeed when a truly talented musician makes something with the resources of a modern technology the results are astounding. Instead it perhaps seems as though the technology is cheapened by an association with mediocrity when it should be a tool of greatness.

So it was with pleasure that we noticed a fresh project on Hackaday.io this morning which provides a marriage of accessible music technology and a requirement for performance. [Ernest Warzocha] has made a wooden sequencer.

It’s true, audio sequencers are old hat, so a new one will have to work hard to enthuse a seasoned Hackaday reader who’s seen it all. What makes [Ernest’s] sequencer different is that he’s made one with a very physical interface of wooden pucks placed in circular recesses on a wooden surface. Each recess has an infra-red reflective sensor that detects the surface texture of the puck placed in it and varies the sample it plays accordingly. It’s all held together underneath by an Arduino, and MP3 samples are played by a Sparkfun MP3 shield. At a stroke, he has turned the humble sequencer from a workaday studio tool into a performance art form that you can see in the video below, and we like that.

Home made sequencers have a special place in maker culture, and as you might expect over the years we’ve featured quite a few of them. Shift registers, CMOS analogue switches or even turntables as the sequencer elements, Lego as a human interface, a sequencer made from a cash register, and a rather lovely steampunk sequencer, to name but a few. So this one joins a rich tradition, and we look forward to more in the future.

Continue reading “A Wooden Performance Is Fine WIth This Sequencer”

Password Extraction Via Front Doorbell

Not a day goes by without another IoT security hack. If you’re wondering why you don’t want your front doorbell connected to the Internet, this hack should convince you.

The hack is unfathomably stupid. You press the button on the back of the unit that pairs the doorbell with your home WiFi network, and it transmits the password in the clear. Sigh. It’s since been fixed, and we suppose that’s a good thing, but we can’t resist thinking for a moment about an alternative implementation.

Imagine, like all previous non-IoT wireless doorbells, that the doorbell transmitted a not-very coded signal over an open frequency like 433 MHz to a receiver inside your home. Do the same with the video stream. Now the receiver can be connected to the Internet, and can be significantly more secure because it’s behind your locked front door. The attack surface presented to the outside world by the doorbell itself is small, and limited to faking a doorbell press or showing you pictures you don’t want to see. Yawn.

But because the outside doorbell unit could be connected to a network, it was. Now the attack surface extends into your home’s network, and if you’re like most people, the WiFi router was your only real defense.

Now we love the IoT, in principle. There are tons of interesting applications that need the sort of bandwidth or remote availability that the Internet provides. We’re just not convinced yet that a doorbell, or a fridge for that matter, meet the criteria. But it does add a hundred bucks to the price tag, so that’s good, right? What do you think? When does the risk of IoT justify the reward?

Thanks [Dielectric] for the tip!

Rasberry Pi Analog Input Using Only Passive Components

The Raspberry Pi is a very capable device whose hardware has been pushed to the limit in all sorts of interesting ways. But even the most ingenious of experimenters have to agree on one point; it doesn’t possess an analog-to-digital converter. If you want analog inputs you will have to buy or build them.

[Mincepi] has done just that, but not as you might expect by adding an integrated circuit on one of the Pi’s interfaces. Instead the circuit [Mincepi] is using consists only of passive components, measuring the time taken to discharge the parasitic capacitance of one of the Pi’s inputs from logic 1 voltage to logic 0 voltage through a resistor into the voltage to be measured. This is a long-established approach to A to D conversion, one that was achieved back in the day with purpose-designed timers as microprocessor ancillaries.

The problem is that the Pi does not have a timer peripheral, so [Mincepi] has used the shift registers that form part of the Pi’s SPI and PCM inputs to perform this task on two channels. A sample rate of 100kHz and 6-bit resolution is claimed, with enough voltage range for a 1V peak-to-peak audio signal to be sampled.

Of course, simplicity does not guarantee a good ADC, and this circuit does not perform very well. It is noisy, non-linear, and as [Mincepi] puts it, probably sensitive to temperature. And though [Mincepi] talks in detail about the software to drive it, none is forthcoming. To quote: “It doesn’t include code since I’m in the process of writing a proper sound device module. My previous code was a simple character device, but it worked just fine, and served to prove the concept.

We really want this to work, even if it’s not the best ADC ever. So we eagerly await the sound device module, and look forward to more news from the project.

This may be the simplest of simple ADCs we’ve yet featured here on Hackaday, but it’s not the first we’ve seen. There is this one using a comparator for example, or this one using a flip-flop. It is the essence of creative electronics to eke a function from a component that was never meant to be, please keep them coming!

Milling PCBs With An Off-The-Shelf CNC

There’s a lot of little things that can go wrong before you get great results out of a process. We like to read build logs to learn from the mistakes made. [Marc Liyanage] bought a Nomad CNC machine from Carbide3d, and after a bit of learning has gotten some very nice PCBs out of it.

The first trip up he encountered was not setting the design rules in EagleCAD to check for gaps too small for his router bit. After he sorted that, and worked around an issue with Carbide not supporting R values for curves; instead opting for IJK, he made a nice TQFP to DIP break out board.

The next board was a more complicated double-sided job. He cleverly had the machine drill two holes all the way through the PCB to give him a space for two alignment pins. Unfortunately this didn’t work out exactly as planned and he had a slight misalignment with some of the via holes. It looked alright and he began assembling. To his dismay, the clearances were off again. It was a bit of deja vu for us.

We’ve made lots of boards on a CNC machine, and can attest to the task’s finicky nature. It’s certainly quicker than the photoresist technique for boards with lots of little holes. It will take someone quite a few tries before they start having more successes than failures, but it’s very rewarding.