Building An Isolation Booth For Your Home Recording Studio

[Brattonwvu] wanted to lay down some tracks with as high an audio quality as possible. To help get rid of the noise pollution of the everyday world he built this isolation booth in his attic.

The project started off with a trip to the home store for some 2×4 stock and OSB to use as sheathing. The framing is as you would expect, but to help deaden the sound he went with a surprising material. He’s filled the cavities between each 2×4 with stuffed animals and old clothes. The same is done in the walls and the inside surfaces are all covered in fabric to prevent echoing. The door has a lip and we can just make out what looks like weather stripping to provide a seal. There is just one opening in the box, where a PVC pipe allows electrical and microphone cables to pass through. [Brattonwvu] reports that you can hear your heartbeat in your ears when standing inside the sealed booth.
CPLD Motor Control

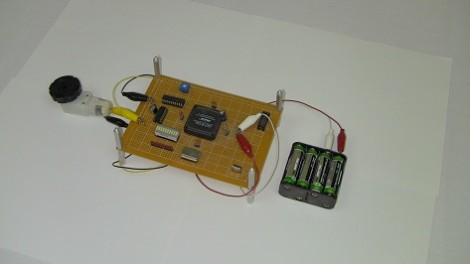
[Chris] continues cranking out the tutorials, this time around he’s showing how to use a CPLD for simple motor control. The demo hardware is pretty basic, he built his own FPGA/CPLD demo board a few years back which used a PLCC socket for easy interfacing. You should be able to use just about any gear you have on hand.

Of course the thing about these chips is that you’re working with hardware that can be run in parallel. [Chris] mentions that this is what makes it perfect for timing-critical applications. Here he’s using a motor driver that monitors a PWM signal, using the duty cycle to actuate the direction and speed at which the motor turns. After the break you can see a demonstration of the CPLD reading from an ADC chip and converting the value to a PWM signal. [Chris] has also used the same hardware for VGA signals; something that is usually a timing nightmare if done with a microcontroller.

If this leaves you thirsting for more CPLD goodness check out our own guide on the subject.

Continue reading “CPLD Motor Control”

MythTV Library On Apple TV Without A Jailbreak

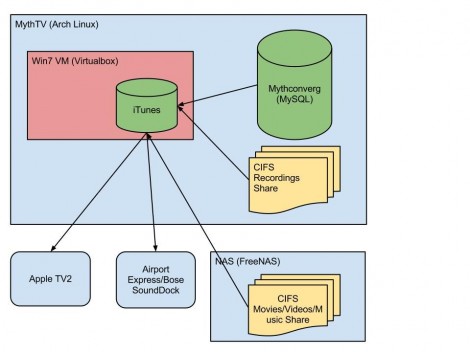
[Dan] wrote in to share a link to his MythTv to Apple TV setup. He found a way to make the recordings he made on his Linux box available on the 2nd Generation Apple TV. Our first thought is that he would use XBMC on a jailbroken device  but that is not the case. The secret is to roll iTunes into the mix.

Take a look at the diagram above. The system starts with an Arch Linux box that runs MythTV, an open source program which allows you to record from tuner or encoder hardware. But actually watching those recordings on an iOS device is difficult for a couple of reasons. First, Apple likes to keep their devices locked up tight in hopes that you buy your entertainment rather than watching over-the-air records. Second, if you’re recording ATSC channels the files may be 1080i or 1080p, neither of which can be handled by the Apple TV 2. [Dan] gets around this by first using the command line version of Handbrake to transcode the recordings to an h264 format. He then uses iTunes running on an Windows 7 virtual machine (on the Linux box) to host the transcoded files in a library the Apple TV can access.

TI Launches C2000 Launchpad (featuring Billy Mays)

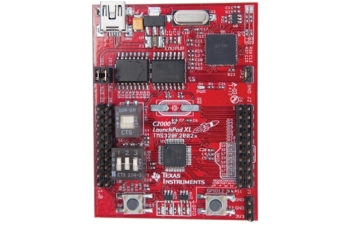
The Texas Instruments MSP430 Launchpad is pretty popular in hacks, likely due to its low price. TI has recently released a new C2000 Launchpad device that offers more power and peripherals for $17. This board uses the C2000 Piccolo processor, which is meant for DSP applications.

Also included is an unrestricted version of the Code Composer Studio IDE and the controlSUITE software package. You can also run the free SYS/BIOS RTOS on this board. It’s nice to see TI providing a lot of free, non-crippled tools that could be used to power some pretty advanced hacks.

Most MSP430 Launchpad Booster Packs should be compatible with this board, and TI has a new layout for Booster Packs that use the additional pins. There is a C2000 specific LED Booster Pack available now for $30. There are also specifications for building your own Booster Packs for the C2000.

TI has released a slightly cheesy promotional video that features a [Billy Mays] like performance. Check it out after the break.

Continue reading “TI Launches C2000 Launchpad (featuring Billy Mays)”

Digital Zoetrope Uses 18 LCD Displays

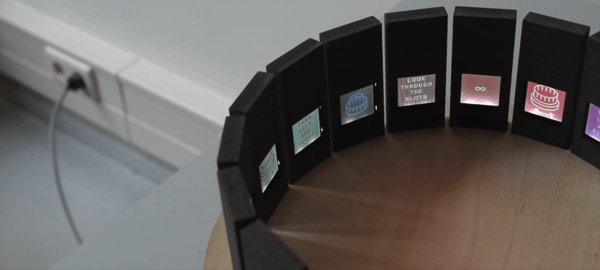
[Jasper] sent in a project he, [Quinten], and [Mr. Stock] have been working on for a while. It’s called the Pristitrope and brings the classic 19th centrury paper-based animation device into the 21st century with 18 LCD displays.

The lazy suzan portion of the build was fabricated out of plywood cut on a CNC router and fastened together with the help of a slip ring to transfer power between the stationary and spinning portions of the device. For the electronic part of the build, eighteen LCD displays were connected together on a data bus with each display independently addressable by a microcontroller.

One really interesting feature of the Pristitrope is its ability to detect if it is currently rotating clockwise or counterclockwise. While [Quinten]’s video doesn’t show off the full possibilities of this feature, the spin sensor makes it possible to always have an animation played in the right direction regardless of how the Pristitrope is spun.

Continue reading “Digital Zoetrope Uses 18 LCD Displays”

Giving The TRS-80 CoCo A 44 Color Display

As a relic of the early 80s, the TRS-80 Color Computer couldn’t display very many colors. By default, the CoCo could only display 8 colors on the screen at a time, but [John] figured out a way to increase the number of colors displayed using a very simple trick that surprisingly isn’t found in original CoCo games.

The TRS-80 Color Computer uses a Motorola 6847 video display generator to produce color graphics on its display. There are several graphics modes available to CoCo programmers, including a high-resolution black and white mode, and two four-color modes using red, green, blue, and yellow or buff, cyan, magenta, and orange.

These color palettes are extremely limiting, and usually switching between these modes produces a lot of flicker. [John] figured out if he switched the color pallets every 1/60th of a second (i.e. during the vertical blanking interval), he could display 44 colors on the CoCo.

It’s a clever little hack to increase the color palette of the CoCo, and in our opinion should be in the running for winning this season’s Retrochallenge. Sadly, [John] is judge for the Retrochallenge this time around, so he’ll have to settle for earning a Hackaday merit badge.

Genezap Improves Your Video Game Skills Using Corporal Punishment

genezap

As if getting your ass handed to you while playing video games wasn’t annoying enough, [furrtek] decided that the best way to help improve his skills was by inflicting physical pain each time his on-screen character died.

While perusing the Internet looking for something to break through the doldrums of the day, he came upon a video in which someone decided to try on a dog shock collar just for kicks. This sparked [furrtek’s] imagination, and he started to think that it would be pretty cool to use the same sort of device to make dying in a video game that much more unpleasant.

After ordering a set of collars online, he tore them apart to see how they functioned, and to measure just how big of a jolt they were able to deliver. [furrtek] then modified two Genesis controllers with a pair of ATtiny 25s, which let him send the fire signal to the collars. Unfortunately, stock Genesis games don’t allow you to send signals to the controllers, so [furrtek] had to spend some time hacking ROM images to trigger events when players are injured or lose a life.

We think the project is pretty slick, and if you don’t mind fiddling with your old controllers, you too can have a merciless trainer strapped around your neck. For those slightly more averse to pain, you can watch [furrtek] and his friend [Dyak] suffer the consequences of poor gameplay for your amusement.

Continue reading “Genezap Improves Your Video Game Skills Using Corporal Punishment”