Born with just one foot, [Nerraw99] had to work around prosthetics all his life. Finally getting fed up with the various shortcomings of his leather and foam foot, he designed, tweaked, printed and tested his own replacement!
After using Structure Sensor to scan both his feet, [Nerraw99] began tooling around with the model in Blender and 3D printing them at his local fablab/makerspace: MakerLabs. It ended up taking nearly a dozen printed iterations — multiple printing issues notwithstanding — to get the size right and the fit comfortable. Not all of the attempts were useless; one version turned out to be a suitable water shoe for days at the beach!
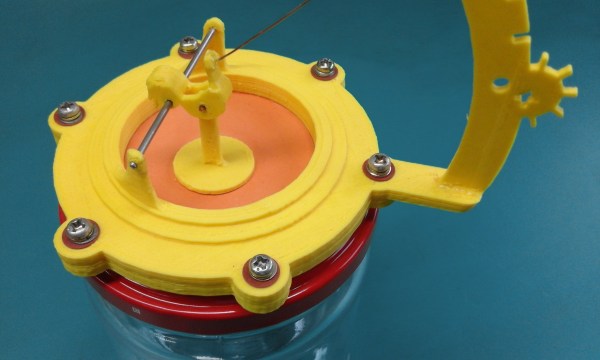
[Taciuc Marius] and his colleague noticed that days with low atmospheric pressure plus caffeine in their system meant a spike in blood pressure. Considering how this might impact his cardiovascular health, he decided to make a relative pressure barometer out of a jar to help him decide whether he should really have another cup of coffee.
Aside from a 3D printer, you’ll need to assemble a small jar with a lid, some screws, lock washers, nuts, and a flexible membrane — a piece of a rubber glove or balloon will do nicely. [Marius] details the build process on his project page, advising others to print the parts at 0.2 resolution — potentially even upping the extrusion multiplier to 1.1 — to prevent gaps in the print that would compromise the airtight seal needed for the barometer to work properly.
Additionally, thick glue or epoxy is recommended for the rest of the assembly process — it doesn’t have to be pretty, but it does need to be sealed! The final product can be easily tested by simply holding the jar.
While this barometer helps one make healthy choices, not all are created equal. This one tells you flat out how you should consider getting to work, while others have been tricked into behaving like touch sensors.
Open source software has unquestionably gone from fringe idealism to mainstream, even if the average person doesn’t really know it. From their web browser to their smartphone operating system, more people are running open source software today than at any other time in the history of computing, and the numbers are only getting bigger. While we can debate how well some companies are handling their responsibilities to the open source community, overall this is probably a lot closer to an open source utopia that many of us ever believed we’d get.
For argument’s sake, let’s say the software is settled. What’s next? Well, if we’ve got all the open source software we could ever ask for, naturally we now need to run it on open source hardware. Just like our software, we want to see how it works, we want to modify it, and to fix it ourselves if we want. These goals are precisely what [Lukas Hartmann] had in mind when he started work on Reform, the latest entry in the world of fully open source laptops.
A plate of fresh keycaps
Like the Novena that came before it, the Reform leverages the four-core ARM Cortex-A9 NXP i.MX6 SoC to deliver tablet-level performance, though [Lukas] mentions the design may migrated to the upgraded six-core version of the chip in the future which should give it a little more punch. The SoC is paired with the Vivante GC2000 GPU which can be used under Linux without any binary blobs. Most hardware is connected to the system via the USB 2.0 bus, though networking is provided by a ThinkPenguin mini PCI-e wireless adapter, and on-board SATA handles the 128 GB SSD.
While the internals are relatively run-of-the-mill these days, the work that [Lukas] has done on the case and input devices is definitely very impressive. He partnered with industrial designer [Ana Dantas] to get the look and feel of the system down, and built almost everything out of 3D printed parts. Even the keyboard caps and the trackball were manufactured in house on a Formlabs Form 2. Rather than using an off-the-shelf USB HID solution, [Lukas] is using Teensy LC boards to interface the custom input hardware with the OS.
[Lukas] is still working on how and when the Reform will be made available to the public. After some refinements, the team hopes to make both kits and individual parts available, and of course put all the files up so you can build your own if you’ve got the equipment. A mockup Amazon listing for the Reform has been posted to get the public’s feedback on the look and features of the machine, and [Lukas] asks that anyone with comments and suggestions send him an email.
For the last couple years, a MakerBot press release has generally signaled that more pink slips were going to be heading out to the already shell-shocked employees at their NYC factory. But just last week something that could almost pass as good news came out of the once mighty 3D printer manufacturer, the unveiling of “MakerBot Labs”. A number of mainstream tech sites heralded this as MakerBot’s first steps back into the open source community that launched it nearly a decade ago; signs of a newer and more thoughtful MakerBot.
Reading the announcement for “MakerBot Labs”, you can almost believe it. All the buzz words are there, at least. In fact, if this announcement came from anyone else, in any other field, I’d probably be on board. Sharing knowledge and listening to the community is essential if you want to connect with hackers and makers. But this is MakerBot, and they’ve dug themselves into a very deep hole over the years.
The spectacular fall from grace that MakerBot has experienced, from industry leader to afterthought, makes this hat-in-hand peace offering hard to take seriously. It reads like a company making a last ditch effort to win back the users they were so sure they didn’t need just a few years ago. There is now a whole new generation of 3D printer owners who likely have never even seen a MakerBot printer, and it’s hard to imagine there’s still enough innovation and life in the company to turn that around before they completely fade into obscurity.
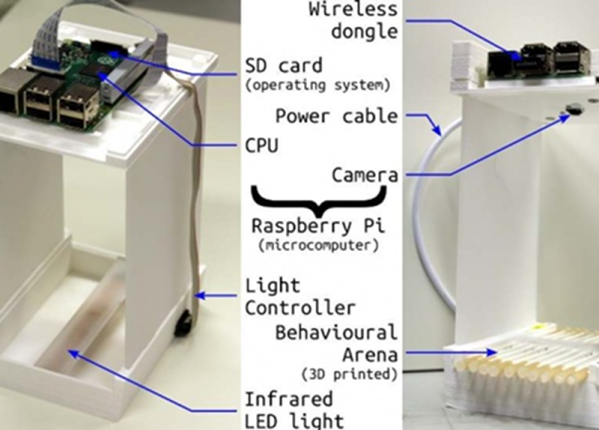
Groucho Marx famously said, “Time flies like an arrow, but fruit flies like a banana.” As insulting as it is, researchers often use fruit flies for research because they have similar behavior and genetics to humans. For example, the flies exhibit signs of anxiety, stress, and many common diseases. Researchers at Imperial College London built an inexpensive and customizable research platform for fruit flies — the ethoscope — that uses a 3D printed enclosure and a Raspberry Pi to study our winged counterparts. You can see a video about the ethoscope, below.
By using a camera, the Pi can watch the flies, something researchers used to do by hand. The software is easy to customize. For example, while studying sleep deprivation, the ethoscope could detect when a fly didn’t move for 20 seconds and rotate its tube to wake it up.
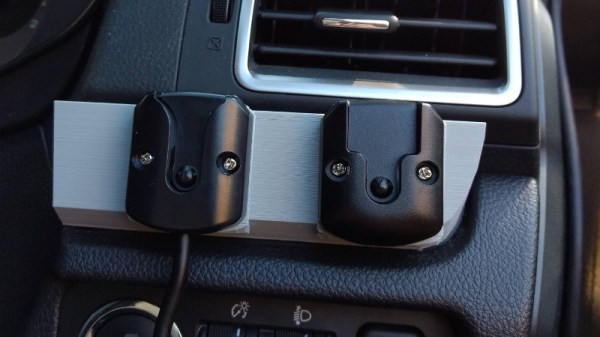
Some may be surprised to hear that CB radio is alive and well in the 21st century. From disaster response to operating in areas without reliable communication infrastructure, there are plenty of reasons people are still reaching for their radio and not their smartphone. Unfortunately, modern automotive interior design doesn’t have such an enlightened view. It’s hard enough to get decent cup holders in some cars, let alone a spot to hang your microphone.
When presented with this problem in his Subaru Forester, [Alex Loizou] did what any modern hacker would, he 3D printed a mount that snaps into the stock dash. No drilling was required to attach his radio mount, it simply replaces a decorative trim piece that wasn’t doing anything anyway. Obviously this particular mount would only really work on the same year and make of vehicle as [Alex] has, but this is a good demonstration of how 3D printing can be used to adapt to existing hardware.
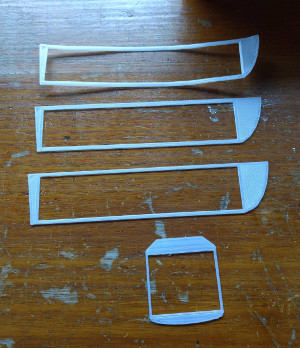
As is often the case when trying to print something to match perfectly with an existing object, there was a fair amount of trial and error required. It took a few attempts before [Alex] got the proper shape, and things weren’t made any easier by the fact he was doing his designing in TinkerCAD. While we appreciate the fact that TinkerCAD provides a web-based CAD tool that is easy enough for anyone to use, using a parametric design tool like OpenSCAD is generally preferred when you need to make slight adjustments to your model.
Software limitations aside, [Alex] managed to come up with a mount that not only holds his CB microphone, but also his handheld transmitter. All while looking about as close to stock hardware as something like this could. We especially like that he switched to a darker filament color for his final version to blend it into the dashes color scheme a bit better.
Even the staunchest 3D printing supporter would have to concede that in general, the greatest strength of 3D printing is not in the production of final parts, but in prototyping. Sure you can make functional prints, as the pages of this site will attest; but few would argue that you wouldn’t be better off getting your design cut out of metal or injection molded if you planned on putting the part into service over the long term. Especially if the part was to be subjected to rough service in an industrial setting.
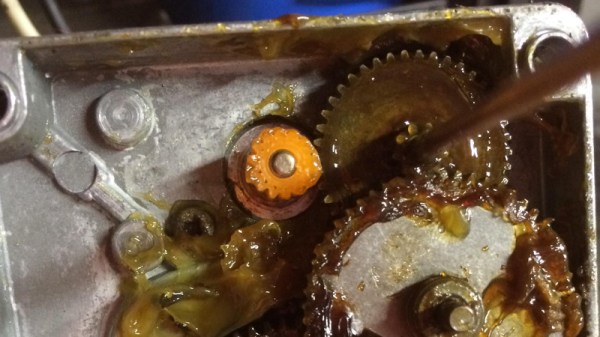
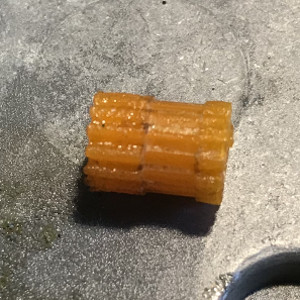
While that’s valid advice, it certainly isn’t the definitive word on the issue. Just because a part is printed in plastic on a desktop 3D printer doesn’t necessarily mean it can’t be put into real service, at least for as long as it takes to get proper replacement parts. A recent success story from [bloomautomatic] serves as a perfect example, when one of the gears in his MIG welder split, he decided to try and print up a replacement in PLA while he waited for the nylon gear to get shipped out to him. Fast forward seven months and approximately 80,000 welds later, and [bloomautomatic] reports it’s finally time to install those replacement gears he ordered.
In the pictures [bloomautomatic] posted you can see the printed gear finally wore down to the point the teeth were essentially gone where they meshed with their metal counterparts. To those wondering why the gear was plastic to begin with, [bloomautomatic] explains that it’s intended to be a sacrificial gear that will give way instead of destroying the entire gearbox in the event of a jam. According to the original post he made when he installed the replacement gear, the part was printed in Folgertech PLA on a Monoprice Select Mini. There’s no mention of infill percentage, but with such a small part most slicers would likely have made it essentially solid to begin with.