With more and more previously industrial processes coming online in the home shop, people are finding that getting the information that was previously provided by the manufacturer of a hundred thousand dollar machine for their three hundred dollar Shenzen special is not easy.
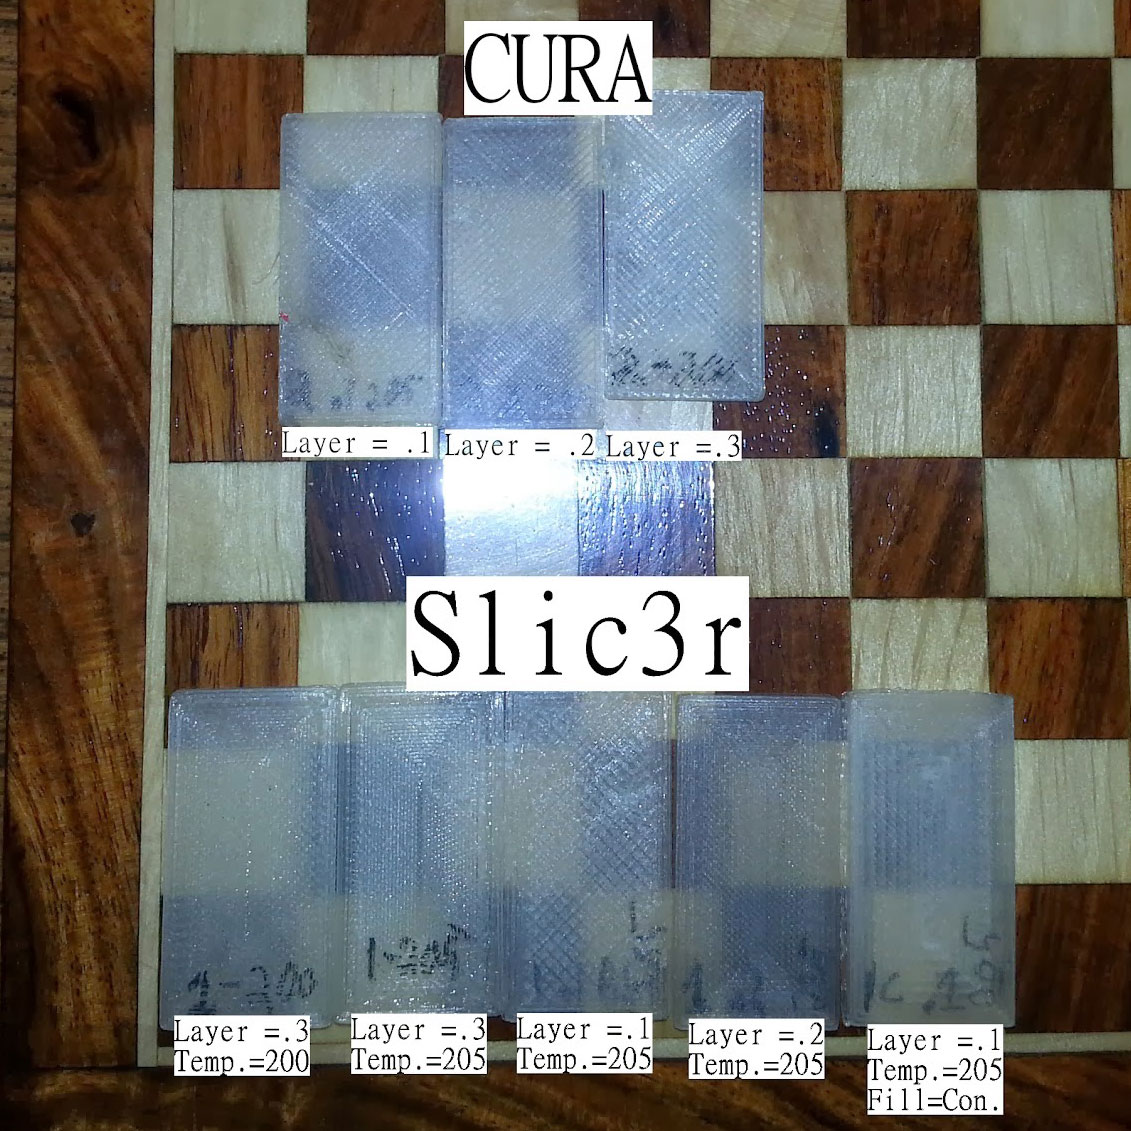
A common example is this, a hacker purchased themselves a brand new 3D printer off amazon for a price too good to be true. After a week of tinkering with it, a small fire, and a few replacement parts later, they get it to work. After they’ve burned through, perhaps literally, the few hundred grams of filament that came with the printer at the setting recommended by the manufacturer, they do a small blanket order of the different filaments out there. Now comes the trouble, each printer is a little different and each filament has different properties. Most people find that the second spool of filament they feed into their printer doesn’t work at all. What’s the quickest way to get the right temperature, cooling, and feed settings for your printer configuration?
This isn’t a problem for the expensive machines. Epilog, a manufacturer of laser cutters, provides a grid of settings for each material you’re likely to cut, tuned to the different properties of each model of laser cutter they sell. Same goes for the expensive industrial 3D printers, each (very expensive) spool of material has the setting sitting in a chip in the casing. When the spool is slotted in the machine, it reads the settings and adjusts accordingly. All the work of tuning was done in a lab somewhere and the print is, theoretically, guaranteed.

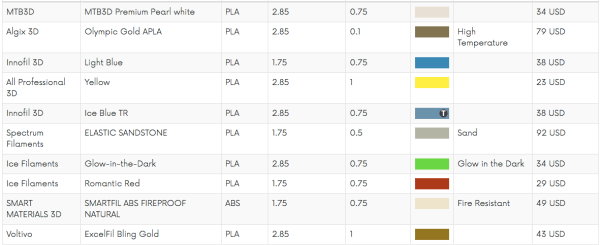
While we were at the Bay Area Makerfaire 2016, we had a chance to talk to [Gauthier de Valensart] and buy him a beer at the Hackaday Meet-up. [Gauthier] is from Belgium where he is the founder of a start-up with one of those fancy new TLDs: filaments.directory. The goal of filaments.directory is to create a database of 3D printer materials and link that up with a user’s 3D printer settings. The eventual goal being, much like the industrial printers, a user would be able to simply scan a barcode, or wave the spool over an RFID reader to input the needed settings into his slicing software or printer.
This sounded familiar to me, not the least because I had started work on it as an extension for repables.com when that was a larger focus in my life. In fact, I remember, while I was kicking the idea around to people at MRRF, that they kept telling me someone else was working on a similar project. I wanted to introduce [Gauthier] to the person who was working on the project back then. Since I was at a bar full of people in the industry, I sort of helplessly rotated in my spot trying to find someone who might remember. I spied [whosawhatsis], a common attendee of MRRF, and asked him. Okay, that was easy, [whosawhatsis] informed us that is was his project… introduction complete. Goes to show you what a good networking event buying a bunch of nerds beer can be.
The project was called, “Universal Filament Identification System,” and it proposed to, “… eliminate the guess-work,” by, “…developing a method for tagging, tracking, and identifying filament for 3d printing in machine-readable formats…” The project appears to be mostly dead now and its domain is a placeholder. I think it suffered from the standard open source feature creep, but the idea is sound.
Which gets us to the questions. There are a lot of difficulties with creating such a system. The first being the data collection. Who should be responsible for measuring the filaments, the materials for laser cutting, or any other process that needs tuned settings? The ideal track, of course, would be for the manufacturers to hold themselves accountable and report on the settings for their filaments. However, many filament manufacturers rely on the ignorance of users to sell dodgy products, it’s only in the interest of a few top-quality ones to do so. If the users do so, then how will the information provided be vetted? You definitely don’t want someone’s ignorance about a faulty thermistor to encourage you to run PLA at 280C.
More and more difficulties arise. How should the information be transferred, etc. What properties should even be recorded? UFID was going as far as to use a color sensor to keep track of colors between batches from 3D printer manufacturers. In the end it’s about creating standards in a standard-less industry by using crowdsourcing. Either way, take a look at what [Gauthier]’s doing (and send him some feedback), read the backlogs of UFID, think about how annoying it was to get the right settings for a laser cutter the last time you used one, and let us know your thoughts in the comments.


 [Bokononestly] decided to