Hackaday Prize Entry: A Broke Hackers’ Model Train

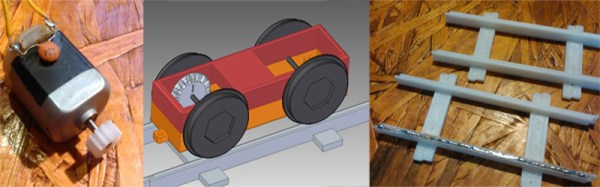
Model railroads are the wellspring of hacker culture; the word itself comes from the MIT Tech Model Railroad Club sometime in the early 60s. These old timers at MIT had incredible resources available to them – multimillion dollar computers, vast amounts of plywood, and real metal tracks to run their trains on. [Szabolcs] doesn’t have any of this, so for his Hackaday Prize entry he’s building the Broke Hackers’ Model Train layout.

Nothing except for the most basic components in this train layout is pre-bought. The tracks are 3D printed, motor control is done through homebrew electronics, and the locomotives will be controlled through a custom protocol. It’s the apex of a hacker’s model train layout, and when you consider how much effort goes into building a normal train layout, [Szabolcs] is looking at a lot of work.

With all the work ahead of him, things haven’t exactly gone smoothly for [Szabolcs]. To print off all the parts for this project, he bought a Makibox, one of the biggest failures in the world of crowdfunded 3D printers ever. The company doesn’t exist anymore, so [Szabolcs] shelled out the cash for an i3 clone. The new printer works great and plastic parts are coming out. A little hiccup, but a great example of what it takes to put a project together for The Hackaday Prize.


The 2015 Hackaday Prize is sponsored by:

LEGO NES Controller

Large NES Controller Made From LEGOs

If LEGO are cool, and abnormally large NES controllers are cool, then what [Baron von Brunk] has created is pretty dang cool. It’s a super large functional NES game controller…. made out of LEGO! Yes, your favorite building blocks from the past (or present) can now be use to make an unnecessarily large game controller.

lego-nes-internals
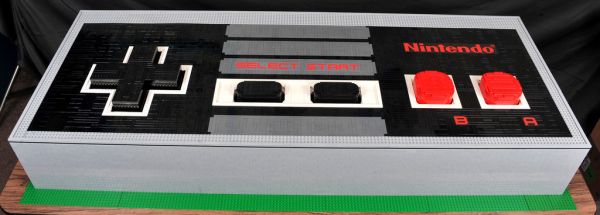
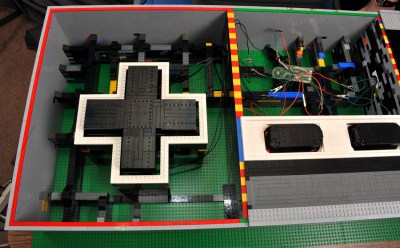
The four main sides of the controller case are standard stacked grey LEGO bricks. The inside of the case is mostly hollow, only with some supporting structures for the walls and buttons. The top is made from 4 individual LEGO panels that can be quickly and easily removed to access the interior components. The large LEGO buttons slide up and down inside a frame and are supported in the ‘up’ position care of some shock absorbers from a Technic Lego set. The shocks create a spring-loaded button that, when pressed down, makes contact with a momentary switch from Radio Shack. Each momentary switch is wired to a stock NES controller buried inside the large replica. The stock controller cord is then connected to an NES-to-USB adapter so the final product works with an NES Emulator on a PC.

[Baron von Brunk] is no stranger to Hackaday or other LEGO projects, check out this lamp shade and traffic light.

Continue reading “Large NES Controller Made From LEGOs”

A Nokia Shield For The Arduino

The Nokia 3100 is a classic in the circles we frequent. The LCD in this phone is a very cheap and very common display, and it was one of the most popular phones since the phone from Bell, making it a very popular source of cool components.

Now everything is an Internet of Thing, and cellular data for microcontroller projects is all the rage. [Charles] thought it would be interesting to use the famous Nokia 3100 to transmit and receive data. After battling with some weird connectors, he succeeded.

The Nokia 3100 doesn’t have a USB connector, as this phone was made before the EU saved us from a menagerie of cell phone chargers. Instead, this phone has a Nokia Pop-Port, a complex connector that still has TX and RX pins running at 115,200 bit/s 8N1. By fitting a USB socket onto a prototyping board, adding a few level shifters, and connecting the pins in the right order, [Charles] was able to get his Arduino talking to an old Nokia Brick.

[Charles] isn’t quite at the level of sending SMS from his confabulation, and even following a tutorial from [Ilias Giechaskiel] didn’t work. [Charles] is looking for help here, and if you have any suggestions, your input would be appreciated.

There is a problem with using a Nokia 3100 as a cheap Arduino cellular shield: it’s only 2G, and sometime soon those cell towers will be shut down. For now, though, it works, and once those 2G towers are shut down, there are plenty of options with cheap, early Android and iOS phones.

$50k In Play: 20 Bulbdial Clock Kits

For this week we’re veering away from our habit of giving away things to help with your build and giving away something fun. 20 Hackaday Prize entries will receive a Bulbdial Clock kit. Getting into the running is easy, start your project on Hackaday.io and make sure you officially submit it to the Hackaday Prize. Get it in by next Wednesday to be considered for this week’s prizes, and you’ll also be in the running each week after that as we work our way through $50,000 in prizes this summer before giving away the big stuff like a Trip into Space and $100,000 in cash.

The Bulbdial Clock has been a favorite of ours for years. Developed by Hackaday Prize Judges [Windell] and [Lenore] at Evil Mad Scientist Labs, it uses three rings of colored LEDs to cast shadows as clock hands. It’s a fun solder kit that will take time to assemble. In keeping with that ideal, your best bet at scoring one this week is to post a new project log showing off the solder work you’ve done on your prototype. If you don’t have one soldered yet, that’s okay too. Just post a new project log that talks about the component assembly you’ll be working on. This would be a great time to finally draw up a basic schematic, right?

Last Week’s 40 Winners of $50 Shapeways Gift Cards

50k-in-play-shapeways-blogview

Congratulations to these 40 projects who were selected as winners from last week. You will receive a $50 gift card from Shapeways so that you can get your custom parts 3D printed. We were on the lookout for projects that we thought would benefit most from custom parts. Some of these are far along in their development, some have just started, but all of them are awesome so browse the list and make sure to skull and follow the ones you like!

Each project creator will find info on redeeming their prize as a message on Hackaday.io.


The 2015 Hackaday Prize is sponsored by:

Interactive Robot: Project Naughty Ball

A month before the Bay Area Maker Faire, there were ominous predictions the entire faire would be filled with BB-8 droids, the cute astromech ball bot we’ll be seeing more of when The Force Awakens this December. This prediction proved to be premature. There were plenty of R2 units droiding around the faire, but not a single BB-8. Perhaps at the NYC Maker Faire this September.

skeletonRegarding ball bots, we did have one friendly rolling companion at Maker Faire this year. It was a project by UC Davis students [Henjiu Kang], [Yi Lu], and [Yunan Song] that rolls around, seeking out whoever is wearing an infrared ankle strap. They team is calling it Project Naughty Ball, but we’re going to call it the first step towards a miniature BB-8 droid.

The design of the Naughty Ball is somewhat ingenious; it’s set up as a two-wheel balancing bot inside a clear plasic sphere. A ton of batteries work well enough as the ballast, stepper motors and machined plastic wheels balance and steer the ball bot, and the structure on the top hemisphere of the ball houses all the interesting electronics.

There is a BeagleBone Black with WiFi adapter, a few motor drivers, an IMU, and a very interesting 3D printed mount that spins the robot’s eyes – infrared cameras that spin around inside the ball and track whoever is wearing that IR transmitting ankle band.

As far as robotics project go, you really can’t do better at Maker Faire than a semi-autonomous ball bot that follows its owner, and the amount of work these guys have put into this project sends it to the next level. You can check out a video description of their project below.

Caption CERN Contest – Not Your Father’s POV Display

Accidents happen – but the awesome quotes you all sent in for Week 15 of the Caption CERN Contest were no accident. A huge thank you for our biggest week yet! The scientists in this week’s image are definitely cleaning up after some type of nasty accident. At first blush it looks like an electrical problem in the coils of what appears to be part of a beam line. With all that soot and radiation dangers to boot, only the photographer and the people in the image know for sure!

The Funnies:

  • “This is the second server these idiots have fried! What the hell’s a Hulu, and why are they trying to watch Gilligan’s Island with it?” Thanks to some unplanned quantum tunneling, Berners-Lee was even further ahead of his time than he thought” – [The Green Gentleman] (Two weeks in a row!)
  • “I found the bug. Who gets to tell Joe he’s sterile?”- [jonsmirl]
  • “‘I told the Captain that she couldn’t take any more’ – Scotty” – [md_reeves]

The winner for this week is [Mr. mmWave] himself, [Tony Long] with “Hardware Accelerator moto – Fail Fast, Fail Often. Also applies to Accelerator Hardware.” [Tony] will be debugging his next microwave mm band ham radio with a Logic Pirate From The Hackaday Store! Congratulations [Tony]!

Week 16: This is not your father’s POV Display!

cern-16-smScientists at CERN have come up with some amazing science advancements. They’ve also needed ways to display the data they collect. This image may depict some incredible new way to display data collected from a high power physics experiment – or it could be a scientist’s project for the CERN science fair. We may never know.

The album is titled CHAMBRE A ETINCELLES DANS EXPO TECHNOL, which roughly translates to “Sparks in the technology expo room”. The lines traveling between the three horizontal display devices definitely appear to be aligned. Are they sparks of electricity? You tell us!

buspirate2
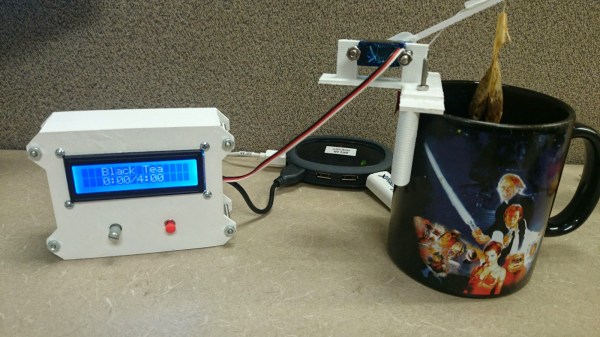
Last week’s prize was a Logic Pirate. This week we’re giving away a Bus Pirate from The Hackaday Store.

Add your humorous caption as a comment to this project log. Make sure you’re commenting on this contest log, not on the contest itself.

As always, if you actually have information about the image or the people in it, let CERN know on the original image discussion page.

Good Luck!

Automatic Tea Maker

Steeping Tea Perfectly With An Arduino

While most of us here at Hack a Day can’t live without our daily java, we do understand and respect the tea drinking hackers out there, like [Brian McEvoy] the 24 Hour Engineer. Like any self-respecting hacker, [Brian] seeks to improve the efficiency of day-to-day tasks in order to spend his time on things that really matter — so he decided to automate his tea cup.

He’s 3D printed a small tea-bagging mechanism that a little RC servo motor can actuate, which allows him to control the amount of time a tea bag spends steeping in his mug. Another 3D printed enclosure includes the Arduino, a few buttons, and an LCD screen to allow you to select the steeping time for your favorite herb. In fact, the majority of this project is 3D printed which means the majority of the cost comes from the minimal electronics required — stuff you probably already have lying around. He’s also included all the design files you need in order to make your own.

The project has been in process for a while, but he’s finally finished it off, and it works great. If you’re hungry for some of the nitty-gritty build logs and troubleshooting a long the way, he’s got a whole bunch of blog posts from throughout the process.

Continue reading “Steeping Tea Perfectly With An Arduino”