Have you ever read about something and thought, “Gee whiz! Why did I never think about that?” That was my reaction to reading about a feature commonly associated with Klipper called adaptive bed leveling or adaptive mesh leveling. Too bad I don’t typically use Klipper, but it all worked out, and I’ll show you how it might work for you.
What Is It?
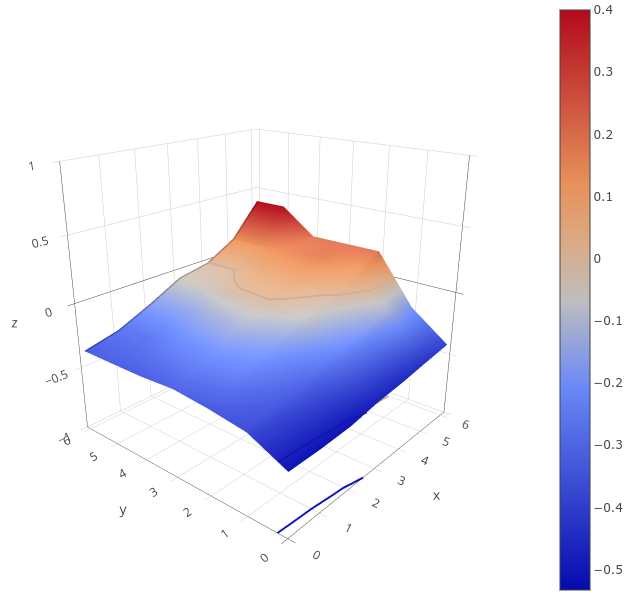
Once a luxury, most 3D printers now come with some kind of bed level sensor. The idea is that the printer can probe the bed to determine the shape of the build plate and then adjust the build plate accordingly. So if a particular spot on the bed is 0.5 mm too high, the nozzle can rise 0.5 mm when it is in that area. There are several techniques Marlin firmware uses, including what I usually use: UBL. Some people scan the bed once and hope it won’t change much. Others will do a time-consuming scan before each print.
However, adaptive bed leveling is a bit different. The idea is that the printer only probes the area where the part is going to print. If your print bed is 235 mm x 235 mm but your part is 50 mm square, you could just probe the points under the 50 mm square.
This does several things. For a given number of points, there is less motion, so it should be faster. Also, for the same number of points, you will have a much denser mesh and, thus, a better idea of what the bed is at any given point. You could even reduce the number of points based on the size of the part you are printing.
When you think about it, it is a dead simple idea. What’s not to love? For most print jobs, you’ll have less work for the printer, faster prints, and a denser mesh. But how do you do it?