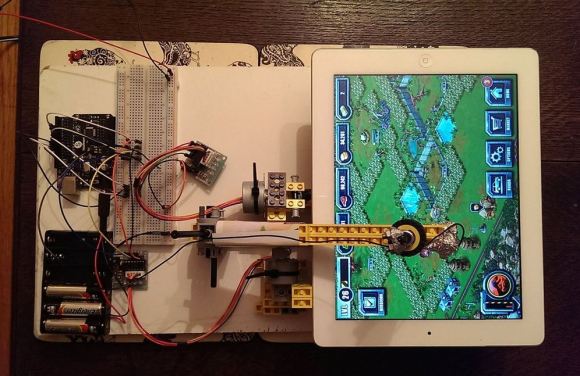
Generating Embroidery With An Arduino

Arduino Embroidery Generation

Want a nifty way to combine the craft of embroidery with electronics? The folks working on the open source Embroidermodder demoed their software by generating an embroidery of the KDE logo using a TFT screen and an Arduino.

Embroidermodder is an open source tool for generating embroidery patterns. It generates a pattern and a preview rendering of what the embroidery will look like when complete. It’s a cross-platform desktop application with a GUI, but the libembroidery library does the hard work in the background. This library was ported to Arduino to pull off the hack.

While generating pictures of embroidery with an Arduino might look neat, it isn’t too useful. However, since the library has been ported it is possible to use it to control other hardware. With the right hardware, this could be the beginning of an open source embroidery machine.

After the break, check out a video of the pattern being generated.

Continue reading “Generating Embroidery With An Arduino”

Robot Controller More Fun Than An Actual Wii-U

wii-u-bot-controller

Okay, that’s probably not fair since we never gave the Wii-U a try at all. But doesn’t this seem like a much better idea for controlling a robot than playing a gaming console?

The photo above is a bit deceiving because the unit actually has quite a bit of depth. Despite that, the cleanliness of the build is very impressive. [Alec Waters] started off with a backup monitor meant for automotive use (we’d estimate 7″). There’s a radio receiver, two analog joysticks where your thumbs line up when holding the controller, and an Arduino to pull it all together. If you haven’t figured it out already, this displays the wireless video from the robot he’s controlling. He’s also include an auxiliary port which lets you bypass the radio receiver and plug in a video feed directly.

Still convinced you need Nintendo’s consumer controller with a built-in screen. Yes, that can be hacked to work with all your projects. But seriously, this is way more fun.

A Clock That Plots Time

[Johannes] just sent us a tip about his small plotter that plots out the current time.

[Johannes] small clock plotter uses a dry wipe pen to write out the time on a small piece of dry erase board. The design is Made of three small 9g servos, with one to lift the pen off the writing surface and the other two to control a pair of connected jointed arms for the x and y-axis.

The little robot painstakingly wipes away the previous time before scrawling the current time in its place (with minute accuracy).

[Johannes] had hackability in mind when creating this project, making sure to keep to standard parts and making the code and design files available. The hardware for the build can be laser cut or 3D printed. The Arduino sketch can be found on GitHub and the design files can be found on Thingiverse. There are more detailed build instructions on Nuremberg’s FabLab page (translated).  Continue reading “A Clock That Plots Time”

Update: Tetris Handheld Get PCB And Case

update-handheld-tetris

Check out this sweet-piece of homemade handheld gaming! [Jianan Li] has been hard at work on the project and published the updates in two parts, one that shows off the PCB he had fabbed for the project, and another which details the 3D printed case. This is, of course, is the culmination of the Tetris project we first saw as an incredbily packed, yet thouroughly tidy breadboarded circuit.

We really enjoy the 8-sided PCB design which hosts all the parts and gives you a place to hold and control the unit, all without seeming to waste much real estate. The case itself is quite impressive. The openings for the square-pixel LED matrices (the original design had round pixels) and the bar graphs all have nice bevel features around them. The control area has a pleasant swooping cutout, with blue buttons which stand out nicely against the red. Check out the slider switch by his left thumb. He printed matching covers for this slider, and the two that stick out the bottom. Also on the bottom are female pin headers so that you don’t need to disassemble the case to interface with the electronics.

All of this and more are shown off in the clip after the break.

Continue reading “Update: Tetris Handheld Get PCB And Case”

Introducing The SquareWear Mini, With Its Chainable Color LED Matrix

[Ray] just tipped us about his latest project: the SquareWear Mini, which basically is an improved version of the SquareWear 2.0 that we featured a month ago. For our readers that may have missed it, the SquareWear is essentially a wearable Arduino platform running at 3.3V and 12MHz. Both versions are based on an ATMega328 microcontroller running the V-USB library to provide USB connectivity, put together with diverse onboard peripherals.

As you can see in the picture above, the Mini includes 2 N-MOSFETs, one temperature sensor, one light sensor, a 16KB EEPROM memory, one buzzer, a one cell LiPo battery connector together with one charging controller, and finally a power switch (USB/battery). It is supposed to be 25% smaller than the SquareWear 2.0 and is optimized to work with a WS2812B-based 5×7 RGB LED matrix that [Ray] also designed. The latter can easily be cascaded in X/Y directions with other LED matrices in order to expand the overall display.

At last, [Ray] created a software to design animations and upload them to the SquareWear . A presentation video of the complete system is embedded after the break and you can download all the design files on GitHub.

Continue reading “Introducing The SquareWear Mini, With Its Chainable Color LED Matrix”

Upgrading Home Automation To Home Anticipation

geofencingHomeAnticipation

[Bithead’s] already built some home automation to control the lighting and temperature in his house while he’s away, but he wanted to take things a step further and have the house automatically anticipate his arrival and adjust the environment accordingly. The project takes advantage of geofencing to create a perimeter around the home that listens for a transceiver in [Bithead’s] car. We featured a similar project with a Raspi a few months ago, which locked the doors upon driving away.

[Bithead’s] implementation uses a pair of Digi Xbee Pro XSC radios with U.FL antennas to provide an impressive 2+ mile range of communication. The home-based Xbee hooks up to a Parallax Xbee USB adapter and subsequently into his computer—its antenna sits in a nearby window on the top floor of his house to maximize range. For his car, [Bithead] originally opted for an Xbee shield and an Arduino Uno, but he’s recently overhauled the build in favor of an Arduino Fio, which reduced the footprint and increased the range. Check out his page for the build log specifics and more pictures.

Pneumatic Powered Flight Simulator

FX7UCGEHK6XMQ3G.MEDIUM

Remember that feature a few days ago about the Cessna 172 flight simulator? It was pretty awesome. But do you know what it was missing? It was missing this. A fully motion-controlled, pneumatically driven, flight simulator cockpit.

[Dominick Lee] is a high school senior, and he was able to whip together this awesome flight simulator made out of PVC pipe, pneumatic cylinders, an Arduino, a projector, and a gaming PC — in just a few months time! He calls it the LifeBeam Flight Simulator, and he’s released all the information required to make one yourself.

It’s most similar to a Stewart platform simulator, which features 2 degrees of freedom, but instead of 6 actuators, this one runs on only two pneumatic cylinders. It works by exporting the roll and pitch (X and Y) data from the game, and then parsing it to an Arduino which controls the pneumatic valve amplifier, powering the cylinders.

It’s an amazing project, and it sounds like [Dominick] had an awesome physics professor, [Dr. Bert Pinsky], to help mentor him. Don’t forget to check out the demonstration video!

Continue reading “Pneumatic Powered Flight Simulator”