You may have heard of the “cheap yellow display” (CYD), so-called due to the board’s typical color. It’s a dodgy cheapo board with, among other things, TFT display, touchscreen, and ESP32 built-in. You can learn more about the CYD over here: Getting Started with ESP32 Cheap Yellow Display Board – CYD (ESP32-2432S028R).
In this build eight AA batteries are used to deliver 12 volts to operate a solenoid controlling a latch and 5 volts for the microcontroller. The encasing is clear in order to entice players in an escape-room style sitting. The custom software is included down the bottom of the project page and it is also available from arduino.cc, if that’s your bag.
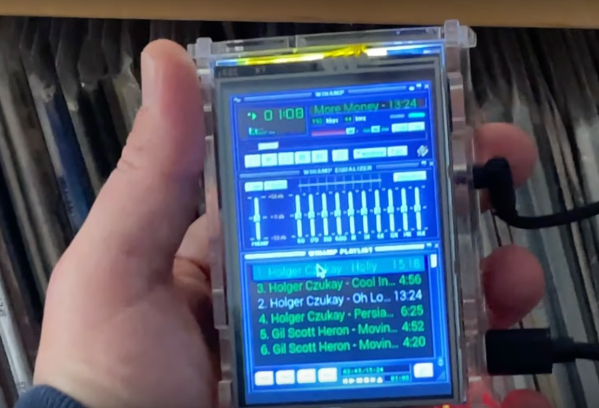
In the late 90s as MP3s and various file sharing platforms became more common, most of us were looking for better players than the default media players that came with our operating systems, if they were included at all. To avoid tragedies like Windows Media Center, plenty of us switched to Winamp instead, a much more customizable piece of software that helped pave the way for the digital music revolution of that era. Although there are new, official versions of Winamp currently available, nothing really tops the nostalgia of the original few releases of the software which this project faithfully replicates in handheld form.
The handheld music player uses a standard Raspberry Pi (in this case, a 3B) and a 3.5″ TFT touchscreen display, all enclosed in a clear plastic case. With all of the Pi configuration out of the way, including getting the touchscreen working properly, the software can be set up. It uses QMMP as a media player with a Winamp skin since QMMP works well on Linux systems with limited resources. After getting it installed there’s still some configuration to do to get the Pi to start it at boot and also to fit the player perfectly into the confines of the screen without any of the desktop showing around the edges.
Although it doesn’t use the original Winamp software directly, as that would involve a number of compatibility layers and/or legacy hardware at this point, we still think it’s a faithful recreation of how the original looked and felt on our Windows 98 machines. With a battery and a sizable SD card, this could have been the portable MP3 player many of us never knew we wanted until the iPod came out in the early 00s, and would certainly still work today for those of us not chained to a streaming service. A Raspberry Pi is not the only platform that can replicate the Winamp experience, though. This player does a similar job with the PyPortal instead.
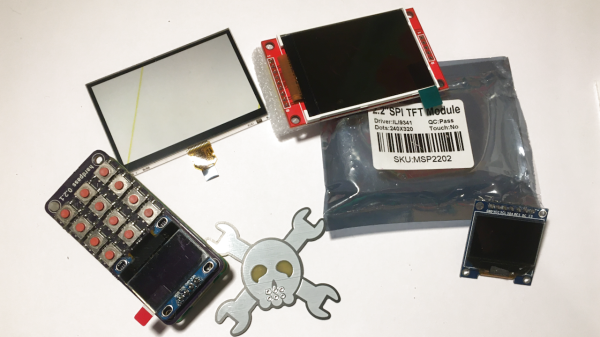
I’ve talked about HD44780 displays before – they’ve been a mainstay of microcontroller projects for literal decades. In the modern hobbyist world, there’s an elephant in the room – the sheer variety of I2C and SPI displays you can buy. They’re all so different, some are LCD and some are OLED, some have a touchscreen layer and some don’t, some come on breakouts and some are a bare panel. No matter which one you pick, there are things you deserve to know.
These displays are exceptionally microcontroller-friendly, they require hardly any GPIOs, or none extra if you already use I2C. They’re also unbelievably cheap, and so tiny that you can comfortably add one even if you’re hurting for space. Sure, they require more RAM and a more sophisticated software library than HD44780, but with modern microcontrollers, this is no problem at all. As a result, you will see them in almost every project under the sun.
What do you need for those? What are the requirements to operate one? What kind of tricks can you use with them? Let’s go through the main aspects.
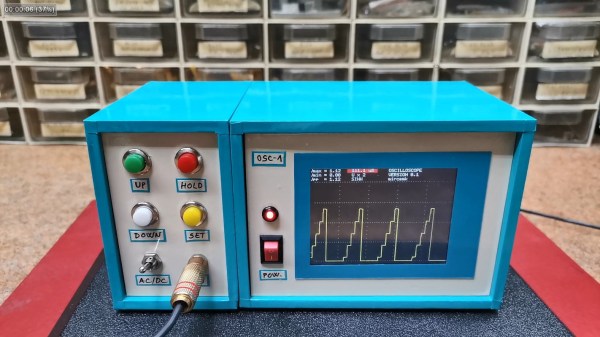
There’s no shortage of cheap digital oscilloscopes available today from the usual online retailers, but that doesn’t mean the appeal of building your own has gone away — especially when we have access to powerful microcontrollers that make it easier than ever to spin up custom gear. [mircemk] is using one of those microcontrollers to build an improved, pocket-sized oscilloscope.
The microcontroller he’s chosen is the STM32F103C8T6, part of the 32-bit STM family which has tremendous performance compared to common 8-bit microcontrollers for only a marginally increased cost. Paired with a small 3-inch TFT color display, it has enough functions to cover plenty of use cases, capable of measuring both AC and DC signals, freezing a signal for analysis, and operating at an impressive 500 kHz at a cost of only around $15. The display also outputs a fairly comprehensive analysis of the incoming signal as well, with the small scope capable of measuring up to 6.6 V on its input.
This isn’t [mircemk]’s first oscilloscope, either. His previous versions have used Arduinos, generally only running around 50 kHz. With the STM32 microcontroller the sampling frequency is an order of magnitude higher at 500 kHz. While that’s not going to beat the latest four-channel scope from Tektronix or Rigol, it’s not bad for the form factor and cost and would be an effective scope in plenty of applications. If all you have on hand is an 8-bit microcontroller, though, we have seen some interesting scopes built with them in the past.
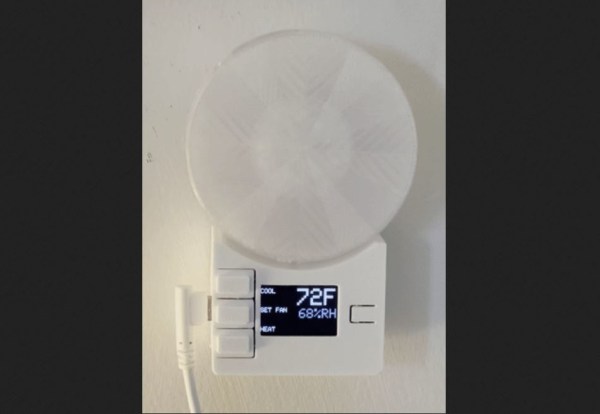
Heat pumps are taking the world by storm, and for good reason. Not only are they many times more efficient than electric heaters, but they can also be used to provide cooling in the summer. Efficiency aside, though, they’re not perfectly designed devices, largely with respect to their climate control abilities especially for split-unit setups. Many of them don’t have remotely located thermostats to monitor temperature in an area, and rely on crude infrared remote controls as the only user interface. Looking to make some improvements to this setup, [Danilo] built a setup more reminiscent of a central HVAC system to control his.
Based on an ESP32 from Adafruit with an integrated TFT display, the device is placed away from the heat pump to more accurately measure room temperature. A humidity sensor is also included, as well as an ambient light sensor to automatically reduce the brightness of the display at night. A large wheel makes it quick and easy to adjust the temperature settings up or down. Armed with an infrared emitter, the device is capable of sending commands to the heat pump to more accurately control the climate of the room than the built-in controls are able to do. It’s also capable of logging data and integrating with various home automation systems.
While the device is optimized for the Mitsubishi heat pumps that [Danilo] has, only a few lines of code need to be changed to get this to work with other brands. This is a welcome improvement for those frustrated with the inaccurate climate controls of their heat pumps, and since it integrates seamlessly into home automation systems could also function in tandem with other backup heat sources, used in cold climates when it’s too cold outside to efficiently run the heat pump. And, if you don’t have a heat pump yet, you can always try and build your own.
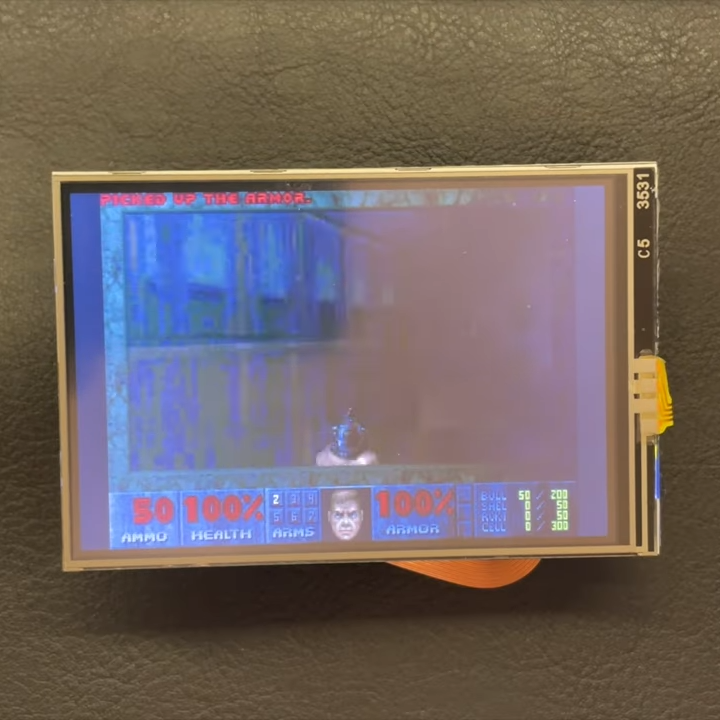
[atomic14] has been interested in wireless power for a while, and while most of the hardware he’s tested over the years has been less than impressive, he demonstrates one that’s able to reliably deliver 5 V at about 1 A which is more than enough to boot a Raspberry Pi W2 into X and launch DOOM. But while that’s neat, he explains that wireless power isn’t quite yet an effortless solution.
The hardware can deliver 5 V at about 1 A wirelessly, which is plenty, but coil alignment is critical to efficiency.
For one thing, the hardware he’s using — similar to those used for mobile phone charging — need the receiver to be very close to the transmitter. In addition, they need to be aligned well or efficiency drops off sharply. For mobile phones this isn’t much of a problem, but it’s difficult to position a Raspberry Pi and display just so when one can’t see the coils. Misalignment means brownouts and other unreliable operation.
So while the wireless power is capable of running the Pi directly, [atomic14] attempts to put a small battery and charger circuit into the mix in order to make the whole thing both portable and more reliable. But because nothing is easy, he discovers that his charging board — which should be able to output as low as 4.5 V — isn’t able to be adjusted down any lower than 5.66 V. It turns out that a resistor marked 104 (which should be 100 kΩ) is actually measuring 57 kΩ, and the trim pot doesn’t go lower than 10 kΩ. The solution is a bit of component swapping, but we suppose it’s a reminder that sometimes with cheap parts, one pays in other ways.
You can see [atomic14]’s wireless power Raspberry Pi running the classic shooter in the video below. Wireless power may have its issues, but it’s certainly a lot less messy than running DOOM with a gigantic potato battery.
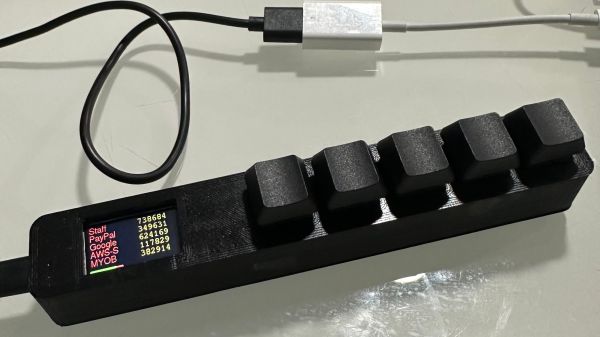
We all know the drill when it comes to online security — something you know, and something you have. But when the “something you have” is a two-factor token in a keyfob at the bottom of a backpack, or an app on your phone that’s buried several swipes and taps deep, inconvenience can stand in the way of adding that second level of security. Thankfully, this “2FA Sidecar” is the perfect way to lower the barrier to using two-factor authentication.
That’s especially true for a heavy 2FA user like [Matt Perkins], who typically needs to log in and out of multiple 2FA-protected networks during his workday. His Sidecar is similar in design to many of the macro pads we’ve seen, with a row of Cherry MX key switches, a tiny TFT display — part of an ESP32-S3 Reverse TFT Feather — and a USB HID interface. Pressing one of the five keys on the pad generates a new time-based one-time password (TOTP) and sends it over USB as typed keyboard characters; the TOTP is also displayed on the TFT if you prefer to type it in yourself.
As for security, [Matt] took pains to keep things as tight as possible. The ESP32 only connects to network services to keep the time synced up for proper TOTP generation, and to serve up a simple web configuration page so that you can type in the TOTP salts and service name to associate with each key. He also discusses the possibility of protecting the ESP32’s flash memory by burning the e-fuses, as well as the pros and cons of that maneuver. The video below shows the finished project in action.
This is definitely a “use at your own risk” proposition, but we tend to think that in the right physical environment, anything that makes 2FA more convenient is probably a security win. If you need to brush up on the risks and benefits of 2FA, you should probably start here.