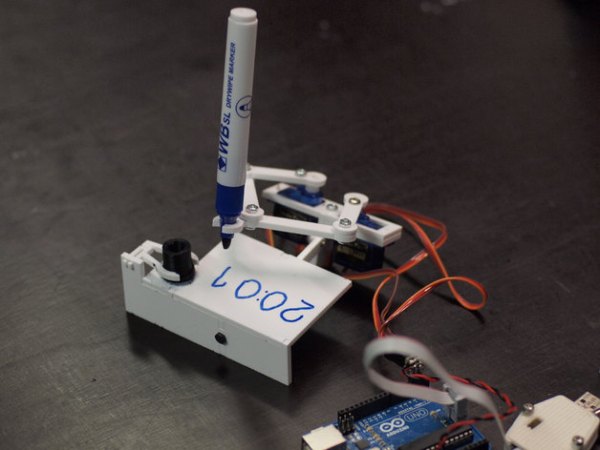
Tricked-out Arduino-controlled Time-Lapse Is More Than Just A Timer

arduinoPhotoRig

[Hlesliebole] wanted a finer degree of remote control over his time-lapse shots, so he decided to build an Arduino-driven infrared shutter. He ended up creating this killer Arduino-controlled photography rig that does a whole lot more.

This hack was built for [Hlesliebole]’s Nikon D3100, but he says it should work with any DSLR and remote shutter. This initial build uses an LED as a stand-in for the remote shutter that he ordered.  He intends to update the post once it arrives and he integrates it.

[Hlesliebole] wired a 7-segment display to show the current time delay between photos. This can be set on the fly with a potentiometer, so there’s no need to stop and reprogram the Arduino. And while you’re grabbing a beer and watching the sun slowly sink, the rig can better capture that sunset because of a photoresistor. It detects the ambient light level and minimizes the number of throwaway dark shots.

If that weren’t enough, he’s built servo functionality into the code to support remote control over the camera’s physical position, allowing for panning or rotation over a scene. [Hlesliebole] doesn’t go into detail, but he assures us that there are many tutorials out there.  If you think you’re man enough, you could always work in this outstanding versatile motion dolly hack.

Continue reading “Tricked-out Arduino-controlled Time-Lapse Is More Than Just A Timer”

DIY Hearing Aid

DIY Hearing Aid

Hearing aids are expensive little devices, typically costing a few thousand dollars each. They need to be highly integrated to fit in the ear, while still providing signal processing to ensure good audio quality.

This DIY hearing aid does some intelligent signal processing. It uses an electret to capture audio, then uses a pre-amplifier to increase the gain 100 times. The next stage consists of four filters, dividing the input signal by frequency into four parts. These are passed into four LTC6910 programmable gain amplifiers, which allow an Arduino to control the gain of each channel. The LTC6910 takes 3 digital inputs that are used to set the gain value.

To determine which gain to use for each frequency band, the Arduino needs to know how much power is in each band. This could be done using a Fast Fourier Transform, but that would require quite a bit of processing power. Instead, an envelope detector averages the signal, which can be read by an analog input on the Arduino. Using this information, the hearing aid can boost specific frequencies when it detects conversation.

This hearing aid won’t quite fit in your ear, but there is a lot of interesting signal processing going on. The schematic, Arduino source code, and a MATLAB simulation are provided.

Cast A Shadow, Play A Note

Looking for a way to entertain friends and family this holiday season? Look no further than the Arduino-powered Photocell Piano. [Asahillis] has posted this Instructable for building a 6-note musical command center.

The piano uses photoresistors to turn each note on when the player runs their hand over it. Notes can be tuned independently using potentiometers on the front of the box. The hack uses two circuits: one to generate the tones, and a second to mix them. [Asahillis] adapted [Forest Mims III]’s timeless schematics for the 555 Tone Maker and the 741 Audio Mixer to create his Photocell Piano.

When the instrument is powered on, the code takes a 5-second reading of the ambient light, and sets a threshold based on its findings. Afterward, the first note will sound, indicating the piano is ready to be played. Each note has its own if-else statement that tells it to sound when its corresponding  photoresistor reaches a value below the set threshold (when the player casts a shadow). There’s a demo video included in the guide but we couldn’t embed it here.  Check out the demo video after the break.

If you prefer to rock out with your lights out, there’s always this impressive laser harp.

Continue reading “Cast A Shadow, Play A Note”

Flying Spaghetti Monster Display

[Anthony Liekens], one of our favorite hackers from Belgium, recently completed this large (and awesome!) Flying Spaghetti Monster LED display!

With so many different holidays in December, [Anthony] decided he wanted his family to celebrate a slightly less traditional deity. The body is a massive 4′ by 8′ wooden board that we think [Anthony] cut out by hand, with a total of 300 RGB LEDs driven by an Arduino. Chicken wire mesh provides support for the LEDs in the FSM’s mouth and eyes. [Anthony] built everything in his very own backyard hackerspace called the Open Garage, which is a fantastic neighborhood hackerspace (and we should know—we stayed at his place during our European Hackerspace Tour!)

[Anthony] has a bunch of videos showing off the display on his personal YouTube channel, but stick around after the break for a quick sample that features the Flying Spaghetti Monster in the front window of his home.

Continue reading “Flying Spaghetti Monster Display”

Arduino Controlled Beer Brewing Machine!

[the_meatloaf] just put the final touches on his fully automated beer brewing machine using an Arduino.

The project was part of his computer engineering degree, and it took [the_meatloaf] and two mechanical engineer friends a year to design and build the entire system from scratch. An Arduino Mega with a 4-button interface allows you to program, save, load, rename, and run up to 26 different recipes saved to the EEPROM.

An automated system like this removes most of the guesswork from an otherwise complex brewing process. The machine starts by heating the water in the first keg using a 2000W heating element, after which the water transfers into the mash vessel via servo valves, where it’s stirred by a mixing motor. The machine then drains the wort (the resulting liquid after mashing) and sparges (adds more water to the mash tun) the grains as programmed: thanks, [Chris,] for clarification! The wort is brought to a boil for the programmed amount of time, while a servo-controlled “hopper” automatically adds the hops.  Finally, a counter-flow heat exchanger rapidly cools the solution to room temperature using ice water, then dispenses the solution for fermentation.

Though [the_meatloaf’s] biggest project to date was quite the accomplishment, he unfortunately won’t get to enjoy it. The sponsors who covered the $1000 budget reclaimed the machine. Drat.

[via Reddit]

Hacking A Reader For Medical Test Strips

med

[Rahul] works at a startup that produces cutting edge diagnostic test cards. These simple cards can test for enzymes, antibodies, and diseases quickly and easily. For one test, this greatly speeds up the process of testing and diagnosis, but since these tests can now be administered en masse, health services the world over now have the problem of reading, categorizing, and logging thousands of these diagnostic test cards.

The normal solution to this problem is a dedicated card scanner, but these cost tens of thousands of dollars. At a 24-hour hackathon, [Rahul] decided to bring down the cost of the card scanners by whipping up his own, built from a CD drive and an Arduino.

The card [Rahul] used, an A1c card that tests for glucose bound to hemoglobin, has a few lines on the card that fluoresce with different intensify depending on the test results. This can be easily read with a photodiode connected to an Arduino. The mechanical part of the build consisted of an old CD drive with a 3D printed test strip adapter. Operation is very simple – just put the test strip in the test strip holder, press a button, and the results of the test are transmitted over Bluetooth.

Not only is [Rahul]’s build extremely simple, it’s also extremely useful and was enough to net him the ‘Most Innovative Project’ prize at the hackathon in his native Singapore.

Portable Musical Stairs

musical stairs

[Amir] recently finished a pretty cool project — Portable Musical Stairs! He designed and built it so it could be temporarily installed in schools for musical therapy sessions with autistic children — a fun activity for all ages!

The system utilizes lasers and photo sensors that come with a built in digital output with a sensitivity potentiometer, which makes it super easy for the Arduino Leonardo to interpret. The reason they are using 2 by 4’s for the system is because of the width of the stairs. At 1.75m across, a laser misaligned by only 1 degree results in it being about 3cm off!

On the software end of things, the Arduino acts as a HID input to the computer to create the sounds. [Amir] has put together a free sound sampler on his website makeysoundy.com, and we must say, it’s pretty fun! You can assign notes to different keys, which makes it super easy to make a similar project to this!

Stick around after the break to see the stairs in action!

Continue reading “Portable Musical Stairs”