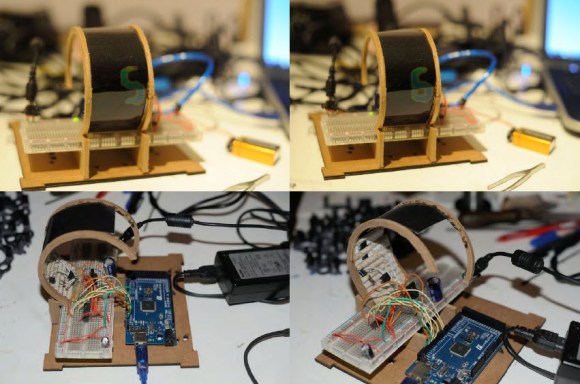
3D Scanner Using A Sharp Infrared Sensor

[Fernando] sent in a tip about a pet project he’s been working on. It’s an interesting take on a 3D scanner. He used a stepper motor to rotate the object being scanned, and an Arduino for control, but the real novelty is the way he used the sensor. [Fernando] mounted a Sharp GP2D120X on vertical surface, and used a second stepper motor to raise the sensor during the scan. As you can see in the videos (embedded after the break), this results in the scan being put together in an ascending spiral.

The Sharp sensor is cheap and decent, but you’re obviously not going to get amazing accuracy. Still, using the average of several measurements, he ends up with a decent result. Happily, [Fernando] has released the code, and it should be easy enough to repurpose it with a more accurate sensor. It would be interesting to see a laser-based sensor paired with this code.

Continue reading “3D Scanner Using A Sharp Infrared Sensor”

An Opensource Arduino Guitar Pedal

If you’re a guitarist, or know a guitarist, you probably know just how many guitar effects there are out there — but what if you could design your own effects?

[J Rodriguez] has just released his opensource Arduino guitar pedal shield, dubbed the pedalSHIELD. He designed it as a platform to learn about digital signal processing, effects, and synthesizers — without needing an in-depth knowledge of electronics or programming. It allows you to design your own effects in C/C++, or download from his own library online. Some of the downloadable presets include an octave pedal, reverb pedals, delay pedals, and even distortion pedals!

The pedal features three programmable potentiometers, two main switches, and the foot pedal switch. The shield plugs directly into an Arduino Due, and you can find all the schematics here and the parts list here. It was completely designed in KiCad which is an open source electronics CAD design suite.

Take a listen after the break to hear the pedal in action!

Continue reading “An Opensource Arduino Guitar Pedal”

Moody Useless Machine

If you ever get bored of trolling the internet seeking inspiration for your next big project, try a YouTube search of “useless machine”. After a few hours of watching these pointless, yet hilarious creations, we’re sure you’re going to want to build one. Luckily for us, [Arvid] documented the design of his moody useless machine to get you started.

Why is [Arvid’s] machine moody? Well, to fully appreciate the emotional sensitivity of a useless machine, you first need to understand what it is they do don’t do. A one sentence explanation is all that is needed here; you flip a switch and the machine flips the switch back… that’s it. [Arvid] implemented a two servo system with a stand-alone Arduino, which allowed him to give his machine a “personality”. Sometimes the switch is thrown back quickly without argument, other times the machine throws a fussy tantrum.

Although the machine is useless, the electronics inside are anything but. To keep everything clean and innocuous looking, the machine is powered by batteries, so [Arvid] places the Arduino into a ‘sleep’ mode until the switch is toggled. The switch is configured as an interrupt on the Arduino, which when toggled, wakes the Arduino.  Once the Arduino is awake, it enables power to the servos via a power MOSFET, then everything’s ready to go; the machine makes its response and goes back to ‘sleep’. This was a great project, but believe it or not, things can get more useless, like with this advanced useless machine.

Continue reading “Moody Useless Machine”

Touching Conversations: Email Snippets Scroll By On Electro-Embroidery Piece

electroembroidery

[Wei Chieh Shih] really moves the needle when it comes to wearable technology. His textile design project entitled I Am Very Happy I Hope You Are Too is a striking marriage of masterful hand embroidery, delicate circuitry, and careful programming.

[Wei] is using an Arduino micro to drive a matrix of surface-mount LEDs in the Hello, World video, which is a ramp-up to the scrolling text version that’s in progress now finished. That full version is part of his residency project at Arquetopia in Oaxaca, Mexico and displays snippets of emails from his past relationships. It’s huge, with multiple matrices as large as 8×25 pixels!

No build notes could be found for this or any of [Wei]’s similar projects, like this awesomely dangerous 200 laser diode jacket or this eerily beautiful light installation on Taiwan’s north beach. Based on the pictures, our speculation is that he is using ordinary 6-strand embroidery floss to make stem or half cross-stitches on all the paths. He then runs very thin, flexible conductor underneath the channel of stitches and solders the wires to the component pads.

If [Wei] wants another way to wear his heart on his sleeve, he could investigate these dynamic LED clothing hacks.

Update: [Wei] has completed this project, and has more information available at his Behance site.

Continue reading “Touching Conversations: Email Snippets Scroll By On Electro-Embroidery Piece”

Arduino Xmas Tree Shield

christmasshield

Nothing reminds us that it’s the holiday season more than an LED Christmas Tree submission. This obviously is not the first of its kind, but [Jose] does offer up a new technique using addressable RGB LEDs.

[Jose] decided to use 20 WS2812B RGB LEDs, which if you haven’t seen before, are RGB LEDs with an integrated controller. Yep, that’s right, just power/ground and 1 data line is all that is needed to control hundreds of RGB LEDs. This LED tree’s design is simple: a custom-etched PCB cut it in to the shape of a Christmas tree. The WS2812B LEDs helped keep everything clean, so the tree lacks any ‘ugly’ ornaments, except for the required bypass cap here and there. For an added bonus, the tree’s LEDs are synchronized to music generated by an Arduino via a piezo buzzer. Why is it a shield?  Well, the whole tree plugs in nicely to a standard Arduino interface. This looks like the perfect starter project to familiarize yourself with addressable LEDs, or at least to get you warmed up before building your own infinity portal.

Continue reading “Arduino Xmas Tree Shield”

Cryophone: A Dry Ice-Powered Musical Installation

cryophone

[Dmitry] is a bit of an industrial artist / hacker, and he’s recently finished this interesting and interactive audio exhibit called the Cryophone.

As you know, dry ice is terribly fun. When placed in water, it sublimates from its solid to gaseous phase rapidly, releasing carbon dioxide gas and causing a drastic (and sometimes violent) temperature change. [Dmitry’s] project attempts to amplify the sounds of these reactions and create music(?) using data from sensor inputs in the system. He uses piezo elements, temperature sensors, and an Arduino to generate an algorithmic composition from the various sensors, which a Mac Mini then synthesizes and outputs as audio in 6 channels.

The result is an eerie collection of noises that would do well in a haunted house or a horror movie. Take a listen for yourself after the break, and if you missed it, check out another unique, audio-based art installation: ‘conus.’

Continue reading “Cryophone: A Dry Ice-Powered Musical Installation”

Particle System Busy Box Keeps Baby Occupied

Busybox

Any child born today has a bright future ahead of them—mostly consisting of watching glowing rectangles for 80 or 90 years. To give his progeny a jump-start on a lifetime of watching LEDs flicker, [Dan] created a busy box. It’s really just an Arduino, RGB LED matrix, and a programmed particle system, but if we’re fascinated by it, it will probably blow an infant’s mind.

The idea for this busy box originated with an earlier Hackaday post that used an 8×8 matrix of RGB LEDs to create a moving color cloud. [Dan] took this project as a jumping off point and created an infant’s busy box with four modes that are sure to be entertaining.

Inside the is a Rainboduino: an Arduino compatible board capable of driving an 8×8 RGB LED matrix. Also stuffed inside the busy box is a 9V battery, rocker switch for the power, and four arcade buttons that cycle through each mode. The first mode is some sort of ‘plasma cloud’ simulation, the next is a ‘painter’ light display. The final two modes spell out [Dan]’s spawn’s name, and all the numbers and letters of the alphabet.

Continue reading “Particle System Busy Box Keeps Baby Occupied”