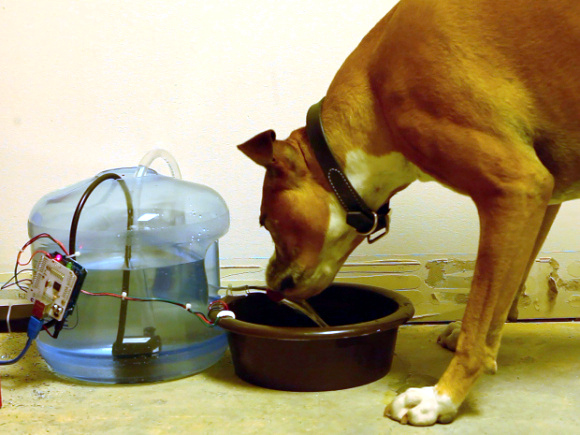
2013 Open Hardware Summit Badge Includes EPaper Display

Take a look at this sexy piece for open hardware. It’s what you’ll be wearing around your neck at the Open Hardware Summit this year. WyoLum teamed up with Repaper for the display and Seeed Studios for the boards.

It’s called the BADGEr and it’s both an Arduino and and Arduino shield. There are several different power options; coin-cell, microUSB, unpopulated barrel jack, or the lanyard terminals if you want to wear the power supply around your neck. You can see the five momentary push buttons see above, but on the back you’ll find the microSD card slot along with a power switch for preserving the coin cell.

Check out the video below for a quick look. In addition to acting as your credentials the conference schedule comes preloaded. And of course, this is an Open Source design so you can dig through schematic, board artwork, and code at the page linked above. Oh, and the first hack has already been pulled off. Here’s the badge reading Crime and Punishment.

Speaking of conference badges, DEF CON starts this week. Hackaday writer [Eric Evenchick] will be there and we hope he has a chance to look in on some of the badge hacking at the event.

Continue reading “2013 Open Hardware Summit Badge Includes EPaper Display”

GRBL Compatible Arduino CNC Shield

By the time you get to the point in a home CNC build where you’re adding control electronics you may be ready for the simplest means to an end possible. In that case, grab your Arduino and heat up that etching solution to make your own GRBL compatible shield.

This familiar footprint manages to contain everything you need for a three-axis machine. The purple boards slotted into the pairs of SIL headers are Pololu Stepper motor drivers. Going this route makes replacing a burnt out chip as easy as plugging in a new module. The terminal block in the center feeds the higher voltage rail necessary for driving the motors. The DIL header on the right breaks out all of the connections to the limiting switches (two for each axis), spindle and coolant control, as well as three buttons for pause, resume, and abort. There’s even a header for SPI making it easier to add  custom hardware if necessary.

This is a dual-layer board which may not be ideal for your own fabrication process. [Bert Kruger] posted his Gerber files for download if you want to put in a small run with OSH Park or a similar service.


Turning Kerbal Space Program Into A Proper Space Simulator

Kerbal

Kerbal Space Program – the game of freakin’ space Lego and incompetent little green men – has seen a lot of popularity since it was on the Steam Summer sale. Now, in a bid to out do the flight sim aficionados who build 737 cockpits in their garage, a few enterprising Kerbalnauts are building custom controllers for this wonderful introduction to [Tsiolkovsky], [Goddard], and [Evel Kinevel].

[vladoportos] thought KSP could use custom gaming controllers to provide switches for staging, attitude hold, and reaction control system commands. In the game, these are toggled by keyboard input, but this unfortunately destroys the immersion of being a rocket-powered angel of death for your Kerbal volunteers. He rigged up an Arduino Leonardo to send USB HID commands to his computer whenever he pressed one of the buttons connected to his breadboard controller. It’s a work in progress, but [vladoportos] has some big plans that include a physical nav ball to show his ship’s orientation in space.

USB input is one thing, but that’s only half the problem. If you want to build a real Kerbal ship simulator, you’ll need to get data out of the game, and into your glass or analog displays. [voneiden] over on the KSP subreddit has the solution for you. He’s been working on a ‘mission control’ app that runs in Python, connects to a Kerbal Space Program plugin over TCP, and displays flight information such as speed, altitude, longitude, latitude, apoapsis, and periapsis.  The code is up on his git, ready for some individual to bring this over to a Raspi and a character LCD display.

Build Your Own Metal Detector

[Dzl] and his rather serious looking son are metal detector enthusiasts. But when they couldn’t find their store-bought metal detector earlier this summer they just went ahead and built their own. [Dzl] starts his write up with an explanation of how most oscillator based metal detectors work. This one differs by using an Arduino to read from the metal detecting coil.

The circuit starts with an oscillator that produces a signal of about 160 kHz which is constantly measured by the Arduino. When metal enters the coil it alters the frequency, which is immediately picked up the Arduino. Instead of that characteristic rising tone this rig uses a Piezo buzzer, issuing the type of clicks you’d normally associate with a Geiger counter.

The last part of the build was to find the best coil orientation. They settled on thirty turns around a metal bucket. An old Ikea lamp is the perfect form factor to host their hardware which seems to work like a charm.

Predator Suit For Monsterpalooza Includes Over-engineered Shoulder Cannon

off-the-hook-predator-suit

This Predator suit was premiered at this year’s Monsterpalooza conference. It’s nothing short of incredible. But the shoulder cannon is really what caught our attention. The thing is fully motorized and includes sound and light firing effects.

We saw a glimpse of what [Jerome Kelty] is capable of about two years ago. He was showing off an Arduino-based animatronics platform he put together for a Predator shoulder cannon that tracked based on where the predator’s helmet was pointing. But other than a video demonstration there wasn’t much info on the that actual build. This post makes up for that and then some.

A replica of this quality is rarely the work of just one person. A team of fans joined in to make it happen. After getting the molded parts for the backpack and canon from another team member [Jerome] set out to fit the support structure, motors, and control electronics into the space available. That meant a ton of milling, cutting, and shaping parts like the support arm seen above which integrates a servo motor into its rectangular outline. All of the controls fit in the backpack, with cables running to the helmet, as well as the cannon.

Continue reading “Predator Suit For Monsterpalooza Includes Over-engineered Shoulder Cannon”

Easy LCD Control For Arduino Mega

arduino-mega-easy-lcd-adapter

[Andy Brown] wrote in to show off the TFT LCD adapter he’s been working on for connecting inexpensive displays to an Arduino Mega.

These TFT LCD screens can be picked up on eBay for a few dollars. But they’re more suited for 16-bit microcontrollers which operate at 3.3V levels. His adapter board, which plugs directly into the Mega’s dual-row pin header, makes it easier to control these with an 8-bit chip that is running at 5V.

There’s a couple of things that make this happen. First off, he’s included level converter chips to managed the 3.3V/5V issues. Second, he uses latch chips to translate eight pins on the Arduino Mega to sixteen pins on the display. Those chips have a latch pin which holds the output values in memory while the input pins are changed. He manages to drive the latch on just one of the chips using the chip select (CS) line called for by the LCD protocol. This means you don’t lose any extra pins.

Another way to uses the displays with Arduino is to use a smart controller for TFT screens.

Continue reading “Easy LCD Control For Arduino Mega”

Arduino Cellphone

OLYMPUS DIGITAL CAMERA

The fact that you can build a cellphone around an Arduino is pretty neat. But we’re drawn to this project more as a testament to the advancement of hobby electronics. An [Average Joe] can build this thing with a minimum or background knowledge and without breaking the bank. Wow.

Of course this isn’t the first DIY cellphone we’ve come across. One of our favorites is this one which resides on a home etched PCB. There was even another Arduino offering with similar components back in September. But the one seen above really pulls it all together into a package that is usable for everyday life. The components include and Arduino Uno, GPRS shield from Seeed Studios, a TFT touch screen, Lithium battery and charging circuit, and a few other bobbles. All of it is mounted inside of a 3D printed case.

A simple phone calls for a simple UI and that’s included as well. The main menu has two buttons, one for placing a call, the other for sending a text. From there you get the virtual keypad seen above for typing out the phone number or composing a message.

[Thanks Victorzie]