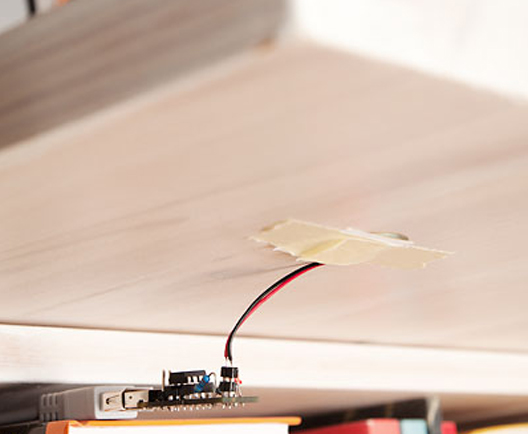
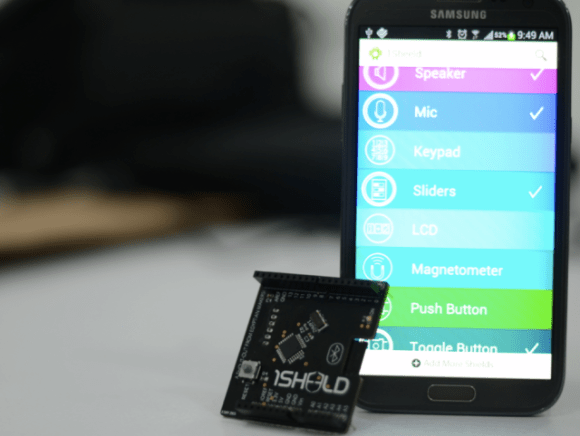
Liquid Nitrogen (finally) Makes An Arduino Project Cool

At $1.5 a liter in Moscow, [Michail] couldn’t resist buying some liquid nitrogen for himself. He thought that because Arduinos were quite popular among geeks, he’d try to overclock one while bringing its temperature down to -196°C/-320°F.

To check the ATmega was still working correctly, [Michail] designed several stability tests: SRAM read/write, flash read, arithmetic math and program flow tests (code with some conditionals). He used a standard HD44780 LCD to view the tests results but also an LED, blinking the number of the test it would have failed. The Arduino was externally clocked by a TTL-logic based square signal generator he designed, which can produce a clock between 16 and 100MHz. It turns out that you can run an Arduino at 65.3MHz when it is cooled with liquid nitrogen!

[Michail]’s article also explains what happens to the different on-board components when cooled with LN2: electrolytic capacitors becomes virtually non-existent, X7R capacitors’ impedance drop by 2/3, silicon diodes voltage drop increase by 50% and LED’s colors change. Check out the video below:

Continue reading “Liquid Nitrogen (finally) Makes An Arduino Project Cool”

Reactive Target Range For Nerf, Airsoft, Etc.

reactive-target-range

Taking the time to build a reactive target range really adds to the fun of toy weapons. It lets you move beyond just point and shoot to actual games of skill.

The project is anchored by an Arduino board. It connects to a piezo element on the back of each of these sheet metal targets. Detecting when a projectile hits the target works pretty much the exact same way the ever popular Knock-block works. To provide interactive enjoyment each target has an LED which, when lit, indicates that the target is active. From here it’s just a matter of coding to add different challenges. So far [Viktor Criterion] has implemented quick draw, timed, and rapid fire modes. The demo after the break shows off everything, including the slick modular design he came up with to make the system portable.

We’d love to see these targets mounted on motorized tracks. Each round would have the targets moving closer to you at a faster pace to keep you on your toes.

Continue reading “Reactive Target Range For Nerf, Airsoft, Etc.”

Hacking Sensoria, The Smart Sock

sensorSock

Sensor-meets-sock product “Sensoria” won’t hit the shelves for a while, but [Andrew] managed to snag a Sensoria Gaming SDK and has hacked the smart sock to control an inexpensive toy helicopter. Seldom do we see projects this rugged yet clearly effective. The sock sends data via its companion device—a Bluetooth anklet—to LabVIEW. LabVIEW subsequently talks to an attached Arduino to manipulate a servo that [Andrew] just…duct taped to the helicopter’s controller. The result: a a quick and dirty hack that proves surprisingly intuitive, providing accelerator-style foot control to drive the throttle. Check out a video of [Andrew] punishing his helicopter after the break.

This is the first hack we’ve seen for the Sensoria, which is still in the crowdsourcing phase over at Indigogo. They have already reached their funding goal, but a few SDKs remain unclaimed. You can watch an official video of the sock’s sensors lighting up a heat map in real time below.

And, if you missed it, have a look at the AsTeRICS project’s helicopter controlled by neck muscles.

Continue reading “Hacking Sensoria, The Smart Sock”

Zappo The Robot Mixes Tone Generator, Sensors, Alarm Clock And More

zappo-clock-bot

Now [Kevin] claims he built this robot for his 3-year-old son but we know he just used that as an excuse to spend way too much time in his workshop. The robot is a roundup of all the interesting things you can do with hobby electronics. It’s a great example of what you can teach yourself in one year, as [Kevin] only started tinkering with electronics about fourteen months ago.

The robot centers around an Arduino which manages to control a plethora of auxiliary boards. The alarm clock part of the build has a readout in the center of the robot’s chest. There are a bunch of sounds which can be played as the alarm, including a lot of iconic movie sound bytes. Add to that some playful features — like a tone generator which is altered by the column of potentiometers on the left, motion activated eyes, and sound activated ears — and you’ve got a dream-come-true of a toy for your kid.

As a side note, we wrote this several days ago, but ended up bumping it a couple of times in the publishing schedule. We reached out to [Kevin] to let him know a feature was on the way. When he learned that we bumped it in order to feature [Jamie Matzel’s] giant robot he had to laugh. The two met at a mini Maker Faire about a year ago and that interaction is what gave [Kevin] the confidence to start the project.

Continue reading “Zappo The Robot Mixes Tone Generator, Sensors, Alarm Clock And More”

A Cable Box Becomes A Network Time Display

DVR

In 2011 [Erkki]’s DVB box gave up the ghost. It had been a fixture of his media center for quite a while, decoding cable and recording shows faithfully for years. A flaky power supply will bring down the mightiest machine, though. and the Topfield box eventually found itself in disuse. One thing [Erkki] liked about this cable box is its wonderful green LED clock – even after the box had been declared dead, he still used it as a clock. Not wanting to keep a faulty machine on life support, [Erkki] decided to strip the guts and replace them with a networked Arduino that receives time over a network

[Erkki] originally used an Arduino and an ENC28J60 Ethernet module to receive time from an NTP server and spit it out onto the LCD display. A full Arduino for this kind of job, especially one that’s a more or less complete project, is a bit overkill so [Erkki] designed a PCB to put his ‘duino to better use.

One interesting bit about this build is that [Erkki] found it completely broken one day. Figuring this was a problem with the microcontroller, he first fried the ATMega with 9 volts – the reasons escape us, however – and started work on programming a new chip. After looking at different ports on his NTP server with a microcontroller, [Erkki] realized he had reset his network switch recently, meaning the previous microcontroller was working perfectly.

In the future, [Erkki] hopes to add some new features to this 8×4 seven-segment display sitting in a large box; something like reading off the temperature, checking IRC and his physical mailbox, and notifying him when someone is at the front door.

A Cold Cathode Audio Visualizer

CC

Finally, cold cathode lights can be used for much more than illuminating the inside of your computer or making your whip look like it can hover. [James] discovered if he varied the voltage going into the inverter, only a certain amount of the tube would light up. Give a hacker an interesting observation and enough time, and eventually he’ll come up with something really cool. In this case, it’s a cold cathode audio visualizer, powered by fluorescent tubes doing unexpected things.

The build details are a little scant, but we were able to coax an imgur album of [James]’ build. He’s using these 20″ CCFL lights with the stock digital inverters replaced with TDK CCFL inverters.

The digital control of this build is provided by an Arduino Mega and a custom shield. We’re guessing the graphic EQ is provided by an MSGEQ7 chip, and the inverters themselves are powered through the Mega’s PWM pins. It’s a lot like an IN-9 Nixie graphic EQ, only much, much bigger. [James] is planning a larger version of this build, dubbed the Mega speKtrum and we can’t wait to see that build along with a proper writeup.

An Introduction To Inertial Navigation Systems

acc_sens

Long before ships relied on GPS to determine their location – and even before radio navigation systems such as LORAN, vessels relied on a still impressively sophisticated means of determining their position: inertial navigation. The theory is simple: if you keep a few very accurate gyroscopes and accelerometers on board, you’ll be able to calculate where you are relative to your previous position. Since electronic gyros and accelerometers are all over the place, [Sebastian] thought he would have a go at creating his own inertial navigation system.

The difficulty in using this method is that every gyroscope invariably has some error. Since the measurements from the gyros and accelerometers are integrated together, the error is also integrated, resulting in an increasing positioning error as time goes on. With a few clever algorithms and very good sensors, it’s possible to minimize this error.

[Sebastian] doesn’t have really great hardware – he’s only working with a accelerometer/gyro breakout board that’s good enough for experimental purposes. After reading the accelerometer data with an Arduino, he’s able to capture all the sensor data and read it into a Python script.

The next steps are to figure out a decent algorithm to integrate all the sensor data, and possibly add a barometer and magnetic compass for better compensation for errors. The project is still in the early phases, but seeing as how an inertial navigation system is one of the engineering triumphs of the early 20th century, we’re eagerly awaiting any progress updates.