Two Factor Authentication With The ESP8266

Google Authenticator is a particularly popular smartphone application that can be used as a token for many two factor authentication (2FA) systems by generating a time-based one time password (referred to as TOTP). With Google Authenticator, the combination of your user name and password along with the single-use code generated by the application allows you to securely authenticate yourself in a way that would be difficult for an attacker to replicate.

That sounds great, but what if you don’t have a smartphone? That’s the situation that [Lady Ada] recently found herself in, and rather than going the easy route and buying a hardware 2FA token that’s compatible with Google Authenticator, she decided to build one herself based on the ESP8266. With the hardware and source documented on her site, the makings of an open source Google Authenticator hardware token are available for anyone who’s interested.

Generated codes can also be viewed via serial.

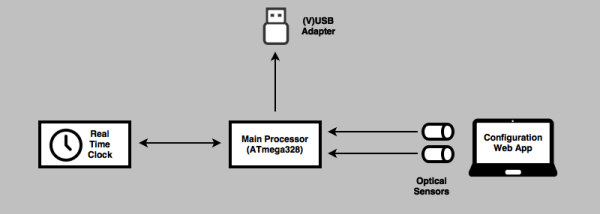
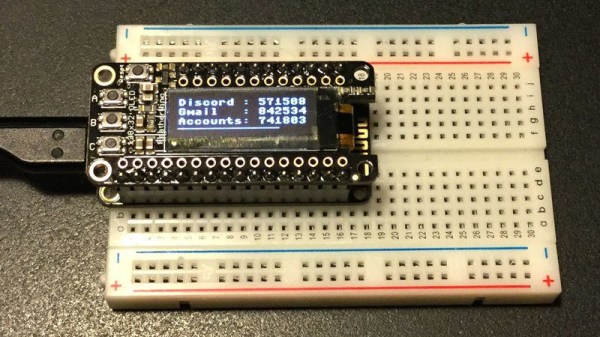
For the hardware, all you need is the ESP8266 and a display. Naturally [Lady Ada] uses her own particular spin on both devices which you can purchase if you want to create an identical device, but the concept will work the same on the generic hardware you’ve probably already got in the parts bin. Software wise, the code is written in CircuitPython, a derivative of MicroPython, which aims to make microcontroller development easier. If you haven’t tried MicroPython before, grab an ESP and give this a roll.

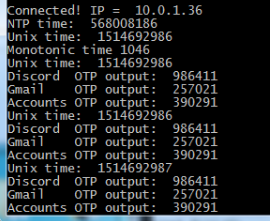
Conceptually, TOTP is relatively simple. You just need to know what time it is, and run an SHA1 hash. The time part is simple enough, as the ESP8266 can connect to the network and get the current time from NTP. The calculation of the TOTP is handled by the Python code once you’ve provided it with the “secret” pulled from the Google Authenticator application. It’s worth noting here that this means your 2FA secrets will be held in clear-text on the ESP8266’s flash, so try not to use this to secure any nuclear launch systems or anything, OK? Then again, if you ever lose it the beauty of 2-factor is you can invalidate the secret and generate a new one.

We’ve covered the ins and outs of 2FA applications before here at Hackaday if you’d like to know more about the concept, in addition to previous efforts to develop a hardware token for Google Authenticator.

Inside Two-Factor Authentication Apps

Passwords are in a pretty broken state of implementation for authentication. People pick horrible passwords and use the same password all over the place, firms fail to store them correctly and then their databases get leaked, and if anyone’s looking over your shoulder as you type it in (literally or metaphorically), you’re hosed. We’re told that two-factor authentication (2FA) is here to the rescue.

Well maybe. 2FA that actually implements a second factor is fantastic, but Google Authenticator, Facebook Code Generator, and any of the other app-based “second factors” are really just a second password. And worse, that second password cannot be stored hashed in the server’s database, which means that when the database is eventually compromised, your “second factor” blows away with the breeze.

Second factor apps can improve your overall security if you’re already following good password practices. We’ll demonstrate why and how below, but the punchline is that the most popular 2FA app implementations protect you against eavesdropping by creating a different, unpredictable, but verifiable, password every 30 seconds. This means that if someone overhears your login right now, they wouldn’t be able to use the same login info later on. What 2FA apps don’t protect you against, however, are database leaks.

Continue reading “Inside Two-Factor Authentication Apps”

Lock Up Your Raspberry Pi With Google Authenticator

Raspberry Pi boards (or any of the many similar boards) are handy to leave at odd places to talk to the network and collect data, control things, or do whatever other tasks you need a tiny fanless computer to do. Of course, any time you have a computer on a network, you are inviting hackers (and not our kind of hackers) to break in.

We recently looked at how to tunnel ssh using a reverse proxy via Pagekite so you can connect to a Pi even through firewalls and at dynamic IP addresses. How do you stop a bad guy from trying to log in repeatedly until they have access? This can work on any Linux machine, but for this tutorial I’ll use Raspberry Pi as the example device. In all cases, knowing how to set up adequate ssh security is paramount for anything you drop onto a network.

Continue reading “Lock Up Your Raspberry Pi With Google Authenticator”

Hackaday Prize Entry: Two Factor Authentication Key

Because people are generally idiots when it comes to choosing passwords — including people who should know better — Google created Google Authenticator. It’s two-factor verification for all your Google logins based on a shared secret key. It’s awesome, and everyone should use it.

Actually typing in that code from a phone app is rather annoying, and [Alistair] has a better solution: an Authenticator USB Key. Instead of opening up the Authenticator app every time he needs an Authenticator code, this USB key will send the code to Google with the press of a single button.

The algorithm behind Google Authenticator is well documented and actually very simple; it’s just a hash of the current number of 30-second periods since the Unix epoch and an 80-bit secret key. With knowledge of the secret key, you can generate Authenticator codes until the end of time. It’s been done with an Arduino before, but [Alistair]’s project makes this an incredibly convenient way to input the codes without touching the keyboard.

The current plan is to use an ATMega328, a real-time clock, and VUSB for generating the Authenticator code and sending it to a computer. Getting the secret key on the device sounds tricky, but [Alistair] has a trick up his sleeve for that: he’s going to use optical sensors and a flashing graphic on a web page to send the key to the device. It’s a bit of a clunky solution, but considering the secret key only needs to be programmed once, it’s not necessarily a bad solution.

With a small button plugged into a USB hub, [Alistair] has the perfect device for anyone annoyed at the prospect at opening up the Authenticator app every few days. It’s not a replacement for the app, it just makes everything easier.

The 2015 Hackaday Prize is sponsored by:

Using Google Authenticator With An Arduino

Google Authenticator is an app that generates one time passwords (OTPs). These passwords are often used as a second factor of authentication, along with your normal password. OTPs work by having a shared secret and a synchronized clock on two devices. When you generate the password, a hash based on the secret and timestamp is created. This proves that you have access to the secret, and can only be used once.

To secure his Lego mini-figures, [Luca] built an authentication system using Google Authenticator and Arduino. A web app is used to generate a secret that can be configured into the Arduino using an array, and into Google Authenticator using a QR code. The Arduino is using a library that implements Time-based One Time Password authentication (TOTP).

There are some challenges, including keeping a good clock source on the Arduino, but this look like an interesting way to do authentication. After the break, watch a quick video overview of the project (for English captions, hit the CC button).

Continue reading “Using Google Authenticator With An Arduino”