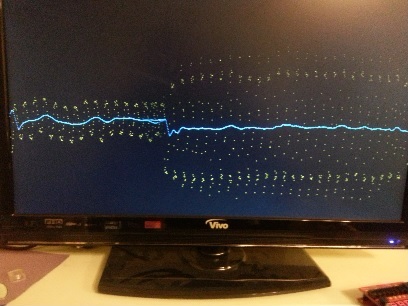
Turning A Router Into An Arduino Shield

[Dirk] had a problem: while he already had an Arduino with an Ethernet shield, he needed WiFi for an upcoming project. Running a Cat5 cable was out of the question, and a true Arduino WiFi shield is outrageously expensive. He did, however, have a WiFi router lying around, and decided it would make a perfect WiFi shield with just a little bit of cutting.

The router [Dirk] used was a TL-WR702N, a common router found in the parts bins of makers the world over. Inspiringly, the size of the router’s PCB was just larger than the space between the Arduino’s pin headers. Turning the router into a shield is simply a matter of scoring the edge of the board and gluing on a few pins for mechanical strength.

Power and ground lines were soldered between the pin headers and the router, while data is passed to the Arduino and Ethernet shield through a short cable. It may not look pretty, but if it works in a pinch we can’t complain.

LED Strip Pong As An Arduino Shield

led-pong-strip

[Schuyler Sowa] has been hard at work on his own version of LED strip Pong. We’d say his work has really paid off. The game is robust and full of features.

Unlike the original Pong video game LED pong only has one axis on which the ball travels. The ball will bounce back if the button at the end of the strip is pressed when either of the last two LED pixels are illuminated. To add in a difficulty adjustment [Schuyler] included a poteniometer which alters the speed.

The game board is one meter of LED strip with individually addressable pixels. It cost a whopping $28 and was the second kind he tried after having trouble with the WS2801 based version (which often come as strings of lights). An Arduino board controls the game, with a shield made from protoboard to connect the components. In addition to the two user buttons — which were hacked out of a computer keyboard — you’ll notice a pair of seven segment displays acting as a scoreboard and an HD44780 character LCD rounding out the user interface.

Continue reading “LED Strip Pong As An Arduino Shield”

LegoDuino For Kid-friendly Microcontrollers

Lego

[J. Benschop] is teaching his nine-year-old son electronics by giving him a few wires, LEDs, and batteries. Eventually, the son looked over at his dad’s workbench and wondered what the little bug-shaped rectangles did. Microcontrollers and embedded programming are just a bit too advanced for someone who hasn’t hit a double-digit age, but [J] figured he could still have his son experience the awesomeness of programming electronics by building a custom electronic Lego microcontroller system.

This isn’t as complex as a Lego Mindstorms system. Really, it’s only an ATMega and a 2.4 GHz wireless transceiver. Still, that’s more than enough to add a few sensors and motor drivers, and an awesome introduction to electronics development. The enclosure for the LegoDuino is, of course, compatible with every Lego brick on the planet. It’s made from a 6×16 plate, three blocks high, with enough room for the electronics, three AA batteries, and the IO headers.

Programming an ATMega, even with the Arduino IDE, is a little beyond the capacity of [J. Benschop]’s nine-year-old son, so he made a few changes to the Minibloq programming environment to support the newly created LegoDuino. It’s a graphical programming language that kids of just about any age can pick up quickly, and with the included RF transceiver inside the ‘Duino, it can even be programmed wirelessly.

It’s an amazing piece of work, and much, much simpler than even the noob-friendly Lego Mindstorms. Not as powerful, though, but when you’re just teaching programming and electronics, you really don’t need much.


The 14th Game For The Nintendo Power Pad

[youtube=http://www.youtube.com/watch?v=6x23TWrInpI&w=580]

Released 25 years ago, the Nintendo Power Pad, a plastic mat that plugged into an NES, saw very limited success despite its prevalence in basements and attics. In total, only six games for the Power Pad were released in North America, and only 13 worldwide. The guys over at cyborgDino thought they should celebrate the sliver anniversary of the Power Pad by creating its 14th game, using an Arduino and a bit of playing around in Unity 3D.

The first order of business was to read the button inputs on the Power Pad. Like all NES peripherals, the Power Pad stores the state of its buttons in a shift register that can be easily read out with an Arduino. With a bit of help from the UnoJoy library, it was a relatively simple matter to make the Power Pad work as intended.

The video game cyborgDino created is called Axis. It’s a bit like a cross between Pong and a tower defense game; plant your feet on the right buttons, and a shield pops up, protecting your square in the middle of the screen from bouncing balls. It’s the 14th game ever created for the Power Pad, so that’s got to count for something.

Video of the game below.

Continue reading “The 14th Game For The Nintendo Power Pad”

Measuring Ketosis With An Arduino

key

A bit of biology and nutrition before we roll into this: Ketosis is when your body runs on fat reserves instead of carbohydrates. This is the basis of diets such as Atkins, and despite the connotations of eating hamburger patties and butter, you can actually lose weight on these diets. One problem with a keto diet is the difficulty of measure how many ketones your liver is processing; this can be done with a urine sample, but being able to measure small amounts of acetone in your breath would be the ideal way to measure ketosis. [Jens] came up with a device that does just that. It’s called Ketosense, and it will tell you how well your keto diet is doing by just having you blow into a sensor.

[Jens]’ device consists of an Arduino, LCD display, and two sensors – one for acetone, and another for temperature and humidity. By carefully calibrating a TGS822 sensor, [Jens] was able to measure the acetone content of an exhaled breath along with temperature and pressure. This gave him a reading in parts per million, and with a short bit of math was able to convert that into something that made sense when talking about ketosis, mmol/l.

Without access to a lab that can measure blood ketone levels, it’s difficult to say if [Jens] device really works as intended. If he were to find his way into a lab, though, it would be possible to correlate his sensor’s values with blood ketone results and improve the accuracy of his sensor.

Astrosmash Style Video Game As Sony SmartWatch Firmware

sony-smartwatch-native-video-game

Here’s a firmware hack that brings a video game to the Sony SmartWatch. It’s pretty impressive considering the limited screen real estate and the fact that it has to be shared with the touch input. But we find it equally impressive that a game of this quality followed so quickly on the heels of Sony announcing the ability to make your own firmware for the watch. The speedy development is thanks partly to the community driven effort to hack the Arduino IDE to load sketches on the watch.

The advent of this IDE hack means that taking your Arduino sketch writing abilities to this hardware now has a fairly low learning curve. And reading through [Asier Arranz’s] game code will make it even easier. He calls his game Star Wars but it reminds us more of Astrosmash. There’s a little green semicircle which is your ground-based defense vehicle. You need to fire the laser to shoot falling items out of the star-strewn night sky while also collecting power-ups that fall to the ground. Game play video is below.

Just remember, if you come up with a cool firmware app for the SmartWatch we want to hear about it.

Continue reading “Astrosmash Style Video Game As Sony SmartWatch Firmware”

Heart-shaped Project Takes No Shortcuts

heart-shaped-project

If all [Blake] wanted to do is scroll “Blake loves Kim” on some LEDs he could have stopped with the breadboard version of the project. Or hastily craft a cardboard heart around the marquee. But he really just used this heart-shaped electronics project as an excuse to get his feet wet with several different types of manufacturing.

The project started as a simple scrolling message pendant. Something along these lines. His very small LED module was being driven by an ATtiny85. He planned to run it from battery which is a perfect excuse to learn how to use the sleep functions built into the chip.

The initial design worked so well he decided to lay out his own circuit board. This made it quite simple to add in a side-positioned button to wake from sleep, and a coin cell battery holder on the back. He used OSH Park for board manufacturing — good thing they allow creative board outlines. To protect the circuitry he also ordered laser-cut acrylic plates that work in conjunction with stand offs to form a case.

He mentions he missed his Valentine’s Day delivery date by a long shot. But that’s how these sort of things go, right?

Continue reading “Heart-shaped Project Takes No Shortcuts”