Sentrifying A Nerf Gun

vulcan

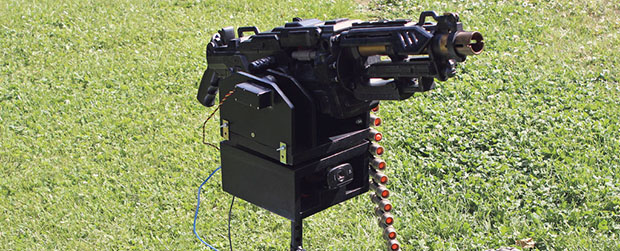
[Brittliv] made the mistake of getting her friends into Nerf weaponry, and so began the race to mutually secured destruction via foam darts. She may have the upper hand in this war, because her Nerf Vulcan sentry gun is both incredibly powerful and is able to be operated autonomously with a webcam featuring a friend or foe identification system.

The azimuth and elevation mount for the gun is made out of plywood, with each axis controlled by a single servo attached to an Arduino. Of course a stock Nerf gun would be fairly boring, so [BrittLiv] increased both the voltage going to the gun’s motor and the strength of the gun by replacing a 2kg spring with a 5kg spring.

Targets are tracked with a webcam using Processing and a bit of code from Project Sentry Gun. One interesting feature is a friend or foe tracking system; if the gun sees someone wearing a t-shirt with the Instructables logo, the target is identified as a friend and is not brutally mowed down with plastic darts.

Continue reading “Sentrifying A Nerf Gun”

Perfect Wall-mounted Tablet Integration

There’s a building downtown built about ten years ago that has tablet-sized LCD screens next to the entrance of each large meeting room. They’re never on and we always wonder why they didn’t just use one of those things that holds a sheet of printer paper to label what’s happening in the meeting space? Now this is a similar idea but with much better execution. Instead of just displaying data the in-wall tablet mount makes your room interactive.

[Tim’s] been working on it for a couple of years. He started out trying to house an iPod Touch behind a junction box cover plate. There are some pictures of that at the top of his build album. That didn’t quite take so keep scrolling to see the path to the finished product shown above. He cut a hole in the drywall and figured out how to mount a tablet dock that includes inductive charging. It holds the tablet in place with the small ledge and a few magnets, keeping its battery charged without a need for wires. Once tested he mudded, sanded, textured, and painted for a perfect finished product.

Twenty Two Servos And An Awesome Clock

servo

We can never get enough interesting clock builds, and [ebrithil]’s servo clock (Deutsche, Google translation) is up there with the best of them. There’s twenty-two servos in this clock, moving time forward with the mechanistic precision only an Arduino project can.

The digits in [ebrithil]’s clock are constructed like seven-segment displays, only instead of lighting up LEDs, servos turn small bits of paper that are light on one side and dark on the other. Turing the servo 180 degrees changes each segment from one shade to the other, making for an electromechanical seven-segment display.

The servos are controlled by an Arduino Mega connected to a DS1302 real-time clock. One problem [ebrithil] had with this project is having the segments rotate slightly every time someone turned on a light attached to the same circuit. He solved this problem by running the circuit off a perpetually charging cell phone battery, allowing him to take this clock on the go without losing time.

Continue reading “Twenty Two Servos And An Awesome Clock”

Hand Soldering BGA Wafer Chips

And here we’ve been complaining about Flat Pack No-Lead chips when this guy is prototyping with Ball Grid Array in a Wafer-Level Chip Scale Package (WLCSP). Haven’t heard that acronym before? Neither had we. It means you get the silicon wafer without a plastic housing in order to save space in your design. Want to use that on a breadboard. You’re crazy!

Eh, that’s just a knee jerk reaction. The wafer-level isn’t that unorthodox as far as manufacturing goes. It’s something like chip on board electronics which have that black blob of epoxy sealing them after the connections are made. This image shows those connections which use magnet wire on a DIP breakout board. [Jason] used epoxy to glue the wafer down before grabbing his iron. It took 90 minutes to solder the nine connections, but his second attempt cut that process down to just 20. After a round of testing he used more epoxy to completely encase the chip and wires.

It works for parts with low pin-counts. But add one row/column and you’re talking about making sixteen perfect connections instead of just nine.

Deep Woods Cabin; One Man, His Tools, And A Camera On A Tripod

We remember watching Alone in the Woods years ago on Public Television. It’s a story of a self-sufficient man named [Dick Proenneke] who loved the outdoors and decided to live alone in the Alaskan wilderness. It’s a remarkable story made more so by the film footage he made to document his experience. That teaser doesn’t do it justice, so check out the web page summaries as well and consider picking up a copy of the films for yourself.

The films include hiking, hunting, observing nature, and building this sweet pad which even [Steve] would be proud of. The first summer he left his native Iowa and scouted for cabin locations near Twin Lakes, Alaska. After finding a suitable location he felled enough trees to build the entire 11′ by 14′ structure and headed back home for the winter.

The next summer he packed in the tools seen above, and got to work. His build includes a stone fire-place as well as a door, windows, and a moss-covered roof. He did return to the continental US one more time, but ended up going back to Alaska to spend another 30 years in the cabin.

Continue reading “Deep Woods Cabin; One Man, His Tools, And A Camera On A Tripod”

The 14th Game For The Nintendo Power Pad

[youtube=http://www.youtube.com/watch?v=6x23TWrInpI&w=580]

Released 25 years ago, the Nintendo Power Pad, a plastic mat that plugged into an NES, saw very limited success despite its prevalence in basements and attics. In total, only six games for the Power Pad were released in North America, and only 13 worldwide. The guys over at cyborgDino thought they should celebrate the sliver anniversary of the Power Pad by creating its 14th game, using an Arduino and a bit of playing around in Unity 3D.

The first order of business was to read the button inputs on the Power Pad. Like all NES peripherals, the Power Pad stores the state of its buttons in a shift register that can be easily read out with an Arduino. With a bit of help from the UnoJoy library, it was a relatively simple matter to make the Power Pad work as intended.

The video game cyborgDino created is called Axis. It’s a bit like a cross between Pong and a tower defense game; plant your feet on the right buttons, and a shield pops up, protecting your square in the middle of the screen from bouncing balls. It’s the 14th game ever created for the Power Pad, so that’s got to count for something.

Video of the game below.

Continue reading “The 14th Game For The Nintendo Power Pad”

Super-precise Light Painting From A Delta Robot

delta-robot-light-painting

The points of those geometric shapes line up perfectly thanks to the delta robot arm controlling the light source. The source is a simple LED that can be switched on and off as it moves. A camera is set up in a dark room to keep the shutter open while the arm moves. We’re assuming that all of the light for the stationary objects in this image comes from the LED as well.

[Sick Sad] built the delta bot for just for this purpose. Check out the video below to see, and perhaps more importantly hear, the thing in motion. Seriously, the whine of the stepper motors is pretty awesome on this one.

The delta concept uses a central head on three arms angled down from above. If the LED is also pointed down it won’t light up the hardware and that’s why it doesn’t show up in the image. We’ve seen similar accuracy when using this style of machine for 3D printing. But if you don’t want to build a complicated machine you can try this out with a simple string plotter.

Continue reading “Super-precise Light Painting From A Delta Robot”