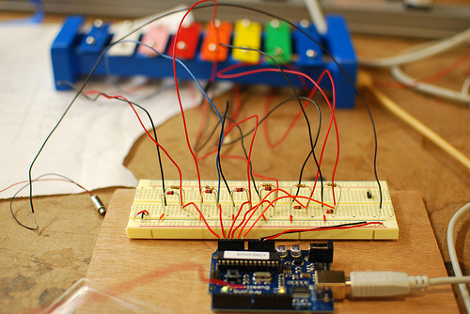
Halloween Props: Techy Jack-o-lanterns

[youtube=http://www.youtube.com/watch?v=UeYS_Tjf7pQ&feature=player_embedded]

Halloween is this weekend. If you still have some time and parts available, you might be looking to spice up your Jack-o-lantern.  We’ve found a few projects that we thought might be nice to share. None of them would merit a post on their own, so we thought we would just round them up and share them all at once. They all appear to be powered by the Arduino, which we know will bring some comments. Just to clear up some questions, they don’t pay us to advertise Arduinos. People just do a lot of projects with them.

First, the silly string shooting Jack-o-lantern which you can see above. He’s using a single servo hooked to an Arduino and a motion sensor.  When it detects motion, it lets out a short squirt of silly string. You can download the code from the project page. We might suggest you arrange this in a manner to avoid spraying directly into some kids eyes.

Check out the next two after the break.

Continue reading “Halloween Props: Techy Jack-o-lanterns”

Headpiece Jabbing For Smiles

Happiness_Hat

[Lauren] has created a facial conditioning device dubbed the Happiness Hat. The hat measures a sensor at the wearer’s cheek to determine if the wearer is smiling. When the hat does detects the wearer is not smiling, it activates a servo that prods the wearer. This project is fairly unique in that it provides haptic bio-feedback of what the body is doing, a similar project to the Happillow. While the Happiness Hat seems to work for treating the outward symptoms of unhappiness, this is but an early step towards the droud.

These Midi Controllers Stink!

BeatShoes-midi-controller

Well, maybe saying it stinks is too harsh. But if you build a midi controller out of an old pair of skate shoes you can be certain that they smell. [Thobson] put odor issues aside and added four force sensitive resistors to his shoes (one in each heel and one under the ball of each foot) for a creation he calls BeatSneaks. As force is applied to the resistors, they become less resistive. This change in resistance is measured by the ADC inputs on an Arduino and used to trigger midi events via USB. There’s video after the break, and [Thobson’s] has provided the schematic and code that he used for his addition to a growing family of unusual musical interfaces.

Does this make tap dancing cool again?

Continue reading “These Midi Controllers Stink!”

InPulse Watch Gets BlackBerry Data Via Bluetooth

inPulse-blackberry-watch

[Eric] just told us about the watch he developed that displays info from a BlackBerry via Bluetooth. The watch displays updates, message alerts, incoming call information, and… tells time. Setup and control is handled with the BlackBerry keypad. The device is charged with a micro-USB connection and will last for about four days without a recharge. We’d chalk up the rather long battery life to the use of an OLED display, which will use less energy when a portion of the display is left black.

So why is it here? Well, he’s got a couple of blog posts that detail two of the final prototypes that you might find interesting. What else? Oh yeah, his original prototype used an Arduino with a Nokia 3310 LCD display. For those of you who continually call the Arduino a worthless toy, looks like it’s good enough to use when taking a product to market.

Halloween Props: Servo Eyes

[flickr video =http://www.flickr.com/photos/todbot/3991211183/]

If you’re wanting to spice up a Jack-o-lantern, why not give it some spooky eyes that will look around? [todbot] shows us how to set this up using an Arduino and 3 servos. His rig uses a hobby servo to control the entire head’s orientation and a smaller servo for each eye’s movement. Their motion is random, but quite convincing. He has them all stuck together with  popsicle sticks, but you would probably move the location of the large servo to rotate the entire pumpkin, or whatever other prop you put it all in. You can download the Arduino sketch and give it a try your self. We might suggest building a simple rack and pinion rig to rotate both eyeballs with  a single servo.

[via HackedGadgets]

Driving USB Peripherals With Arduino

arduino-driving-USB-keyboard

Circuits@Home have managed to host a USB keyboard with an Arduino and display the keyboard inputs on a character LCD. This uses the USB host shield we covered in August. That host shield includes a MAX3421 which is used here to drive the character LCD.

The control code for the keyboard ends up being fairly simple. The keyboard is polled for entries. The HID input is then examined and converted to ASCII codes for use with the LCD screen. This could make for an excellent controller or debugger for embedded systems. The Arduino, shield, and LCD could be integrated into the keyboard itself with an I/O port for connecting to your project. Commands can be typed out and sent through the I/O port when enter is pressed, with feedback displayed on the screen.

The example code provided with this project lays out the framework for hosting peripherals. We’re looking forward to more projects, and code libraries that take advantage of this new functionality.

Well Engineered Diy Segway

diy-segway

[Mark] wanted a Segway but why buy something if you can have more fun building it? His end product is an amazing homemade version of the self-balancing transportation package. We’ve seen several projects that include auto-balance, but this one is large enough to ride on and has a bit of an advantage in the design. The motors, batteries, and other components are mounted below the wheel hubs and are weight balanced. This means that the device wants to find balance naturally, even when the electronics are switched off.

The frame was modeled in CAD and then welded together. For propulsion [Mark] has installed two 750 Watt motors which will use sprockets and chains to turn the wheels. The machine balances based on data from both a gyroscope and an accelerometer, with the entire packaged tied together using an Arduino.

[Mark’s] build log is well laid out and details each part of the build with a different post. His two most recent entries include video of the unit balancing and of him riding the 95% completed project. A big thanks to [Mark] for taking the time to document this so that we can share in the excitement of a well-executed project.