data logger

Data Logger Powered By Linkit One Board

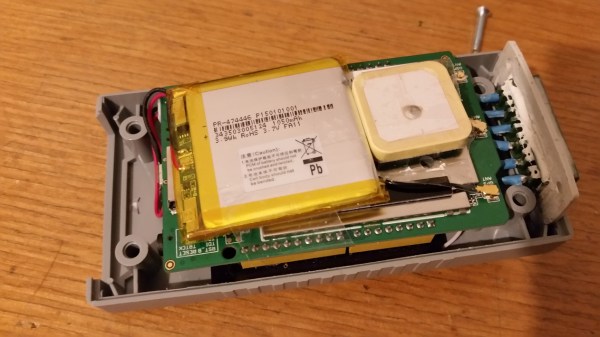
[Jed Hodson] put together a nice little data logger with a Linkit One board at its heart. It’s capable of logging two analog channels and one digital channel which also has PWM capabilities. A GPS is used to get the correct time and a Freetronics OLED display coupled with a shield lets the user view the data in real time.

The data is logged on the Linkit One’s internal storage as a .CSV file, allowing for easy access via a spread sheet program. A LiPo rechargeable battery keeps the electrons flowing and the system will give a warning once the power drops below 20%. Speaking of system – the Linkit One board features an ARM-7 processor and has headers to fit Arduino shields. It’s targeted for wearable and IoT type devices.

Be sure to check out this project if you’re in need of a nice data logger. All code and details of the build are available on [Jed’s] Blog.

A Third Scale Mini PowerMac

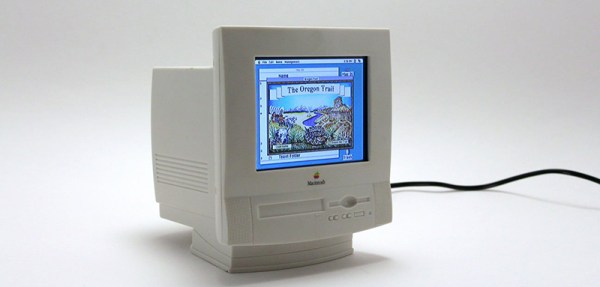
We’re surrounded by tiny ARM boards running Linux, and one of the most popular things to do with these tiny yet powerful computers is case modding. We’ve seen Raspberry Pis in Game Boys, old Ataris, and even in books. [Aaron] decided it was time to fit a tiny computer inside an officially licensed bit of miniature Apple hardware and came up with the Mini PowerMac. It’s a 1/3rd scale model of an all-in-one Mac from 1996, and [Aaron] made its new hardware fit like a glove.

Instead of an old Mac modified with an LCD, or even a tiny 3D printed model like Adafruit’s Mini Mac Pi, [Aaron] is using an accessory for American Girl dolls released in 1996. This third-scale model of an all-in-one PowerPC Mac is surprisingly advanced for something that would go in a doll house. When used by American Girl dolls, it has a 3.25″ monochrome LCD that simulates the MacOS responding to mouse clicks and keypresses. If you want to see the stock tiny Mac in action, here’s a video.

The American Girl Mini Macintosh is hollow, and there’s a lot of space in this lump of plastic. [Aaron] tried to fit a Raspberry Pi in the case. A Pi wouldn’t fit. An ODROID-W did, and with a little bit of soldering, [Aaron] had a computer far more powerful than an actual PowerMac 5200. Added to this is a 3.5″ automotive rearview display, carefully mounted to the 1/3rd size screen bezel of the mini Mac.

The rest of the build is exactly what you would expect – a DC/DC step down converter, a USB hub, and a pair of dongles for WiFi and a wireless keyboard. The software for the ODROID-W is fully compatible with the Raspberry Pi, and a quick install of the Basilisk II Macintosh emulator and an installation of Mac OS 7.5.3 completed the build.

STM32 JavaScript Peeks And Pokes

A lot of people find scripting languages very productive and we’ve seen quite a few chips now supporting what you normally think of as a scripting language. These high-level abstraction languages are great, until they aren’t. When you need to go under the abstraction and do something complex or you need every cycle of performance, you might have to break your normal tools.

The Espruino is an ARM processor (an STM32) that has JavaScript on board. However, [Gordon Williams] shows how you can use peeks and pokes to access the hardware directly when the need arises. The names derive from another popular abstraction’s escape hatch. The old BASIC languages allowed direct memory access using keywords peek and poke. [Gordon] shows some examples of accessing the timer for PWM, and even looks at the STM32 reference manual to show how he knew where to peek and poke to begin with.

Continue reading “STM32 JavaScript Peeks And Pokes”

Transparent ESP8266 WiFi-to-Serial Bridge

These days, connecting your microcontroller project to a WiFi network is pretty easy — you connect up an ESP8266 to your microcontroller project and pretend it’s a WiFi modem, using these old-school-style AT commands. But what do you do if you need to flash new code into the microcontroller? You can’t reprogram the micro remotely through the ESP8266 because those stupid AT commands get in the way.

The solution? By flashing the esp-link firmware into your ESP8266, you talk directly to the microcontroller over WiFi as if it were connected by a serial cable: the ESP8266 becomes a totally transparent WiFi-serial bridge. Now, with a serial bootloader and an ESP8266 in Wifi-to-serial bridge mode, you can reflash your microcontroller wirelessly, and then telnet in to interact with and debug the system remotely. Once you’ve fixed the bugs, you can re-flash the microcontroller: all over WiFi, without having to climb up a ladder to reach your IoT attic-temperature sensor.

To flash a connected Arduino, for instance, all you need to do is convince AVRDUDE to use the network instead of a locally-connected USB-serial cable: avrdude -p m328p -c arduino -b 115200 -P net:192.168.1.123:23 -U:yourHexFile.hex. The ESP8266 passes the data straight through its TX and RX lines to your microcontroller and everything works as if it were wired.

Configuration to allow the ESP8266 to join your WiFi network takes place on a self-hosted webpage that uses [Sprite_tm]’s esp-httpd standalone server, which makes setup pretty painless. And then after that you can simply telnet to the ESP8266 at port 23 and type away, or do anything else you would with a wired serial connection.

Although the simple bridge mode came first, esp-link looks like it’s growing to be a one-stop shop for all your IoT or microcontroller + WiFi needs. In addition to the serial bridge code, there is also a REST-based microcontroller-to-internet mode and there is bi-directional MQTT support in the wings. We haven’t had a chance to dig into these yet, so if you have, let us know in the comments.

If you want to dig in deeper, head over to [Jeelabs]’ blog for a slightly outdated tour of the project written by the code’s author, [Thorsten von Eicken]. For the most up-to-date development news, follow the very active development of esp-link in this thread on the esp8266 forums.

ARM Programming On Mars

Before you overreact to the title, keep in mind the latest version of Eclipse is code named “Mars.” It is always a bit of a challenge to set up a generic ARM tool chain. If you don’t mind sticking to one vendor, shelling out a lot of money, or using Web-based tools, then you might not have this problem. But getting all the tools together can be annoying, at best.

[Erich Styger] works with students and knows they often stumble on just this step so he’s provided clear documentation for getting Eclipse, the ARM gcc compiler, and a full set of tools installed. He focuses on Windows and the Kinetis platform, but the steps are virtually the same regardless. Just get the right tools for your operating system and skip the Kinetis-specific parts if you don’t need them.

Continue reading “ARM Programming On Mars”

Go Forth On A Breadboard

Forth isn’t a shiny new programming language, but it has a staunch following because it is lightweight and elegant. The brainchild of [Chuck Moore], the language is deceptively simple. Words are character sequences delimited by spaces. In its simplest form, Forth knows a few basic words including–and this is the key–a word to define other words.

[Jean-Claude Wippler] likes to experiment with physical computing and he found a Forth image ready-made for the LPC1114. Why is that interesting? The LPC1114 is one of the few (or maybe the only) modern ARM processor in a breadboard-friendly DIP package. Since [Jean-Claude] had a chip sitting around, he had a Forth system up in no time. All he needed was a breadboard and a 3.3V serial connector. The chip has its own bootloader and the The Mecrisp-Stellaris Forth he used has over 300 words as well as the ability, of course, to add more.

Continue reading “Go Forth On A Breadboard”