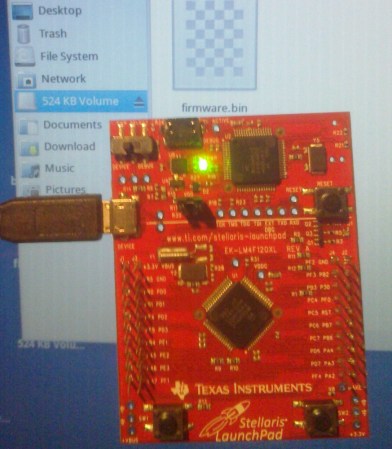
How To Configure Eclipse For The Stellaris Launchpad

eclipse-for-stellaris-launchpad

We’re partial to using gedit and a makefile for our AVR projects. But for the most part we don’t a debugger with those smaller chips. Now that we’re getting going with ARM processors we use debugging all the time and Eclipse is a great way to combine code writing, compiling, and debugging in one place. Sure, we could use one of TI’s provided IDEs (some of them are based on Eclipse), but we’d rather build our tools up ourselves. [Doragasu] is making this a snap with his Eclipse for Stellaris Launchpad tutorial.

He illustrates every step with a screenshot like the one seen above. Here he is including the driverlib from StellarisWare in the linking step. After all of the compiler and linker settings are just right all you need to do is make a copy of the template to start a new project. The final part of the setup configures lm4flash to write binaries to the chip, and configures OpenOCD for use when debugging.

[via Comments]

A Study Of GCC And The TI Stellaris

hard-look-at-stellaris-and-gcc

There are several things that we really like about the TI Stellaris. We think the peripheral library — called Stellarisware — has a pretty intuitive API that makes it easy to get into. But we’re also quite impressed that the software comes with makefiles that build the libraries and examples using your own GCC cross compiling toolchain. We spent quite a bit of time pawing through those makefiles and the makedefs settings file to figure out how TI was doing things. Now if you don’t want to do that sleuthing yourself you can head on over to the GCC with TI Stellaris Launchpad guide which [Brandon] just published.

Shown above is the helpful chart of compiler flags which he pulled from the files with his added comments on what each does. He did the same for the linker flags, and then discusses the program calls made during compilation and linking. He then delves into how the driver library on the chip’s ROM can be accessed in code. This is just the first in a four-part series he plans to write. We can’t wait to see what he has to say about the hardware FPU as we haven’t had time to explore that for ourselves quite yet.

MOD Player For The Stellaris Launchpad

[Ronen K.] wrote in to tell us about the MOD playing Stellaris Launchpad project he recently completed. A MOD is a sound file for the computers of days long gone. But you’ll certainly recognize the sound of the 8-bit goodness that is coming out of this device.

To understand how a MOD file stores samples you might want to glance at the Wikipedia page. There are a ton of these files out there, but this implementation is meant for files with only four channels. For now the only external hardware used is an audio jack which needs a ground connection and a PWM signal on each of the two audio channels. [Ronen] is storing the files in flash memory rather than using an SD card or other external storage. This leaves 213k of space for up to six files that can be selected by the user buttons which cycle forward or backward through the list. See this demonstrated after the break.

The project ports existing code from an STM32 application. Since that is also an ARM microcontroller there’s not a ton of work that needed to be done. But he did have to write all of the PWM functionality for this chip. This PWM tutorial turned out to be very helpful during that process.

Continue reading “MOD Player For The Stellaris Launchpad”

How To Build OpenOCD With Stellaris Launchpad Support

The stable version of OpenOCD (an open source On-Chip Debugging software package) doesn’t have support for the ICDI protocol used by the Stellaris Launchpad board. But it is pretty easy to build your own OpenOCD from source after patching it to use the protocol.

We’ve already seen an open source tool used to flash binary images to the TI ARM board. But that can’t be used with GDB. With the recent inclusion of USB-based ICDI in the OpenOCD development branches we gain all the features that come with the package. We’re quite happy hear about this as we use OpenOCD for many hardware architectures and this makes development for this board feel more like normal.

Our Stellaris Launchpad hasn’t just been sitting in the closet since we got it. We’ve learned a lot by using the lm4tools to program the chip as we work our way through the online workshop. We’re really beginning to like the Stellarisware peripheral library that has been provided. For us it works in a much more intuitive way than the one that STM uses with their ARM Discovery boards. We’d recommend taking a look at the workbook PDF (which is basically a verbose listing of what’s in the video series) and the library reference (called SW-DRL-UG-9453.pdf) which is in the docs folder of the Stellarisware package.

[via Dangerous Protoypes]

In-depth Comparison At STM32 F3 And F4 Discovery Boards

The STM32 F3 and F4 Discovery boards have been around for a while now. We’ve looked at both separately and they’re impressive dev boards for the price. Now can get a closer look at each from this in-depth comparison of the two Cortex-M4 development tools.

To start off, both of the boards have the same size and footprint (there are two dual-row pin headers which break out the connections to the ARM chip). Fundamentally the F3 and F4 chips have a different level of features, but the boards themselves are aimed at different applications as well. The F3 series of microcontrollers looks to be more affordable than the F4, containing less program memory, no Ethernet capability, and only one USB port. But both have hardware floating-point abilities and they’re blazing fast. The boards offer a MEMS accelerometer for prototyping. But the Discovery-F3 also contains a gyroscope while the Discovery-F4 provides audio hardware like a microphone, and DAC.

If you want to use a Linux box to develop with these tools you might find this guide helpful.

Netduino Gets A Huge Upgrade

The Netduino, a dev board built around the .NET Micro framework with the goal of being compatible with Arduino shields just got a huge upgrade.

The new Netduino Plus 2 features an upgraded STM32 ARM Cortex-M4 uC running at 168 MHz, improving on the original Netduino’s ARM7 running at 47 MHz. In addition to some more processing power, the STM32-based microcontroller has twice the RAM and six times as much Flash memory. Also, Ethernet (10Mbps), a MicroSD card port, and of course compatibility with all Arduino shields – including the new Arduino ‘Revision C’ boards for the Leonardo – remains intact.

In keeping with the design goals of the Netduino, the new board uses the .NET Micro Framework running under Windows. It looks like OS X and Linux users won’t be left out in the cold for long, though; there’s a project to port the .NET Micro stuff over to Mono.

Tip ‘o the hat to [Jason] for sending this one in.

Developing With EBay-sourced ARM + LCD Dev Boards

eBay isn’t only about counterfeit designer handbags and boxes of all-marshmallow Lucky Charms, sometimes there’s actually something useful for sale. [Matt] found a bunch of Chinese-made ARM development boards with integrated LCD displays on the ‘bay, but without a reliable toolchain, these boards – as cool as they are – are nearly useless. Thankfully, he figured out how to do something with these boards, and neatly packaged everything into a VirtualBox image.

The boards in question usually include a 2.4″ or 3.2″ touch panel LCD, an STM32F103 ARM Cortex-M3 CPU, a microSD card connector, and sometimes a few other goodies like 16MB of Flash memory and an RS-232 port. An amazing amount of computational capability packaged into an easy-to-use form factor made even more awesome by their $40 price point.

Because these boards offer so much more than a common Arduino, a proper OS is in order. [Matt] looked over FreeRTOS and included a few demo programs for his Ubuntu-based VirtualBox image (available for download on [Matt]’s site, it’s a dropbox, email us if you need some hosting, [Matt]) Never mind, see below.

Programming these boards can be done over a serial interface, but a JTAG programmer such as a Bus Blaster makes things very, very easy.

You can check out a few demos [Matt] put together after the break. It’s a very cool development that is much more suited for being integrated into an electronics project than a Raspberry Pi or other such high-power ARM board, and something we hope to see more of in the future.

EDIT: You know what’s really good for hosting Linux distros? Torrents. That’s [Matt]’s distro and the HaD crew is seeding. Please seed.

Continue reading “Developing With EBay-sourced ARM + LCD Dev Boards”