[Quinn Dunki] has been hard at work building a Teddy Top – an Apple IIc Plus modified for a road warrior. It has a 3.5 inch disk drive, runs at a blistering four megahertz, and has a beautiful integrated color LCD. It would be a shame to have such a great machine and no way to play games as they were intended, so [Quinn] set about building a game pad for her lovable Apple II.
The Apple II joystick port isn’t as simple as an Atari or Commodore joystick port. Where the bog-standard Atari joystick is basically just a bunch of switches connected to pins, the Apple II joystick is analog. Weird, and even weirder is the value of the pots in these joysticks: 150kΩ. Somehow or another, nobody makes pots in this value any more. Luckily the hardware in these joysticks is well documented, and shoehorning in modern components isn’t that bad.
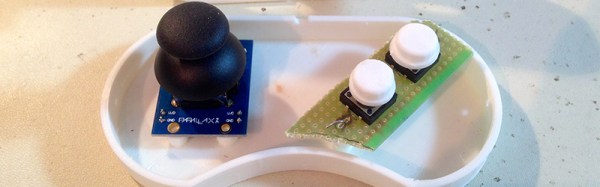
The Apple joystick has a bit of circuitry – a 556 timer chip that reads the values of each pot and converts that into a stream of 0s and 1s for the Apple. The joystick [Quinn] found for her game pad is an analog thumb stick on a neat breakout board manufactured by Parallax. This analog joystick has 10kΩ pots in it, and that just won’t work with the 556 timer chip. However, since this is just resistors and a 556 chip, adjusting some of the values on the original schematics does the trick. [Quinn] added a few capacitors to her circuit, and everything worked beautifully.
With the electronics down, she turned her attention to the case for her Apple II road warrior enclosure. She recently picked up a 3D printer, which means she’s new to 3D printing. After spending a few hours designing a controller in 123D Design, she sent the files over to the printer. Warping happened. She tried an ABS slurry. The part was stuck to the bed. It took a few tries (purple glue sticks are awesome, [Quinn]), but she eventually got her plastic enclosure printed out, and the circuitry installed. The result is a portable computer, with a custom controller, playing Lode Runner. Can’t beat that.
 . Vinyl is an insulator. [Ben] dealt with this by using his vacuum chamber to evaporate a thin layer of silver on the vinyl.
 [Ben] wasn’t done though. He checked out a few other recording formats, including CD and DVD optical media, and