Forkless Motorcycle Tears Up The Track

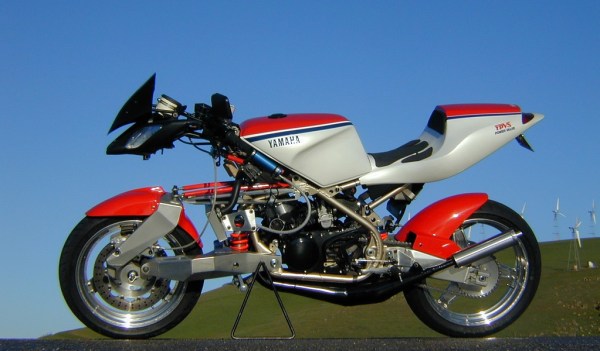
The bike above may look like a pristine Yamaha prototype, but it’s actually the work of [Julian Farnam], a motorcycle hacker of the highest level. We caught his Yamaha A-N-D FFE 350 on OddBike, and you can read [Julian’s] own description of the bike on his Slideshare link.

The FFE 350 started life as a Yamaha 1990’s RZ350 two-stroke racer. From there, [Julian] gave it his own Forkless Front End (FFE) treatment. Gone is the front fork, which while common in motorcycle and bicycle design, has some problems. Fore-aft flex is one – two thin tubes will never make for a rigid front end. Changing geometry is another issue. Since forks are angled forward, the front wheel moves up and to the rear as the shocks compress. This changes the motorcycle’s trail, as well.

Forkless designs may not have these issues, but they bring in a set of their own. A forkless design must have linkages and bellcranks which are often the source of slop and vibration. [Julian’s] design uses two sets of linkages in tension. The tension between the two linkages removes most of the slop and provides that directly connected feel riders associate with forks.

The FFE 350 wasn’t just a garage queen either – it laid down some serious laps at local tracks in Southern California. Unfortunately, the forkless design was too radical to catch on as a commercial venture, and the FFE has spent the last few years in storage. [Julian] is hard at work bringing it back to its 1998 glory, as can be seen on his restoration thread over on the Custom Fighters forum.

Seeing The World Through Depth Sensing Cameras

The Oculus Rift and all the other 3D video goggle solutions out there are great if you want to explore virtual worlds with stereoscopic vision, but until now we haven’t seen anyone exploring real life with digital stereoscopic viewers. [pabr] combined the Kinect-like sensor in an ASUS Xtion with a smartphone in a Google Cardboard-like setup for 3D views the human eye can’t naturally experience like a third-person view, a radar-like display, and seeing what the world would look like with your eyes 20 inches apart.

[pabr] is using an ASUS Xtion depth sensor connected to a Galaxy SIII via the USB OTG port. With a little bit of code, the output from the depth sensor can be pushed to the phone’s display. The hardware setup consists of a VR-Spective, a rather expensive bit of plastic, but with the right mechanical considerations, a piece of cardboard or some foam board and hot glue would do quite nicely.

[pabr] put together a video demo of his build, along with a few examples of what this project can do. It’s rather odd, and surprisingly not a superfluous way to see in 3D. You can check out that video below.

Continue reading “Seeing The World Through Depth Sensing Cameras”

Teensys And Old Synth Chips, Together At Last

The ancient computers of yesteryear had hardware that’s hard to conceive of today; who would want a synthesizer on a chip when every computer made in the last 15 years has enough horsepower to synthesize sounds in software and output everything with CD quality audio? [Brian Peters] loves these old synth chips and decided to make them all work with a modern microcontroller.

Every major sound chip from the 80s is included in this roundup. The Commodore SID is there with a chip that includes working filters. The SN76489, the sound chip from the TI99 and BBC Micro are there, as is the TIA from the Atari consoles. Also featured is the Atari POKEY, found in the 8-bit Atari computers. The POKEY isn’t as popular as the SID, but it should be.

[Brian] connected all these chips up with Teensy 2.0 microcontrollers, and with the right software, was able to control these via MIDI. It’s a great way to listen to chiptunes the way they’re meant to be heard. You can check out some sound samples in the videos below.

Thanks [Wybren] for the tip.

Continue reading “Teensys And Old Synth Chips, Together At Last”

Wax Motors Add Motion To Your Projects

[electronicsNmore] has uploaded a great teardown and tutorial video (YouTube link) about wax motors. Electric wax motors aren’t common in hobby electronics, but they are common in the appliance industry, which means the motors can be often be obtained cheaply or for free from discarded appliances. Non-electric wax motors have been used as automotive coolant thermostats for years.  Who knows, this may be just what the doctor ordered for your next project.

As [electronicsNmore] explains, wax motors are rather simple devices. A small block of wax is sealed in a metal container with a movable piston. When heated, the wax expands and pushes the piston out. Once the wax cools, a spring helps to pull the piston back in.

The real trick is creating a motor which will heat up without cooking itself. This is done with a Positive Temperature Coefficient (PTC) thermistor. As the name implies, a PTC thermistor’s resistance increases as it heats up. This is the exact opposite of the Negative Temperature Coefficient (NTC) thermistors we often use as temperature sensors. PTC’s are often found in places like power supplies to limit in rush current, or small heating systems, as we have in our wax motor.

As the PTC heats up, its resistance increases until it stops heating. At the same time, the wax is being warmed, which drives out the piston. As you might expect, wax motors aren’t exactly efficient devices. The motor in  [electronicsNmore’s] video runs on 120 volts AC. They do have some advantages over solenoid, though. Wax motors provide smooth, slow operation. Since they are resistive devices, they also don’t require flyback diodes, or create the RF noise that a solenoid would.

Continue reading “Wax Motors Add Motion To Your Projects”

Hackaday Prize Finalist: An Un-noodly Spectrometer

And so we come to the final finalist bio for The Hackaday Prize. In only three days, we’ll know whether [fl@C@]’s RamanPi Spectrometer or one of the four other projects to make it into the finals round will be making it to space, or only Japan.

There are a surprising number of spectrometer projects out there on the Intertubes, but most of these setups only measure the absorption spectrum – literally what wavelengths of light are absorbed by the material being measured. A Raman spectrometer is completely different, using a laser to illuminate the sample, and measuring the scattering of light from the material. It’s work that has won a Nobel prize, and [fl@C@] built one with a 3D printer.

Bio below, along with the final video that was sent around to the judges. If you’re wondering who the winner of The Hackaday Prize is, even I don’t know. [Mike] and a few Hackaday overlords do, but the rest of us will remain in ignorance until we announce the winner at the party we’re having in Munich next Thursday.

Continue reading “Hackaday Prize Finalist: An Un-noodly Spectrometer”

Accurately Measuring Electrical Conductivity

[Ryan] designed a PCB that lets you easily take readings from a commercial electrical conductivity probe over I2C. Conductivity measurements are great for measuring the salinity of a solution, which is useful for applications like hydroponics. While the probes themselves are a bit pricey (on the order of $50 from eBay), they are very accurate and last a long time.

Commercial conductivity probes contain platinum electrodes to prevent corrosion. The electrodes are excited with an AC signal, which prevents polarization of the solution and avoids chemical reactions at the electrodes. The voltage across the two electrodes is measured while the electrodes are being excited, which is proportional to the conductivity of the solution

[Ryan]’s board generates +/-5v and uses a Wien bridge oscillator to generate a sine wave which excites the outermost electrodes. The voltage across the electrodes is amplified and fed into a MCP3221, an inexpensive 12-bit ADC with an I2C interface. [Ryan] also wrote an Arduino library for the MCP3221 so you can easily get your probe up and running.


RFToy Makes Wireless Projects Easier

[Ray] has created RFToy, a simple gadget to aid in setting up wireless systems with a variety of common radio modules. RFToy is an open source microcontroller board running on an ATmega328. While RFToy is Arduino code compatible, [Ray] chose to ditch the familiar Arduino shield layout for one that makes it easier to install RF modules, and is more handheld friendly.

[RFToy] includes headers for the popular nRF24L01 2.4 GHz transceiver, as well as 433/315 transmitters and receivers found in many low-cost wireless electronic devices. The 128×64 pixel OLED screen and 3 button interface make it easy to set up simple user interfaces for testing new designs.

[Ray] hasn’t broken any new ground here. What he has done is create a simple tool for wireless projects. Anyone who’s worked on a wireless system can tell you that tools like this are invaluable for debugging why your circuit isn’t talking. Is it the transmitter? The receiver? Something else in the power supply circuit?

Check out [Ray’s] demo video after the break. In it, he sniffs, records, and plays back signals from several remote-controlled outlets. [Ray] also has a great demo of sending temperature data back and forth using an nRF24L01.

Continue reading “RFToy Makes Wireless Projects Easier”