Bridging Networks With The Flip Of A Switch

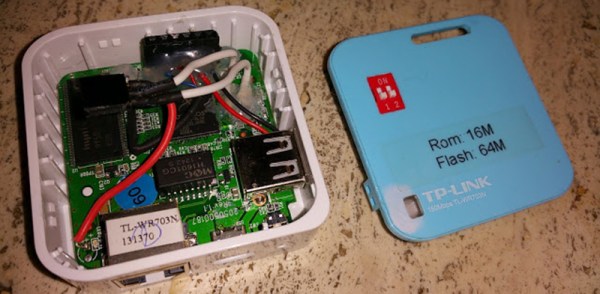
The TP-Link TL-WR703n is the WRT54G for the modern era – extremely hackable, cheap, and available just about everywhere. Loaded up with OpenWRT, it’s capable of bridging networks: turning Ethernet into WiFi and vice versa. This requires reconfiguring the router, and after doing this enough times, [Martin] was looking for a better solution. The SOC inside the WR703n has two exposed GPIO pins, allowing [Martin] to choose between WiFi access point or client and between bridged or NAT/DHCP.

According to the OpenWRT wiki, there are a few GPIOs available, and after connecting these pins to a DIP switch, [Martin] could access these switches through the firmware. The hard part of this build is building the script to change the settings when the system boots. This script looks at the state of the GPIOs and changes the WiFi into client or access point mode and tries not to muck about with the DHCP somewhere off in the cloud. Yes, we just used cloud in its proper context.

The only other hardware to complete this build was a simple USB to serial converter that should be shoved into the corner of everyone’s workbench. Not bad for an extremely minimal soldering and configuration required for a something that’s extremely useful.

Self balancing chopper

Self Balancing Vehicle Inspired By Bicycles Of Yesteryear

[XenonJohn] is not a newcomer to the world of self balancing vehicles. He was part of the Medicycle team and a semifinalist for The Hackaday Prize. Working on the Medicycle had exposed some opportunities for improvement of the design, the most significant being the single wide wheel supporting the vehicle and rider. The unicycle design was more difficult to learn to ride than that of a two-wheeled nature. [XenonJohn] wanted to make an improved self balancer and this new one will have two wheels that are independently controlled.

Although the finished product looks like it started with a bike frame, the self-balancer’s frame is actually completely custom. The handlebars and banana seat were purchased new as aftermarket parts for old-style bicycles. Powering the two wheels is a pair of 24v brushed motors, conveniently each one came with a 6:1 reduction gearbox pre-installed. The wheels are a complete compilation of parts not intended to go together. The BMX bike rims were laced to mountain bike front hubs. The hubs have provisions for a disk brake but [XenonJohn] mounted a large toothed pulley there instead. A belt then connects the drive motor gearboxes to the pulleys completing the drive train.

The LiFePO4 battery kit was purchased off eBay and puts out 24v and 15AH using eight cells. These batteries alone were a hefty percentage of the projects cost, costing nearly $300. Controlling the vehicle is an Arduino Mega that makes use of the FreeSix IMU library. The Mega receives inputs via I2C from a Sparkfun SEN-10121 board that contains both accelerometers and gyroscopes along with turn switches connected to the ‘brake’ levers on the handlebars. The Arduino then sends commands to the 25 amp Sabertooth motor controllers to keep you balanced as you buzz around town.

Video below.

Continue reading “Self Balancing Vehicle Inspired By Bicycles Of Yesteryear”

Hackaday Links Column Banner

Hackaday Links: November 16, 2014

There have been a few people asking us to do our full teardown of a crowdfunding campaign, this time for Bleen. We’ll get to that, but here’s the TL;DR version: 208 people just threw money away, and right now Indiegogo is ~$3000 richer for doing nothing.

Insipired by a Hacklet, [Chris] documented his retro console build. He started out like most people do with a Raspberry Pi, but found emulating newer consoles like the N64 consumed too much processor time. He moved his build over to custom-assembled hardware with an AMD Micro-ATX board, a drive, and a USB gamepad. It’s beautiful, and much, much more powerful than a Raspberry Pi.

SD card in your Pi died? Of course it did. The problem is you’re not shutting down your Pi correctly. [satya] whipped up a quick project to fix that. One button, a bit of Python, and a shell script is all you need for a one-button shutdown for your Raspberry Pi.

A while ago, [Jan] built an ARM-based modeling MIDI synth that sounds a lot like the old Junos of the 80s. It’s build around the one 8-pin DIP ARM that’s being manufactured, placed between a MIDI jack and a 1/4″ jack. That’s pretty much all the components. [Gritty] plugged it into a Teensy that’s connected to a sequencer. It sounds awesome.

Everyone loves the Spark Core – there are a few floating around the office here. Now there’s a new Spark. It’s called the Photon, and they’re packaging it as a module. There’s an STM32F2 microcontroller and a BCM43362 Wi-Fi transceiver packaged in a nice, FCC certified module. Very cool.

The Computeum, One Of The Biggest Computer Museums In Germany

QWERTZ Everywhere

I cannot say in words how perfect the venue for our Hackaday Munich party was. Not only was there a gigantic collection of vintage video games just around the corner, there was also a freaking warehouse full of mainframes, tubes, transistors, and some of the old retrocomputers you may have used in the 80s and 90s.

It’s called the Computeum, and without a doubt it is one of the most complete computer museums in Germany. There are fantastic computer museums in the states, but these don’t hold a candle to the pure amount of big iron and silicon found at the Computeum.

Continue reading “The Computeum, One Of The Biggest Computer Museums In Germany”

An Extremely Tiny 5.8GHz FPV Transmitter

Flying RC aircraft with a first person view is the latest and greatest thing in the hobby. In a fact that I’m sure will be shocking to 90% of people, you don’t need to buy a Phantom quad fly FPV. The guys at Flite Test show how you can build a tiny 5.8GHz FPV transmitter for under $100.

The parts used for this build are pretty much jelly bean parts at this point, but [Peter] at Flite Test is going for extremely lightweight parts for this build. He found an NTSC board camera that only weighs 1g and added a wide-angle lens. The transmitter is a tiny 200mW module that only weighs about 2g.

Why are the Flite Test crew going for small and light FPV setups? They just launched a new line of planes that can be built from a single piece of foam board. If you have a small micro quad, you can easily add FPV to it with this rig.

The Future Of The Internet Of Things

When buying anything, you’re going to have a choice: good, fast, or cheap. Pick any two. A plumber will fix a drain good and fast, but it won’t be cheap. The skeezy guy you can call will fix a drain fast and cheap, but it won’t be good.

Such it is with radios. You can have long-range (good), high bandwidth (fast), or a low price (cheap). Pick any two. The Internet of Things demands a cheap, long-range radio module, but until now this really hasn’t existed. At Electronica last week, Microchip demoed their IoT solution, the LoRa. This module has a 15km (rural) or ~3km (heavy urban) range, works for a year on two AAA batteries, and is very cheap. Bandwidth? That’s crap, but you’re not streaming videos to your shoe.

Continue reading “The Future Of The Internet Of Things”

100% DIY Intervalometer Is 100% Awesome

It’s easy to tell from this process documentary that [Nagyizee] is not one to settle for prefabricated anything. He could have just bought some off-the-shelf DSLR intervalometer, but that would mean interfacing with someone else’s design through cold, soulless plastic.

[Nagyizee] wanted a one-of-a-kind tool built from the ground up. In addition to a timer, he was in the market for a light sensor and sound detection. He chose an STM32F100 ARM Cortex M3 running at 8MHz in the name of power efficiency and started designing the UI and firmware. A custom graphic library for the OLED display streamlines it even further. Once the schematic was finalized, [Nagyizee] devised a stylish and ergonomic wooden case to be milled with a tiny Proxxon F70.

With the enclosure decisions out of the way, he etched and drilled the PCB and placed the components. The light sensor needed a lens and a prism, so he made one from a 10mm LED body. Not one to miss a detail, [Nagyizee] also turned some buttons, hand painted them, and made a scroll wheel. He ends the video with a demonstration that proves it is quite capable. In addition to standard cable release mode, it handles long exposure times, sequential shooting, and capture on light, shadow, or sound. But wait, there’s more: [Nagyizee]’s creation combines modes with ease and grace.

Continue reading “100% DIY Intervalometer Is 100% Awesome”