Ninety five percent of the population will say Apple computers is the brainchild of [Steve Jobs]. The other five percent will be right, but what nearly no one knows is that the Macintosh project was originally conceived by [Jef Raskin]. He holds the honor of turning the Mac into an, ‘information appliance’ and being one of the first people to seriously consider how millions of people would interact with computers.
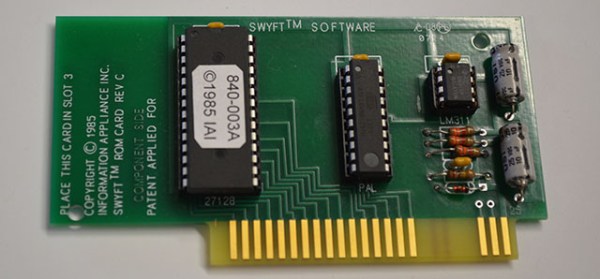
The Mac wasn’t [Jef]’s first project at Apple, though. Before the Mac project he was working on something called Swyft – an easy to use command line system that was first implemented as a firmware card for the Apple IIe. [Mike Willegal] was kind enough to bring one of these Swyft cards to the Vintage Computer Fest this weekend, and did a demo of it for us.
The basic idea behind the Swyft card was to have an integrated word processor, calculator, and access to Applesoft Basic. Holding down a ‘leap’ key – in the case of the Apple IIe add-on, the open apple key – allowed the user to search for text and perform operations on any result. It’s odd, but it just makes sense in some strange way.
[Mike] is doing a build class at the VCF today where anyone attending can build their own Swyft card. He also has instructions for building your own, should you want to experiment with one of the ‘could have beens’ of user interface design.