RGB Infinity Mirror

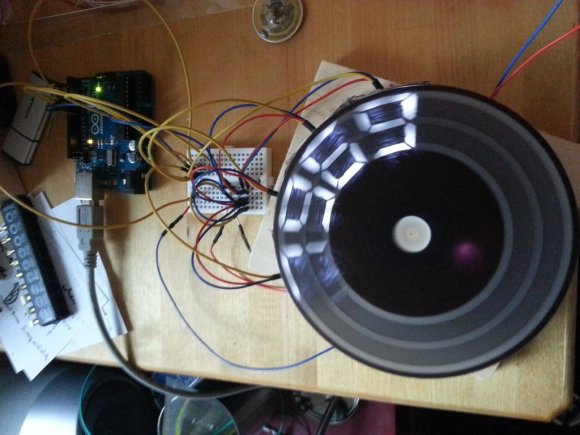
If you’ve been waiting for a more detailed guide before you set off to work on your own Infinity Mirror, [Ben]’s write-up is perhaps the most approachable one you will find. This build uses a set of four potentiometers to control an analog RGB LED strip (these lights are not individually addressable: but that makes coding simpler). [Ben] powers everything from a 12V 5A DC adapter, which is more than enough to run the 12V RGB strip along with the Arduino.

The mirror has two different ‘modes:’ individual channel color control and color-fade. In the first mode, three pots drive the RGB channels respectively. The color-fade mode has a mind of its own, sliding between all possible colors; you can spin the fourth potentiometer to control the speed of the transition.

The video below better illustrates the different modes. We definitely recommend [Ben’s] excellent guide as an ideal first project for anyone who has yet to take the plunge beyond simple microcontroller exercises. Check out Freeside Atlanta’s Infinity Mirror prototype for more inspiration.

Continue reading “RGB Infinity Mirror”

As Millenials Grow Up Do They Demand Cooler LED Sneakers?

flora-LED-sneakers

We’re hoping that whomever came up with the idea of integrating LEDs into children’s shoes is kicking back on a beach somewhere living off the residuals of the idea. We see those things everywhere. Now the real question is, if you grew up with LEDs in your shoes do you expect cooler light up kicks as you age? [Becky Stern] must think so and that’s why she’s showing off Adafruit’s addressable LED strip shoe project called Firewalker.

This is prototype rather than product, so you can see the Arduino compatible Flora board on the ankle of the lit shoe above. There’s also a battery pack hitching a ride on the laces. But those worried about that fashion faux pas can work on a more finished driver that straps to your calf, or can be integrated in the insole.

Lighting patterns are set off by Velostat, a pressure-sensitive conductive sheet that goes in the heel of the insole. The Flora board measures the resistance, triggering a light show (embedded below) when it drops. Now we just need someone to integrate a power generator based on your movement.

Continue reading “As Millenials Grow Up Do They Demand Cooler LED Sneakers?”

Laser Cut Arc Reactor Replica

laser-cut-arc-reactor

We’re starting to become a repository for Arc Reactor replica projects. The one shown above uses mostly laser cut components. We missed it back in May when [Valentin Ameres] tipped us off the first time. But he sent it in again after seeing the 3D printed version earlier this month.

Our biggest gripe is that we don’t have our own laser cutter to try this out on. Everything has been cut from 2mm thick acrylic. The black, silver, and copper colored components were painted to achieve this look. Many of the clear parts also had a dot matrix etched into them to help with light diffusion.

Basic assembly just required the parts be glued together. The finishing touches include wire-wrapping the slots of the outer ring and adding LEDs and current limiting resistors.

The plans are not freely available, but the 3D printed version linked above doubles as a 123D tutorial. That should help get you up to speed designing your own if you are lucky enough to have time on laser cutter.

Continue reading “Laser Cut Arc Reactor Replica”

Reaction Time Challenge

reactionChallenge

We’re not sure where [Bill Porter] finds all of his free time, but we’re glad he’s put it to such good use by building an exhibit piece for the local science museum: Reaction Time Challenge. It’s likely that we were all inspired to love science as kids in a museum like this, and [Bill’s] contribution is already fascinating its young audience. The challenge lets two participants test how fast they can smack a big red button after a randomly-generated countdown. The time taken for the players to react is translated into the RGB LED strips, measuring how fast they managed to hit the button.

Builds like this one need to clearly communicate how they should be used; you don’t want confused children bamming around on your cabinet. First, [Bill] guts the dim LEDs inside the big plastic buttons and replaces them with some brighter ones. To keep the connections clean, he takes the cannibalized ends of an Ethernet cable and hooks the speaker and buttons to an Ethernet jack. The jack sits snugly in a project box where it connects to an Arduino. Two RGB LED strips run from the opposite end of the box, daisy-chaining from the bottom of the cabinet to the top, then back down again. See it all come together in the video after the break.

[Bill’s] museum must be pretty lucky; he resurrected the “Freeze Frame” exhibit for them just over a year ago and has done a bunch of other projects for them over the years.

Continue reading “Reaction Time Challenge”

Turning Cheap Voltmeters Into I2C Displays

Voltmeter I2C Displays

[Tom] needed 8 displays for a project. He wanted to to control them over I2C, and was trying to reduce cost. Some vendors make I2C controllable seven segment displays, but they cost about $10 each. [Tom] figured he could hack cheap voltmeters to get the same results for about $3 a pop.

The voltmeters that [Tom] bought used a 8 bit STM8S003F3P6 microcontroller. He reverse engineered the device and re-created the schematic to find out where the I2C and programming pins would be. Then he hooked it up to a STM8 Discovery development board, which has an integrated programmer.

With the hardware figured out, it was time for new firmware. Fortunately, [ba0sh1] had already written firmware for a similar purpose which could easily be adapted. The code implements a software I2C slave, which reads data off the bus and displays it. It’s all available on Github.

The end result is a I2C controlled display for a third of the cost. Next time you need a bunch of these in a project, consider picking up some cheap voltmeters.

Unplayable Holophonor Replica Is Unplayable

holophonor

You won’t find all that many props or homemade replica builds here at Hackaday, but [Harrison Krix’s] work is second to none, and his Futurama Holophonor replica is worth drooling over. [Harrison] sourced an old (and apparently grimy) clarinet from a local thrift store, which he strips clean of its keys and attachments. The body itself receives some subtle modifications from the lathe and epoxy to plug some holes. Custom-spun plastic pieces complete the rest of the body, including the meticulously crafted bell which houses 54 LEDs.

[Harrison] also whips up a breakout board for a mini Arduino Pro with 4 fading and 4 blinking channels, and some custom power supply options for the Holophonor’s base: a scratch-built fiberglass AAA battery holder and optional AC adapter jack. As an added bonus, he’s fitted the Holophonor’s stand with a set of Robot Devil hands that hold it in place. The only video is an illumination test, but it sure is pretty. You can see it below! It looks perfect, but alas is unplayable which actually makes it even more authentic.

The Holophonor is the latest in a slew of work from Volpin Props. You probably remember [Harrison’s] first Daft Punk helmet from a few years back, or the second one that followed shortly after.

Continue reading “Unplayable Holophonor Replica Is Unplayable”

One Pixel Video Game Rises From RGB Button Hardware

rgb-button-one-pixel-video-game

This project was completely component driven. [Christopher] and [Robert] wanted to try out buttons with an RGB backlight option. They found the one shown above, which looks fantastic. It should since it costs over twenty bucks in single units. What they came up with is a one pixel video game that works like a color matching version of Simon Says. The button will show you the target color for just a moment. The player then holds the button as it fades through colors. Releasing it at the right instant will produce a green flash, a wrong shade results in a red flash.

They went with an Arduino Mega for the project as that was within easy reach. A hunk of protoboard is used as a shield, it includes the button itself, connected through some current limiting resistors to the pins that drive the LED. There is also a tactile switch which actuates the AVR’s reset pin.

When trying to get the LED to fade through the full range of colors [Christopher] was hit with a common problem. Since our eyes don’t detect changes in low and high intensity light the same way, you can’t use linear changes in PWM and get a smooth result. He fixed this by using Gaussian curves to set the intensity levels.

Continue reading “One Pixel Video Game Rises From RGB Button Hardware”