Adding Footwell And Glove Box Lights To Your Ride

[KonaStar] shows us that adding some light to you car interior isn’t very hard. It’s just a matter finding some unused space and routing the cables so that they’re out of sight. Here he’s added LED lighting to the footwells and glove box of his car.

He managed to find some depressions in the molded dashboard of the car which were just the right size for a small four-lead LED. He drilled holes for those leads, and soldered some protoboard to them on the inside of the dash. This way there’s nothing unfinished to catch your eye, and the protoboard provides an area to host the resistor and interconnect.

There are switches in the glove boxes that turn the lights off when closed. These work for the footwells too. In addition, the LED lighting harness is wired to the parking lights so they will not come on when the car’s lights are off. Because he started with a lighting harness intended to add ambient light to a vehicle, the system responds to the doors being opened as well.

It’s a nice addition if you don’t mind pulling out several pieces of your interior during the install. We’re more comfortable with something along the lines of this turn signal hack.

Touch-based Wirless RGB Lamp Control

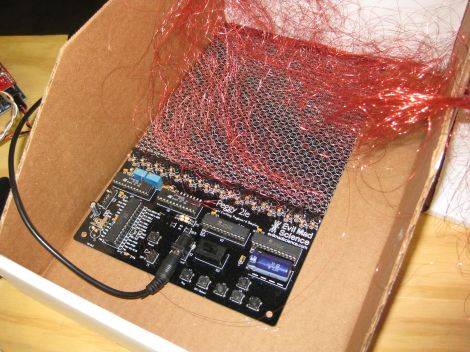
[Alex] built an add-on board for his TI launchpad that lets him use it as a wireless controller for an RGB lamp (translated). As you can see above, the board has a pair of female pin-headers which make it easy to install or remove the board. This way you can use it for other projects without any hassle.

The board itself doesn’t have any buttons. Instead, [Alex] etched a two-sided PCB, including pads for use as capacitive touch sensors. Here we only see the underside of the board, which hosts four RGB LED modules. These give feedback by showing the levels which are about to be set for each color. In the clip after the break you’ll get a good look at the touch sensors. There are two that act like buttons, scrolling through each color channel, and sending the updated values to the lamp via a wireless module mounted on that same side. There are also four pads which act as a slider. We didn’t see any code but apparently this uses one of TI’s touch sensor libraries.

Continue reading “Touch-based Wirless RGB Lamp Control”

Hacking Together A Color Changing Water Wall

[BadWolf’s] girlfriend wanted him to build her a lamp for Christmas and he didn’t disappoint. What he came up with is a water-filled color changing lamp with bubbles for added interest. See for yourself in the clip after the jump.

The color changing properties are easily taken care of by some waterproof RGB LED strips. [BadWolf] went the Arduino route for this project but any microcontroller will be able to fill the role of color cycling. The enclosure is all hand-made from acrylic sheets. He grabbed some chemical welding liquid from the hardware store and applied it to the acrylic with a syringe. That’s easy enough when attaching the edges to one side of the enclosure. But it gets much tougher when it’s time to seal up the other side. He recorded a video of this which shows the syringe taped to a rod so he can get it down in there, pushing the plunger with a second extension device.

Bubbles are supplied by a small aquarium pump. We’re wondering if this will need frequent cleaning or if you can get some pool chemicals to keeps it nice and clear (or just a teaspoon of bleach)? Continue reading “Hacking Together A Color Changing Water Wall”

Edge-lit Nixie Tube Is Sheer Brilliance

It’s not often that we see something so brilliantly simple we’re left reaching for our checkbooks while wondering exactly how we never though of that before. [Jürgen]’s edge-lit Nixie display is one of those builds.

[Jürgen]’s modern take on a Nixie display uses ten laser-engraved pieces of acrylic to emulate a Nixie numerical display. In the base of the display are 10 LEDs, each shining onto the side of a piece of acrylic. When an LED lights up, you can clearly see the corresponding number. Edge-lit displays are old hat, but talking about the possibility of an RGB Nixie-style display is really neat.

The build was inspired by an antique edge-lit display that performed the same function as the ever-popular Nixie tube with 10 miniature light bulbs and light pipes. The ancient edge-lit displays came in a rectangular enclosure that worked very well for panel-mount uses, but [Jürgen] stuck to a more traditional cylindrical orientation. All we want to know is when a manufacturer in China is going to start building these. Check out the demo of the edge-lit Nixie after the break.

Continue reading “Edge-lit Nixie Tube Is Sheer Brilliance”

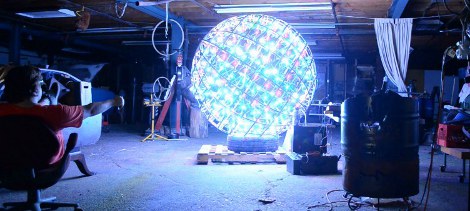
384-LED Ball Receives Animation Wirelessly And Knows Its Orientation

We get a ton of tips about Kickstarter projects. Here is a great example of what we need to see in order to feature one of them. This LED Blinky Ball developed by Null Space Labs is the target of a rather ambitious fundraising campaign. But in addition to the fundraising write-up they’ve shared extensive details about the prototype.

The ball is made up of sixteen slices; each is its own circuit board hosting an LED driver. All slices use the same PCB design, but one of them has an ATmega328 populated on the board to act as master. Optional components on the master board include an accelerometer, and a Bluetooth module to receive animation data. To get the full effect of the most recent prototype you’re going to want to see the video on their Kickstarter page.

Think this ball looks familiar to you? The original design was developed by [Nikolai] as a performance piece for a friend. This version was inspired by our feature of that earlier project.

So, use this as a template if you’re planning to submit your Kickstarter links to Hackaday’s tips line. We want to juicy details on the project!

Share A Light-up LED Heart With Your Valentine

It’s not roses or jewelry, but we hope [Erik]’s light-up USB heart will be appreciated by his significant other. When the two heart pieces come in contact with each other, each side lights up.

[Erik] started his build by cutting two half-heart shaped pieces out of polycarbonate. After drilling a few holes for LEDs and wires, magnets and reed switches were installed along the ‘broken’ side of the heart. Whenever the hearts come in contact with each other, the magnets trip the reed switches and light up both sides of the heart.

There is USB flash drive embedded in each heart half is loaded with a portable Dropbox. When the USB drive is plugged into a computer, the dropbox steps into action and synchronizes the photo album stored in each heart half. No matter how far apart they are, [Erik] and his SO can share pictures through their glowing LED hearts. Not to come off as a hopeless romantic, but this sounds like something we’d like for Valentine’s day. We’re hoping [Erik]’s SO thinks that as well.

Plotting Pictures With Light

Flashing LEDs for a persistence of vision display are on bicycle wheels, alarm clocks, and even light painting sticks to draw images in the air. What if you wanted to plot an image in the air (translation) with a single LED? That’s what [acorv] did after taking a cue from a polar plotter.

Like the polar plotter and Drawbot, [acorv]’s build began with a pair of stepper motors and fishing line (translation). [acorv]’s brother upped the stakes a bit and suggested replacing the marker with an LED and taking long exposure photographs. Armed with a DSLR and a lot of patience, a few experimental pics were taken. To plot the image, the Lightbot flashes its LED as it goes across the plot area. The process of building an image pixel by pixel takes a while – eight minutes for this image – but the brothers were encouraged enough to take their rig outside.

After setting up the polar plotter between two tripods, [acorv] and his brother made this image in the dead of night. It’s an interesting spin on the POV LED builds we’ve seen before. Check out [acorv]’s Lightbot slowly drawing something after the break.

Continue reading “Plotting Pictures With Light”