New Part Day: SK6812 Mini-E. A Hand Solderable Neopixel Compatible LED!

Normally when we give you a New Part Day piece, it concerns a component that you will have never seen before. The subject of this find by [Robert Fitzsimons] then is a slight departure from that norm, given that the SK6812 Mini-E is a WS2812 or Neopixel compatible multi-colour LED of a type that has been available for a while now.

What makes this component new though is its packaging. The Mini-E variant of the SK6812 only appeared last year and has now found its way through to smaller order quantities on AliExpress. Its special feature is that it has a set of flat leads rather than the usual pads on the underside of the package. This means that unlike its predecessors it is readily hand solderable, as he demonstrates by attaching a set of leads to one.

The leads emerge halfway up the side of the device, which seems designed to be mounted recessed within a PCB hole. He demonstrates this with a piece of stripboard, and remarks that they would make a good choice for many small projects such as Shitty Add-On boards.

We’ve touched the leadless SK6812s a few times before, along the way remarking that in some respects they are better than the WS2812 they follow.

Continue reading “New Part Day: SK6812 Mini-E. A Hand Solderable Neopixel Compatible LED!”

It’s An LED Cube, But Maybe Not Quite What You Were Expecting

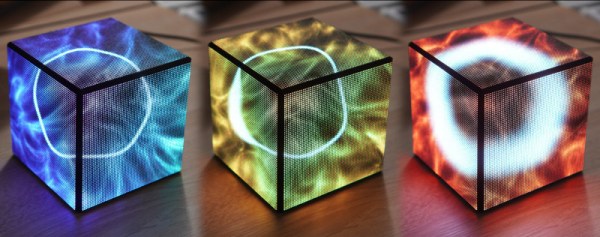
LED cubes are a pleasing ornament and still something of a talking point, but now they have reached the point of being available as inexpensive kits from China. The simpler ones don’t have quite the cachet they used to. It’s still a project that can deliver a few surprises though, as [Moritz v. Sivers] shows us very well with his glass LED cube. Instead of the usual wire frame construction he’s employed a novel technique of applying each layer of WS2812 LEDs to its own glass PCB.

The PCBs are created with self-adhesive copper foil, cut out with a CNC cutter and painstakingly transferred to the glass substrate with the help of a piece of transfer paper. The LEDs are soldered on, and once each board has been tested they are mounted in the manner of a toast rack to laser cut acrylic corner pieces. There are four layers of 16 LEDs each, which might not make for the largest cube, but still makes for a respectable show. The addressable LEDs take it a level above the 3D matrix type of cube with which you might already be familiar, and the extra time required to load each value into them doesn’t seem to slow the display down.

There are a couple of videos we’ve placed below the break, one showing it in action and the other taking us through the build process. This last one should provide plenty of inspiration for anyone with an interest in creating this type of PCB on glass or any other unusual substrate. Continue reading “It’s An LED Cube, But Maybe Not Quite What You Were Expecting”

Light The Way To Every Component

How do you organize your stock of components and modules? If an unruly pile of anti-static bags and envelopes from China stuffed into a cardboard box sounds familiar, then you need help from [Dimitris Tassopoulos]. He’s organized his parts into drawers and created a database, then linked it via an ESP8266 and a string of addressable LEDs to light up the individual drawer in which any given component resides. It’s a genius idea, as you can see in action in the video below the break.

Behind the scenes is a web server sitting atop an SQL database, with a PHP front end. It’s running on a Banana Pi board, but it could just as easily be running on any other similar SBC. The ESP8266 has a REST API to which the webserver connects when a component is sought, and from that it knows which LED to light.

The LED strip is not the tape with which most readers will be familiar, but a string of the type we might be more used to as Christmas lights. These have a 100mm spacing between LEDs, allowing them to be easily positioned behind each drawer. The result is a very effective parts inventory system. We’re not entirely sure that it would entirely banish the tide of anti-static bags here, but we’re impressed nevertheless.

Continue reading “Light The Way To Every Component”

Bask In The Glory Of This 336 LED Digit Display

[Chris Combs] recently took the wraps off of an incredible art piece that he calls Road Ahead which uses 336 seven segment LED digits to create an absolutely gorgeous display. With a piece of smoked acrylic to slightly diffuse the orange glow of the LEDs, the end result has a distinctively retro look that we’d gladly spend all day staring at.

For those looking to dig a bit deeper, [Chris] has put together some very impressive documentation over on Hackaday.io that goes into plenty of detail on how he designed and built this beauty. From the design of the PCBs that carry all of the 0.3″ SMD displays to the custom software running on the Raspberry Pi 3 that powers it, there’s no technical stone left unturned.

According to the build log, this is the second version of the display. The first one was housed in a rather attractive wooden enclosure, but as [Chris] explains, that was precisely the problem. He wanted something that looked cold and unfeeling as the nearly 340 digits flashed away with potentially ominous intent. So he ditched the wooden case for a powder coated steel one that looks more like the front panel of a mainframe than something you’d pick up at the craft store.

Another interesting point explained in the write-up is how the Python software is designed to treat the hardware as a contiguous graphical display rather than just an array of independent digits. Grayscale images can be reproduced on the by using PWM to adjust the brightness of each segment’s corresponding “pixel”; though admittedly it takes a bit of imagination to see the intended image with a resolution this low.

This project reminds us of the incredible LED hexdump display we saw not that long ago, down to the PWM trickery for squeezing “graphics” out of these exceptionally non-graphical elements. With any luck, perhaps these are the opening shots in an arms race to see who can build the largest array of multi-segment LED displays.

A Strange Display Gives Up Its Secrets

Providing a display for a project in 2020 is something of a done deal. Standard interfaces and off-the-shelf libraries for easily available and cheap modules mean that the hardest choice you’ll have to make about a display will probably relate to its colour. Three decades ago though this was not such a straightforward matter though, and having a display that was in any way complex would in varying proportion take a significant proportion of your processing time , and cost a fortune. [AnubisTTP] has an unusual display from that era, a four-digit LED dot matrix module, and the take of its reverse engineering makes for a fascinating read.

The LITEF 104267 was made in 1986, and is a hybrid circuit in a metal can with four clear windows , one positioned over each LED matrix. Inside are seven un-encapsulated chips alongside the LED matrices on a golf plated hybrid substrate. The chips themselves are not of a particularly high-density process, so some high-resolution photography was able to provide a good guess at their purpose. A set of shift registers drive the columns through buffers, while the rows are brought out to a set of parallel lines. Thus each column can be illuminated sequentially with data presented on the rows. It’s something that would have saved a designer of the day a few extra 74-series chips, though we are guessing at some significant cost.

This display may seem antiquated to us today, but it wasn’t the only option for 1980s designers. There’s one display driver from back then that’s very much still with us today.

A Replica From WarGames, But Not The One You Think

Remember the WOPR from WarGames? The fictional supercomputer that went toe-to-toe with Matthew Broderick and his acoustic coupler was like a love letter to the blinkenlight mainframes of yesteryear, and every hacker of a certain age has secretly yearned for their own scaled down model of it. Well…that’s not what this project is.

The [Unexpected Maker] is as much a WarGames fan as any of us, but he was more interested in recreating the red alphanumeric displays that ticked along as the WOPR was trying to brute force missile launch codes. These displays, complete with their thoroughly 1980s “computer” sound effects, were used to ratchet up the tension by showing how close the supercomputer was to kicking off World War III.

The display as it appeared in the film.

Of course, most us don’t have a missile silo to install his recreated display in. So when it’s not running through one of the randomized launch code decoding sequences, the display doubles as an NTP synchronized clock. With the retro fourteen segment LEDs glowing behind the smoked acrylic front panel, we think the clock itself is pretty slick even without the movie references.

Beyond the aforementioned LEDs, [Unexpected Maker] is using a ESP32 development board of his own design called the TinyPICO. An associated audio “Shield” with an integrated buzzer provides the appropriate bleeps and bloops as the display goes through the motions. Everything is held inside of an understated 3D printed enclosure that would look great on the wall or a desk.

Once you’ve got your launch code busting LED clock going in the corner, and your illuimated DEFCON display mounted on the wall, you’ll be well on the way to completing the WarGames playset we’ve been dreaming of since 1983. The only way to lose is to not play the game! (Or something like that…)

Continue reading “A Replica From WarGames, But Not The One You Think”

A Simple POV Globe Via APA102

POV builds come in all shapes and sizes, and typically rely on LEDs for their high light output and fast response time. With this in mind, [Great Scott] grabbed some LED strip off the shelf and set about whipping up a POV LED globe.

Being a spinning POV build, it’s necessary to consider how to get power to the rotating elements. [Great Scott] decided to go with a simple solution of putting a LiPo battery on the rotating assembly, which runs the LEDs and Arduino Nano at the heart of the operation. The LEDs in question are of the APA102 type, making them readily addressable and capable of a wide color gamut. It’s all spun by a simple brushed DC motor, running from a separate supply at the base of the platform.

It’s very much a hacker build, held together with duct tape and zipties. Despite this, it looks tidy when in operation, as all of the important hardware is hidden at the centre of the globe. There’s a bit of a vibration problem, but [Great Scott] reckons this can be fixed with some frame modifications.

We’d love to see the build run some more advanced operations, like a representation of the Earth, or some kind of sun clock. If you’re interested in learning more about POV displays, we’ve got the primer you need. Video after the break.

Continue reading “A Simple POV Globe Via APA102”