When it comes to computers, it seems like the only thing that matters is speed. The more the better, in general, and the same applies to peripherals. We want the fastest network adapters, the fastest video card, and the fastest printer. So why in the world would anyone intentionally build a really slow inkjet printer? For art, of course.
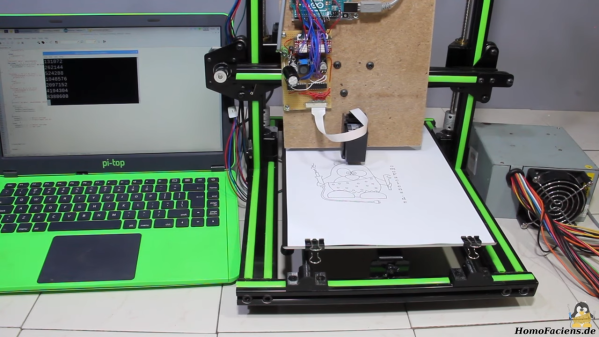
At least that’s the story [HomoFaciens] tells us in the video below. His efforts are in support of a friend’s art project, which seeks to print slowly but continuously on a roll of paper. [HomoFaciens]’s printer is based on an H-P C6602 inkjet cartridge, one of those high-priced consumables that make buying a new printer more attractive than replacing them once depleted. After figuring out how to drive the printhead — 5 to 6 μs pulses of 18 volts through a ULN2803 Darlington array driver chip seemed to do the trick — he mounted everything to the gantry of an old 3D printer. It’s interesting to watch the images slowly being built up — something that printers usually hide from prying eyes — and to see how the DPI count of the printer can be increased by interlacing each printed line.
Orbiting over our heads right now are two human beings who flew to the International Space Station in a SpaceX Crew Dragon vehicle on top of a Falcon 9. The majority of coverage focused on the years since human spaceflight last launched from Florida, but [Eric Berger] at Ars Technica reminds us it also makes for a grand ten-year celebration of the SpaceX workhorse rocket by sharing some stories from its early days.
Falcon 9 is a huge presence in the global space launch industry today, but ten years ago the future of a young aerospace company was far from certain. The recent uneventful launch is the result of many lessons learned in those ad-hoc days. Some early Falcon 9 flights were successful because the team decided some very unconventional hacks were worth the risk that paid off. A bit of water intrusion? Dry it out with a blow dryer and seal it back up. Small tear in a rocket nozzle? Send in someone to trim a few inches with shears (while the rocket was standing vertical on the launchpad).
Industry veterans appalled at “a cowboy attitude” pounced on every SpaceX failure with “I told you so.” But the disregard for convention is intentional, documented in many places like this old Wired piece from 2012. Existing enshrined aerospace conventions meant the “how” was preserved but the “why” was reduced to “we’ve always done it this way” rarely re-evaluated in light of advancements. Plus the risk-averse industry preferred staying with flight-proven designs, setting up a Catch-22 blocking innovation. SpaceX decided to go a different way, rapidly evolving the Falcon 9 and launching at a high cadence. Learning from all the failures along the way gave them their own set of “why” to back up their “how” growing far beyond blow dryers and metal shears. We’re happy to see the fail-learn-improve cycle at the heart of so many hacker projects have proven effective to send two astronauts to the space station and likely beyond.
We are used to flipdots, single mechanical pixels that are brightly colored on one side and black on the other, flipped over by a magnetic field. Driving the little electromagnets that make them work is a regular challenge in our community. [Johan] however has a new take on the flipdot, and it’s one we’ve never seen before. Instead of making a magnetic field to flip his dots he’s doing without the electronics entirely, and just using a magnet.
The project is a level indicator for a water tank, which contains a magnet floating in a plastic bottle. This has previously been used to trigger a reed switch that controls the refill pump. To those reed switches he adds a row of flipdots, but these aren’t the commercial dots you might once have seen adorning the front of your local bus. Instead, they’re custom dots made from washers, suspended in pivots by means of a spot weld and mounted in a frame inside a clear tube to keep dirt at bay. As you can see in the video below the break, when the magnet floats past inside the tank it flips them over one way, and on its return journey if flips them back the other. The result is a fully serviceable flipdot display, completely lacking the normal electronics, and we rather like it.
(It may be the first electronic-free flipdot we’ve shown you, but it’s not the first homemade one.)
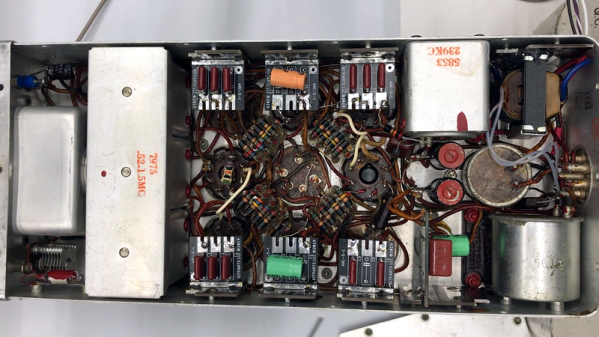
If you’ve ever been to a hamfest in the United States, you probably have at least seen an ARC 5 Command set. These were very rugged receivers and there were a ton of them made. Hams have been reworking them for years. In a recent video [Tom N3LLL] shared some of his tips for restoring them.
You might think these are just like a regular old radio, but there are some unique challenges, including capacitors filled with beeswax and strange threaded screws. [Tom] made several custom boards to replace the dynamotor with a solid-state inverter, replace odd capacitors, and provided a faceplate. He also 3D printed some replacement studs to replace the often decayed anti-vibration studs for the dynamotor.
The teardown at the end shows how rugged these things are. Tom’s restoration philosophy is to modernize the set while keeping the outward aesthetics. The receivers perform well, and as you might expect are built like tanks.
If you want to try your hand at restoration, these are not very expensive because there were so many of them made. Often the shipping is about the same price as the radio, but one in good shape can cost a bit more. We think the real fun is getting one that is not in such good shape and making it better.
Everyone has their own style and we know some restorers are more purists, but as a practical matter, [Tom’s] restorations look great, sound great, and preserve these great old radios so that someone might still be using them in another 75 years.
We’ve covered the ARC 5 before, unsurprisingly, and that restoration was a bit more traditional if you prefer it that way. If you need something to listen to on the AM band, try a matching transmitter.
Last week, [Danal Estes] passed away. This comes as a shock to many of us who had the pleasure of interacting with him online. Not only was [Danal] an active contributor to the 3D printing community, he was simply a warm-hearted character who was just fun to get along with. I met [Danal] online less than a year ago. But I owe him a debt in helping transform a set of design files that I posted online into a full blown community of hardware enthusiasts.
Here’s my best shot at recounting some of this fellow human’s legacy as seen from the fellow tool changing 3D printing enthusiasts who knew him.
Getting to Know an Online Community Builder
I first met [Danal] online last September through Thingiverse when he posted a make of Jubilee, a tool changing machine design that I posted a few weeks prior. At a time when Jubilee was just a set of files and instructions on the internet, I was stoked that someone in the world was out there building a duplicate. To get to know these people better and work out any pinch points in their assembly process, I started a Discord Chat Server. [Danal] was the first to join and start telling his story in pictures.
As a community of curious people on Discord grew, questions about the machine started to arise. How big was it? How did the tool changing work? I tried answering as many as I could, putting an FAQ blurb on Thingiverse, But a few weeks in, something else happened: [Danal] started answering the questions. Not only that, he was greeting nearly every single person who introduced themselves on the server. I didn’t understand the value of a simple “welcome aboard!” that follows someone’s first post in a budding online community, but [Danal] did. So he did just that. He made you feel welcome to have landed in this corner of the internet. In a world full of engineers who don’t like repeating themselves, [Danal] seemed to get that his repeat interaction was new for the person on the other end; and that made it worth doing.
Danal’s first tool changes
As the days passed, questions continued, and [Danal] continued to fill people in with answers to questions–even repeat questions. All the while, he posted progress pictures of his own machine. In a way, the rest of the community seemed to be holding their breath during this time, watching [Danal] post status reports; waiting for some conviction that these files actually turned into something that worked. Then, less than a month later, [Danal] posted a video of his first successful tool change. It did work! Almost certainly inspired by [Danal’s] success, a few more folks started building machines of their own. But [Danal] was the first person to duplicate a Jubilee.
More than twenty machines have been built in the wild since I posted the project files back in September. I believe that the inspiration to start draws from the success of people who have finished before, which chains down to the inspiration drawn from the success of the first person to finish: [Danal Estes]. I owe him one for that: for inspiring a community of folks to follow in this adventure.
Commoditized Automatic Nozzle Alignment
[Danal] did more than affirm the machine design to a new Jubilee community. Over the short span of the project, [Danal] put his software hat on and developed an automated machine-vision based tool alignment system that he called TAMV. It turns out that tool tip calibration is one of the gnarly problems for any multi-nozzle 3D printer. Tools must be aligned relative to each other such that each of the unique materials they print are aligned in the resulting print. The current ways of doing this are cumbersome and manual. Either you measure offsets by printing a vernier scale or by taking pictures with an upwards-facing microscope. [Danal] took this gnarly problem as an opportunity to automate the process completely, so he did.
In just two months, [Danal] returned with an announcement on the Jubilee Discord to present TAMV, aka: Tool Align Machine Vision. By mounting an upwards facing webcam to the front of his Jubilee, [Danal] simply ran his one-button script, and his machine automatically calibrated each available tool both automatically and better than most humans could with the prior methods. It did this by sequentially picking up tools, putting them in the camera field of view, and then measuring their offsets. What’s more, he released the entire code base as open-source, literally transforming a gnarly problem into a thing of the past with a commodity solution made usable with a simple installation script and setup instructions that he also wrote.
Here on Hackaday, it’s humbling to read about the amazing feats folks are overcoming all from the comfort of their home workbenches. But it’s invigorating to see that same feat unfolded in a way that lets us unpack it, learn from it, build on top of it. The act of documenting work you’ve already done with the intent that others could follow it is an act of grace. [Danal] was gracious.
A Shared Story Told in Projects
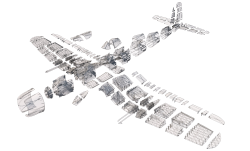
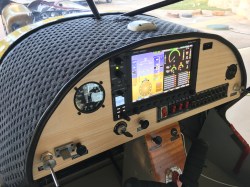
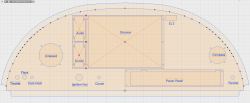
As [Danal] became one of the most active community members on Discord, we started to learn more about his other projects. For [Danal], 3D printers were as much a side project as they were tools in a family of other tools for creative projects. Armed with these machines, [Danal] put them to work on machines for flight, from extraordinary remote control aircraft (3D printed of course) that could barely work their wingspan through a doorway to the consoles of real world aircraft that could carry a pilot.
It was always a pleasure to get a slice of [Danal’s] adventures. Getting to hear about his excitement in projecting was food for a growing community of hobbyists eager to get back to our workbenches. And the framing of his adventures was warm enough to make you feel not just that you wanted a bit of this lifestyle for yourself, but that you could have it too. I hope that this part of [Danal’s] legacy is something that we online folk can continue: the shared courtesy and warm attitude to newcomers in a hardware hacking community.
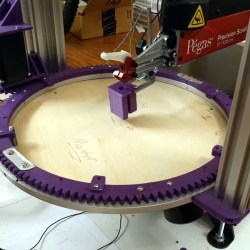
I was enchanted by a failed project this week. [Andrew Consroe]’s CNC scroll saw doesn’t work yet, but the emphasis is on the word “yet”. Heck, even when it does work, it might not make sense, but that’s not the point anyway.
A scroll saw table has a vertical reciprocating blade perpendicular to a table, a lot like a band saw but with a shorter blade. You push the wood sheet to be cut into the blade, and because it’s thin, you can twist and turn all sorts of interesting jigsaw-puzzle shapes. [Andrew] automated this with an X-Y gantry and an innovative geared rotating ring, needed to keep the wood fed into the cutting edge of the blade.
It’s a crazy contraption, and a difficult and unique movement planning problem, and watching it move in the video is a joy. But it’s not working either: errors in the motion add up over a cut, and he’s ended up snapping a blade on every piece. And this is version three of the device!
But here comes the inspiration. First, the only reason he’s filming this is to keep a log of how the project looked at this phase — he’s already planning out the next one. Second, this is the soul of learning by doing. You don’t learn anything unless you’re trying something new.
And finally, [Andrew]’s project reminds me of why I love machine builds in the age of rapid prototyping. Blazing through three entirely different machines cost him essentially nothing. Tearing apart version one left him with the same stepper motors, aluminum extrusions, and electronics as when he started out. Except that he now knew so much more about his particular problem space. Now he’s ready to go again.
So if you’re at all robotically inclined, but you’re looking at the cost of motors, belts, bearings, and steel, don’t think of it as an expense for this project, but for years’ worth of iterations, and maybe even fully different machines.
Just be sure to take [Andrew]’s lead and get it down and documented before you take it apart! Heck, send it in to Hackaday and it’ll live forever.
This article is part of the Hackaday.com newsletter, delivered every seven days for each of the last 200+ weeks. It also includes our favorite articles from the last seven days that you can see on the web version of the newsletter.
Want this type of article to hit your inbox every Friday morning? You should sign up!
Our abilities to multitask, to quickly learn complex maneuvers, and to instantly recognize objects even as infants are just some of the ways that human brains make use of our billions of synapses. Biologically, our brain requires fluid-filled cavities, nerve fibers, and numerous other cells and connections in order to function. This isn’t the case with a new kind of brain recently announced by a team of MIT engineers in Nature Nanotechnology. Compared to the size of a typical human brain, this new “brain-on-a-chip” is able to fit on a piece of confetti.
When you take a look at the chip, it is more similar to tiny metal carving than to any neurological organ. The technology used to design the chip is based on memristors – silicon-based components that mimic the transmissions of synapses. A concatenation of “memory” and “resistor”, they exist as passive circuit elements that retain a relationship between the time integrals of current and voltage across an element. As resistance varies, tiny read charges are able to access a history of applied voltage. This can be accomplished by hysteresis and other non-linear properties of passive circuitry.
These properties can be best observed at nanoscale levels, where they aren’t dwarfed by other electronic and field effects. A tiny positive and negative electrode are separated by a “switching medium”, or space between the two electrodes. Voltage applied to one end causes ions to flow through the medium, forming a conduction channel to the other end. These ions make up the electrical signal transmitted through the circuit.
In order to fabricate these memristors, the researchers used alloys of silver for the positive electrode, and copper alongside silicon for the negative electrode. They sandwiched the two electrodes along an amorphous medium and patterned this on a silicon chip tens of thousands of times to create an array of memristors. To train the memristors, they ran the chips through visual tasks to store images and reproduce them until cleaner versions were produced. These new devices join a new category of research into neuromorphic computing – electronics that function similar to the way the brain’s neural architecture operates.
The opportunity for electronics that are capable of making instantaneous decisions without consulting other devices or the Internet spell the possibility of portable artificial intelligence systems. Though we already have software systems capable of simulating synaptic behavior, developing neuromorphic computing devices could vastly increase the capability of devices to do tasks once thought to belong solely to the human brain.


")