64-bit And A Display: Minecraft Computers 10 Years Later

Some people build their own computer to play games, while others play games to build their own computer. Minecraft is the prime candidate for the latter, and while you can certainly arrange the blocks to make them look like a computer, we’re of course talking about replicating the actual functionality of a CPU or parts thereof, and/or external components within the game. Many such creations have spawned in the decade since the first Minecraft-built ALU surfaced, and [Rockfarmor] built a 64-bit specimen to add to that list — and made a video to showcase it.

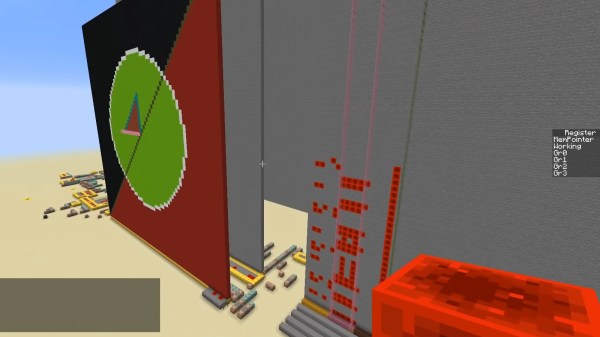
Instead of emulating a common architecture, [Rockfarmor] went for a more home-made approach, and re-used the architecture from an old school assignment (in Swedish) as basis. The result is a simple yet fully functional 64-bit CPU with 32 registers, 32kB main memory and a separate 16kB stack. The instruction set mostly contains ALU and branching operations, but also a few special opcodes to control an additional 64×64 pixel blocks, 64-color display — including drawing circles, lines, and color fills.

More details on the architecture can be found in its documentation and in an older video (with subpar audio circumstances unfortunately). An additional time-lapse video of the initial build is also available, and you will find all of them after break. To simplify development, [Rockfarmor] also wrote a desktop app to program the computer in assembly and upload it straight to the Minecraft version.

As with all computers built in Minecraft, the driving force is redstone, which essentially allows circuit design within the game, and [Rockfarmor]’s is no difference here. He also uses command blocks to avoid the laboriously and slow “wiring” required otherwise, turning it more into a “wireless redstone” circuit.

No doubt, purists will consider this cheating, but another angle would be to see it as Moore’s Law applied to Minecraft computers, considering the computer’s size and speed compared to the first Minecraft ALU. Or maybe as the equivalent of microcode in real-world CPUs? Or then, maybe we should just accept and embrace different options and preferences.

Continue reading “64-bit And A Display: Minecraft Computers 10 Years Later”

Testing Hardware With ASCII Waveforms

Testing software is — sometimes — easier than testing hardware. After all, you can always create test files and even fake user input before monitoring outputs using common tools. Hardware though, is a bit different. Sometimes it is hard to visualize exactly what’s happening. [Andrew Ray’s] answer? Produce simulated waveforms using ASCII text.

The process uses some custom tools written in OCaml, but the code is available for you on GitHub. The tool, called Hardcaml, allows you to write test benches for hardware — not a new idea for FPGA developers. The output, however, is an ASCII text waveform and common software development tools can check that waveform against the expected output.

Continue reading “Testing Hardware With ASCII Waveforms”

A DIY Electronic Load With A Twist

If you’re testing a power supply or battery pack, an electronic load is a nice tool to have. By watching the voltage as you crank up the resistance, you can verify the unit’s real-world capabilities quickly and easily. But [Xavier Bourlot] wanted a bit more information than is generally afforded by these devices, so he came up with his own scratch built load that can measure the voltage at multiple points in the circuit.

Now at first glance, it might not be obvious why you’d want such a capability. But [Xavier] is looking to do something very specific with this device: analyze the efficiency of DC-DC converters. The idea is that if the electronic load can measure the voltage on both sides of the converter, it can calculate what kind of losses are being incurred.

Could you do this with a multimeter and a traditional electronic load? Sure. But if it’s the kind of thing you’ll be doing a lot of, it’s not hard to see why this method would be preferable.

But even if you ignore the converter analysis capabilities, this looks to be a very useful device to have around the lab. [Xavier] says it can sink more than 5 amps, and handle an input voltage as high as 100 volts. Powered by an ATmega328P, the load is also fully programmable and even features an I2C expansion port that you can use to hang additional hardware or sensors on. The stock firmware is already quite capable, and the list of future enhancements has some very interesting entries such as the ability to log data over serial or to a SD card.

We’ve seen a number of programmable electronic load projects over the years, ranging from Arduino shields to VFD equipped units that would be the pride of any hacker’s bench.

Cheap Party Light Gets Arduino Upgrade

If you’ve got a party coming up and are looking to add a little bit of excitement, you might be interested in this recent project from [Gav Lewis]. The build is based on a commercially available party light, but with some upgraded components the final product is brighter and more dynamic than it was stock.

Realistically, [Gav] has changed out almost every component of this light except for the enclosure and the front lens. The original 5 mm LED array was replaced with a new 8×8 WS2812B panel, and the electronics completely replaced with an Arduino Nano. He’s still using the light’s original power supply, but as it only puts out around 4.2 V, he’s added a boost converter to provide a stable 5 V for the new hardware. He also added a small 12 V cooling fan, which he says is basically silent since it’s only getting half its rated voltage.

[Gav] has developed a number of lighting patterns with FastLED that do a good job of emulating what you might see from a much more expensive laser scanner. In the video after the break, you can see how multiple colored beams of light exit the housing at once, projecting patterns on the opposite wall. He says he’s like to restore the device’s original sound activation mode, but as of yet hasn’t gotten the code sorted out.

This project uses a off-the-shelf 8×8 matrix of WS2812B LEDs, but if you ever find yourself needing to piece together your own array from individual LEDs, we recently covered a great tip for making it a bit easier.

Continue reading “Cheap Party Light Gets Arduino Upgrade”

Lattice Drops EULA Clause Forbidding FPGA Bitstream Reverse Engineering

Yesterday we reported that Lattice Semiconductor had inserted a clause that restricted the reverse engineering of bitstreams produced by their FPGA toolchains. Although not explicitly stated, it’s assumed that this was directed toward several projects over the past five years that have created fully open source toolchains by reverse engineering the bitstream protocols of the Lattice ICE40 and ECP5 FPGA architectures. Late yesterday Lattice made an announcement reversing course.

To the open source community, thank-you for pointing out a new bitstream usage restriction in the Lattice Propel license. We are excited about the community’s engagement with Lattice devices and our intent is to not hinder the creation of innovative open source FPGA tools.

It’s refreshing then to see this announcement from Lattice Semiconductor. Even more so is the unexpected turn of speed with which they have done so, within a couple of days of it being discovered by the open-source community. We report depressingly often on boneheaded legal moves from corporations intent on curbing open source uses of their products. This announcement from Lattice removes what was an admonition opposing open source toolchains, can we hope that the company will continue yesterday’s gesture and build a more lasting relationship with the open source community?

The underlying point to this story is that in the world of electronics there has long been an understanding that hardware hackers drive product innovation which will later lead to more sales. Texas Instruments would for years supply samples of exotic semiconductors to impecunious students for one example, and maybe you have a base-model Rigol oscilloscope with a tacitly-approved software hack that gives it an extra 50MHz of bandwidth for another.

We can only congratulate Lattice on their recognition that open source use of their products is beneficial for them, and wish that some of the other companies triggering similar stories would see the world in the same way. Try interacting more with your open source fans; they know and love your hardware more than the average user and embracing that could mean a windfall for you down the road.

Burning Chrome

You want a good project that combines multiple disciplines, gives you something useful in the end, and will certainly wow the muggles? Or do you simply need a custom rig with which to “jack in” to “cyberspace”? How about building your own luggable, portable, computer with some style — your own cyberdeck?

Coming to you from the fertile world that William Gibson created in “Neuromancer”, “Count Zero”, and “Mona Lisa Overdrive”, cyberdecks were the portable computers that the heroes and anti-heroes roaming the Sprawl would use to connect to what was essentially the Internet. Since we’re already living in the era where large portions of the world are controlled by vast corporations, we spend our entire lives online, and machine intelligence is poised to become sentient, you might as well get building.

We’ve seen a number of great examples of cyberdeck builds, and they’re all special in their own way, but there are common features uniting them all. First, you’ll need a screen, a portable computer brain, some batteries, and a nice keyboard. The good news is that all of the above have become eminently available, even inexpensive, in the last few years.

Discipline #1 is that of the case modder. You’re designing your ideal portable computer, after all. It’s got to look good, and we don’t mean that black, boxy ThinkPad look. If you’ve got a 3D printer, and maybe a willingness to spray paint, the world is your oyster here.

Discipline #2 is that of the keyboard builder. You’re not going to want to enter the Matrix with anything less than a pleasant typing interface. Again, 3D printing, laser-cutting, or CNC milling your own keyplate and building yourself a keyboard from scratch is a viable option, but there are tons of Bluetooth and USB keyboard options if you want to cut corners, or find one you really like.

Discipline #3 is the software hacker. Putting together exactly the right set of software, setting up the system to do what you want, and getting that sweet background screen just right are the last steps to making yourself at home in Cyberspace.

With so much latitude to introduce your own design ideas into your bespoke luggable, no two will be alike. Mine’s going to have programming ports for every microcontroller I frequently use, a decent speaker, maybe a variable power supply, and probably some reasonable amount of LED bling. What’s going to be on yours?

This article is part of the Hackaday.com newsletter, delivered every seven days for each of the last 200+ weeks. It also includes our favorite articles from the last seven days that you can see on the web version of the newsletter.

Want this type of article to hit your inbox every Friday morning? You should sign up!

Sparklines For Your ESP32 Projects

On a typical microcontroller project we may only have access to a relatively tiny screen. Information display can be a challenge, but it’s one that may be made easier by [0xPIT]’s ESParklines library for Espressif processors using the Arduino framework.

A sparkline is a simple line graph without annotations (like axes or units) intended to fit within the flow of text. They’re largely associated today with the statistician Edward Tufte, and if you’ve not encountered them or Tufte before then we suggest you’ll enjoy educating yourself.

It’s a simple enough library and it comes with example code. Usefully it maintains a data buffer all of its own allowing simple updating, and as well as the examples there is a YouTube video we’ve put below the fold showing graphs evolving as more information is added to them. We’re curious about one thing though, it’s billed as an ESP library, for either the ESP8266 or the ESP32, but we can’t find any ESP-specific code in there and neither could our friendly ESP-guru. Have we missed something? The comments are below if you can shed any light.

Continue reading “Sparklines For Your ESP32 Projects”