An Experiment To Test Radioactive Decay Varying Over Time

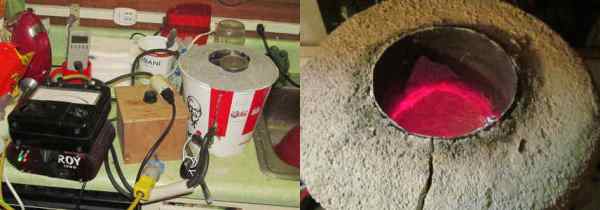
tritium_decay_experiment_black_box_electronics_top_view_IMG_3873

Here’s a hypothesis for you: radioactive decay varies over time, possibly with a yearly cycle. [Panteltje] decided to test this hypothesis, and so far has two year’s worth of data to comb over.

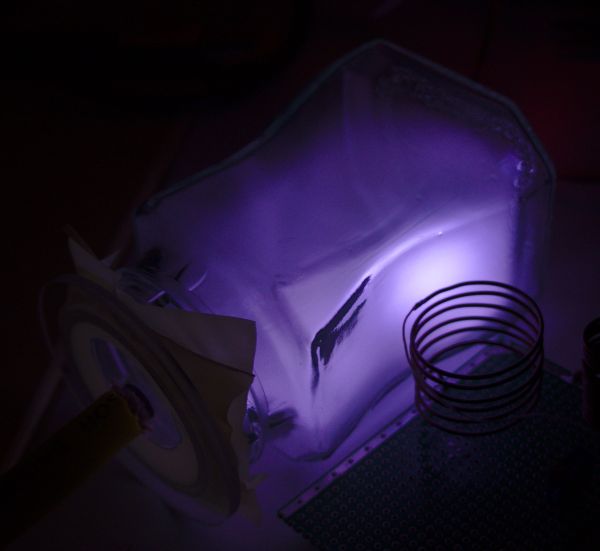
Radioactive decay can be easily detected with a photomultiplier tube, but these tubes are sensitive to magnetic fields and cosmic rays that would easily fly through just about any shielding [Pantelje] could come up with. Instead, the radiation in this setup is detected with simple photo detectors, pressed right up against a tritium-filled glass ampoule, a somewhat common lighting solution for fishing lures, watch faces, and compasses.

The experimental setup records the photo detectors, a temperature sensor, and a voltage reference, recording all the data to an EEPROM once an hour. All the important electronics are stuffed into a heatsinked, insulated, light-proof box, while the control electronics reside on a larger board with battery backup, alarm, indicator LEDs, and an RS232 connection.

After one year, [Pantelje] recorded the data and reset the experiment for another year. There are now two years worth of data available, ready for anyone to analyze. Of course, evidence that radioactive decay changes over the course of a few years would turn just about every scientific discipline on its head, so at the very least [Panteltje] has a great record of the output of tritium lights against the expected half-life.

A Ring Of Colored Pencils

Colored Pencil Ring

[Peter] proved he has equal parts prowess, patience, and perseverance with this colored pencil ring (imgur link). The ring is made from a cross-section of several colored pencils. The idea seems simple. The build process IS simple. As always though, the devil is in the details.

[Peter] started with a cheap pack of colored pencils. They have to be hexagonal pencils, as round ones won’t work well for this build. [Peter] used two nails to align the  pencils, and medium thickness Cyanoacrylate glue to bond them together. Cyanoacrylate (aka super glue) is a very strong but inflexible bond. We’re curious if a different adhesive might have worked better for this task.

Once the block of glued pencils was dry, [Peter] drilled a hole approximately his ring size. He used a band saw to cut a rough ring blank around the hole, then headed to the wood lathe. He mounted the ring with a jam chuck, which is a piece of wood turned to an interference fit with the workpiece. The problem was that the jam chuck cracked the ring as it was being installed. [Peter] was able to glue the ring back together, and turn it down on his lathe.

Click past the break for more on [Peter’s] ring.

Continue reading “A Ring Of Colored Pencils”

carbon nanotube being turned into aerogel sheet

Artificial Muscles Use Carbon Nanotube Sheets

Light as air, stronger than steel and more flexible than rubber. Sound like something from the next installment of the Iron Man series? [Tony Stark] would certainly take notice of this fascinating technology. Fortunately for us, it does not come from the studios of Hollywood, but instead the halls of the NanoTech Institute at the University of Texas.

Professor [Ray Baughman] and his team of scientists at the NanoTech Institute have developed a type of artificial muscle through a process of making aerogel sheets by growing carbon nanotubes in a forest like structure. Think of a vertical bamboo forest, with each bamboo stem representing a single carbon nanotube. Now imagine that the individual bamboo stems were connected together by much smaller horizontal threads. So that if you dislodge the bamboo and began to pull, the threads would pull the others, and you would get this sheet-like structure.

These aerogel sheets of carbon nantubes have some truly science fiction like properties. They can operate from 1,600 degrees centigrade to near absolute zero. If you inject a charge, each nanotube will be repulsed from one another, expanding some 220% of the sheet’s original size. Your muscles do this at roughly 20 – 40%. Stick around after the break for a video demonstration of these carbon nanotube aerogel sheets being made and demonstrated.

Thanks to [Steven] for the tip!

Continue reading “Artificial Muscles Use Carbon Nanotube Sheets”

Electronic Puzzle Box Uses Only Discrete Components

Puzzle box

Do you need an idea for a fun do it yourself gift for a friend or significant other? Look no further, [conductance] has you covered. He put together an awesome electronic puzzle box using all analog electronics. The puzzle case is shaped like an over sized die and is made out of wood. It also requires a small jumper cable and an external magnet to complete the puzzle.

This is a six-sided die, where each side has something different to offer. The “five” side of the die shows the progress you’ve made in completing the puzzle. Each of the five dots contains a green LED that will light up when the corresponding puzzle has been successfully completed.

The “one” side is completed by placing the included magnet over the dot. The magnet activates a reed switch which lights up the first LED. The “two” side contains a tilt switch. In order to solve this piece of the puzzle you must ensure the two side is facing up, as if you rolled a two. The “three” side contains three key switches. Each switch must be turned to a particular orientation. Once all three keys are configured properly, a third LED lights up.

The “four” side contains four sockets that fit the included jumper cable. This puzzle is solved by jumping the two correct sockets together. Finally, the number “six” side just has six momentary push buttons. All six buttons must be pressed simultaneously in order to light up the final LED. The tricky part is pressing all six buttons while simultaneously “rolling” a two in order to ensure the tilt switch is also activated.

Once all five LED’s are lit up, a relay is triggered which then activates a solenoid. The solenoid unlocks the door and reveals the prize. It’s always great to see electronics circuits like this that use all discrete components. This could have been accomplished any number of ways, but there’s something satisfying about a simple circuit that’s just right for the job. Be sure to check out [conductance’s] schematic if you want to see how this puzzle works.

[via Reddit]

Two Wheeler Is Gyroscope Stabilized

[Jim] loves gyros – not those newfangled MEMS devices, but old-fashioned mechanical gyroscopes. His obsession has pushed him to build this gyro stabilized two wheeler. We love watching hacks come together from simple basic materials and hand tools, with liberal amounts of hot glue to hold everything in place.  That seems to be [Jim’s] philosophy as well.

This is actually the fifth incarnation of [Jim’s] design. Along the way he’s learned a few important secrets about mechanical gyro design, such as balancing the motor and gyro assembly to be just a bit top-heavy. [Jim’s] gyro is a stack of CDs directly mounted to the shaft of a brushed speed400 R/C airplane motor. The motor spins the CDs up at breakneck speed – literally. [Jim] mentions that they’ve exploded during some of his early experiments.

The gyroscope is free to move in the fore-aft direction. Side to side balance tilting is on the wheels themselves. The wheels are model airplane wheels, which have a curved tread. No cheating by using flat LEGO wheels in [Jim’s] lab! A potentiometer measures the tilt angle of the gyro. The voltage from the pot is fed into an Arduino Uno which closes the loop by moving a servo mounted counterweight.

The vehicle is controlled with a regular R/C plane radio. A servo steers the front wheel while another DC motor drives the rear wheel. Not only is [Jim’s] creation able to balance on its own, it can even make a U-Turn within a hallway.

Continue reading “Two Wheeler Is Gyroscope Stabilized”

a black aluminum heatsink with fins on a green matt

Hacking Manufacturing: Ordering A Custom Heatsink From China

Building a one-off hack is fun. But what happens when people like your hack so much they want to buy it? As many of us have discovered, going from prototype to product can be a frustrating, tedious, and often expensive process. [Nick] at Arachnid labs has documented the process of manufacturing a custom heatsink in China.

While designing the Re:Load Pro, [Nick] discovered that there were no enclosures with integrated heatsinks which suited his application. Rather than design an entire case from scratch, [Nick] used an aluminum extrusion. This is a common technique in the electronics world, and literally thousands of extrusion profiles are available. The problem was the heatsink. Only a custom part would fit the bill, so [Nick] created a CAD drawing detailing his design. Much like the case, the heatsink was an aluminum extrusion. The custom nature of the heatsink meant that [Nick] would need to pay mold/tooling costs as well as satisfy minimum orders.

Continue reading “Hacking Manufacturing: Ordering A Custom Heatsink From China”

Galvanic Isolated FTDI Board Saves Your USB Ports

Isolated FTDI circuitg

We work with some dangerous circuits in the pursuit of cool hacks. High voltage, high current, all demand some respect. We can protect our bodies easily enough, but what about that fancy new laptop or Macbook? [David] is here to help with his isolated versatile FTDI circuit.

Our computers are often wired directly into the circuits we’re hacking on. In days past that might have been a parallel or serial port. Today it’s almost always USB, specifically serial over USB. USB has some safety features built-in, such as current limiting. However, it isn’t too hard to blow up a USB port, or even a motherboard with high voltage. Galvanic isolation is a method of removing any electrical connection between two circuits. Connections can still be made through optical, magnetic, or capacitive methods, just to name a few. One of the simplest methods of galvanic isolation is the humble optocoupler.

Isolating a high-speed USB connection can get somewhat complex. [David] wisely chose to isolate things on the serial side of the FTDI USB to serial converter. He started with SparkFun’s open source FTDI Basic Breakout. Galvanic isolation is through either an Analog Devices ADuM 1402 or ADuM 5402. The 1402 needs a bit of power on the isolated side, while the 5402 includes an isolated DC/DC converter to provide up to 60mA.

[David] didn’t just stop at galvanic isolation. He also added ESD protection, over current protection, and multiple options which can be selected when the board is built. Nice work [David]! Now we don’t have to worry about our laptop frying when we’re blowing up wires.