Tag Connect Programming Headers

A Small Replacement For Large Programming Headers

No matter how small you make your embedded projects, you still need a way to program the MCU. Standard programming headers can be annoyingly large for those very small projects. [Danny] wrote in to tell us how we can save room on our PCB designs using special spring loaded connectors, rather than large headers.

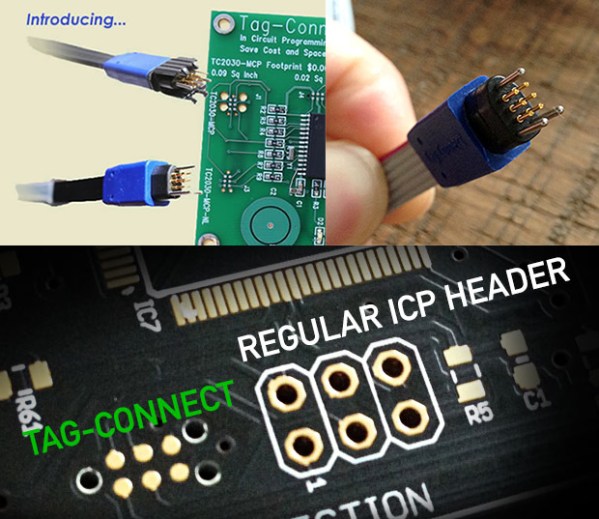
There are so many small embedded development systems, such as the Trinket that still rely on standard headers. Reducing the size of the programming headers and interface headers is an issue that deserves more attention than it currently receives. Based on Tag-Connect, a proprietary connector built around pogo-style pins, your PCB does not actually require any on-board mating connector. The PCB footprint simply has test-pads that connect with the pogo-pins and holes that allow for a rock solid connection. While the Tag-Connect header is a bit expensive (it costs about $34), you only need to buy it once.

It would be great to see even smaller Tag-Connect cables. Do you have a similar solution? What about something even smaller and more compact? Write in to tell us about any ultra-compact connector solutions you have been using!

Send Wireless TXT Between Two TI Calculators


TI calculators with wireless circuitry

One day while sitting in class in a Cornell University schoolroom, [Will] and [Michael] thought how cool it would be to send text messages to each other via their Texas Instruments calculators.  Connecting the two serial ports with a serial cable was out of the question. So they decided to develop a wireless link that would work for both TI-83 and TI-84 calculators.

The system is powered by a pair of ATmega644’s and two Radiotronix RF Modules that creates a wireless link between the two serial ports. The serial ports are 3 wire ports, which can be used for several things, including acting as a TV out port. [Will] and [Michael] reverse engineered the port’s protocol and did an excellent job at explaining it in full detail. Because they are dealing with the lowest level of the physical protocol, there is no need for them to deal with higher levels like checksums, header packets, ext.

Be sure to stick around after the break to see a video of the project in action. It’s quite slow for today’s standards. If you have any ideas on how to speed it up, be sure to let everyone know in the comments.

Continue reading “Send Wireless TXT Between Two TI Calculators”

Hackaday Links: April 27, 2014

hackaday-links-chain


The HackFFM hackerspace in Frankfurt finally got their CO2 laser up and running, and the folks there were looking for something to engrave. They realized the labels on IC packages are commonly laser engraved, so they made a DIP-sized Arduino. The pins are labelled just as they would be on an Arduino, and a few SMD components dead bugged onto the pins provide all the required circuitry. Video here.

A few years ago, we heard [David Mellis] built a DIY cell phone for an MIT Media Lab thingy. Apparently it’s making the blog rounds again thanks to the Raspi cell phone we featured yesterday. Here’s the Arduino cell phone again. Honestly we’d prefer the minimalist DIY Nokia inspired version.

The Raspberry Pi is now a form factor, with the HummingBoard, a Freescale i.MX6-powered clone, being released soon. There’s another form factor compatible platform out there, the Banana Pi, and you can actually buy it now. It’s an ARM A20 dual core running at 1GHz, Gig of RAM, and Gigabit Ethernet for about $60. That SATA port is really, really cool, too.

[Richard] has been working on a solar-powered sun jar this winter and now he’s done. The design uses two small solar panels to charge up two 500F (!) supercapacitors. There’s a very cool and very small supercap charging circuit in there, and unless this thing is placed in a very dark closet, it’ll probably keep running forever. Or until something breaks.

Here’s something awesome for the synth heads out there: it’s an analog modeling synthesizer currently on Indiegogo. Three DCOs, 18dB lowpass filter, 2 envelopes and an LFO, for all that classic Moog, Oberheim, and Roland goodness. It’s also pretty cheap at $120 USD. We really don’t get enough synth and musical builds here at Hackaday, so if you’re working on something, send it in.

A glass-based PCB? Sure. Here’s [Masataka Joei] put gold and silver on a piece of glass, masked off a few decorative shapes, and sandblasted the excess electrum away. [Masataka] is using it for jewelery, but the mind races once you realize you could solder stuff to it.

a black aluminum heatsink with fins on a green matt

Hacking Manufacturing: Ordering A Custom Heatsink From China

Building a one-off hack is fun. But what happens when people like your hack so much they want to buy it? As many of us have discovered, going from prototype to product can be a frustrating, tedious, and often expensive process. [Nick] at Arachnid labs has documented the process of manufacturing a custom heatsink in China.

While designing the Re:Load Pro, [Nick] discovered that there were no enclosures with integrated heatsinks which suited his application. Rather than design an entire case from scratch, [Nick] used an aluminum extrusion. This is a common technique in the electronics world, and literally thousands of extrusion profiles are available. The problem was the heatsink. Only a custom part would fit the bill, so [Nick] created a CAD drawing detailing his design. Much like the case, the heatsink was an aluminum extrusion. The custom nature of the heatsink meant that [Nick] would need to pay mold/tooling costs as well as satisfy minimum orders.

Continue reading “Hacking Manufacturing: Ordering A Custom Heatsink From China”

Hackaday Retro Edition: Hackadaying At 300 Baud

SONY DSC

For a bottom of the barrel website like our retro edition, there’s little reason to have a fast Internet connection. Even the fastest hands in the land can barely type faster than 300 baud. The problem with low-speed connections is the overhead involved, as [Pierre] discovered when he dug out an acoustic modem from the ’80s and loaded up our retro site.

While this isn’t the first modem ever made – that’s 1960s tech – but it does operate at the same speed – 300 bits per second, or slower than you reading this sentence. [Pierre] stuck a desk phone into the modem’s cups, plugged it in to a phone line simulator, and connected to a Raspberry Pi equipped with another modem. From there, it was pretty easy to set up a terminal at 300 baud.

A serial connection isn’t a connection to the Internet, however, and at 300 baud, PPP is nearly impossible. The overhead of encapsulating packets is just that high. SLIP is a much better choice to send IP packets over a slow serial connection, but [Pierre]’s mac doesn’t include the proper tools.

[Pierre] ended up using the serial connection between his Mac and Raspi with Zterm. From there, Lynx and Bob’s your uncle.

There’s an unsurprisingly long video of [Pierre] loading up the retro site below, as well an unsurprisingly long video of speedtest.net running at 56k.

Continue reading “Hackaday Retro Edition: Hackadaying At 300 Baud”

Galvanic Isolated FTDI Board Saves Your USB Ports

Isolated FTDI circuitg

We work with some dangerous circuits in the pursuit of cool hacks. High voltage, high current, all demand some respect. We can protect our bodies easily enough, but what about that fancy new laptop or Macbook? [David] is here to help with his isolated versatile FTDI circuit.

Our computers are often wired directly into the circuits we’re hacking on. In days past that might have been a parallel or serial port. Today it’s almost always USB, specifically serial over USB. USB has some safety features built-in, such as current limiting. However, it isn’t too hard to blow up a USB port, or even a motherboard with high voltage. Galvanic isolation is a method of removing any electrical connection between two circuits. Connections can still be made through optical, magnetic, or capacitive methods, just to name a few. One of the simplest methods of galvanic isolation is the humble optocoupler.

Isolating a high-speed USB connection can get somewhat complex. [David] wisely chose to isolate things on the serial side of the FTDI USB to serial converter. He started with SparkFun’s open source FTDI Basic Breakout. Galvanic isolation is through either an Analog Devices ADuM 1402 or ADuM 5402. The 1402 needs a bit of power on the isolated side, while the 5402 includes an isolated DC/DC converter to provide up to 60mA.

[David] didn’t just stop at galvanic isolation. He also added ESD protection, over current protection, and multiple options which can be selected when the board is built. Nice work [David]! Now we don’t have to worry about our laptop frying when we’re blowing up wires.

Backyard Roller Coaster – Family, Physics And Fun

Coaster Dad Track Segment

This week we have been in touch with [Will Pemble], Geek Dad. After a visit to Magic Mountain in early 2013, his son [Lyle] asked “Why don’t we build our own rollercoaster, Dad?”. [Will] couldn’t think of a single reason why not. This was the start of the CoasterDad Project. Excited by the challenge of building a Backyard Roller Coaster, [Will] also thought it would be a fantastic opportunity to teach [Lyle] about physics. Family, Fun, and Physics – what could be better?

The track is made from parallel PVC pipes on a lumber frame, similar to the one we saw for the Manpowered PVC rollercoaster, but it is more varied and looks a lot sturdier. [Will] is now working on mark II of the cart made from a steel frame with skateboard wheels and has independent axles. He is planning to add a pedal mechanism with freewheel, so you can get a little extra oomph on the rises.

In [Will’s] great videos you can get a front row seat on the coaster and see that even though it is fairly compact it has enough rises, troughs and turns to keep you entertained. It may not be quite as exciting as [Jon Iver’s] homemade rollercoaster, but when finished, the rider will be able go round and round self-propelled to their heart’s content, or till they puke, whichever comes first.  [Will] also explains the theory and practicalities behind making a strong, safe, but really fun coaster. Don’t miss the videos after the fold.

Have you made a backyard roller coaster, or are thinking about building one? Have you got any questions about [Will’s] roller coaster build? He’s up for making a video to answer some of them, so please leave questions for him in the comments below. We will post the video later on.

Continue reading “Backyard Roller Coaster – Family, Physics And Fun”