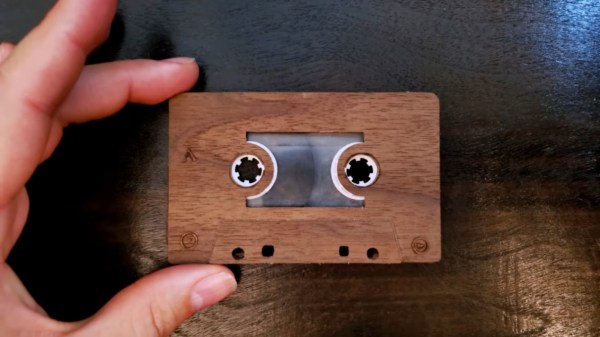
Midiboy, The Portable Gaming Console With MIDI

The ArduBoy is a tiny little gaming console that’s also extremely simple. It’s only a small, cheap, monochrome OLED display, a microcontroller with Arduino-derived firmware, and a few buttons. That’s it, but with these simple ingredients the community around the ArduBoy has created a viable gaming platform. It has cartridges now, and one version has a crank. Now, the MIDIboy is bringing something like the ArduBoy to the world of electronic music.

Inside the MIDIboy is what you would expect from any review of the ArduBoy schematics. There are six buttons, a speaker, a USB port, and a SPI OLED display. In addition to all of this are two big chonkin’ DIN-5 ports for MIDI in and MIDI out, and yes, the MIDI in port has an optoisolator.

As for what you can do with a tiny little game console connected to MIDI, there are already a few choice apps — the MIDI Chords app creates chords, obviously, and the MIDImon sketch is a MIDI monitor. There are some controllers for MIDI synths, and of course this device is completely open source. If you’ve ever wanted a DIY controller for your favorite MIDI synth, this is what you need.

If an ArduBoy with MIDI doesn’t sound exciting, just check out Little Sound DJ. That’s a Game Boy cartridge that turns your old brick Game Boy into a music production workstation. Yes, it sounds great and there’s a lot of potential in a pocket game console with MIDI ports.

Guitar Made From Noodles Glows In The Dark

Wood.  Specifically, certain types of tone woods; woods that impart a certain tone. That’s what guitars are made of. And occasionally, plastic, or metal, or fibreglass or, well, anything. [_forwardaudio_] built his out of noodles, because, why not?

Well, not completely out of noodles. Epoxy is used to give some strength to the noodles, because, despite the fantastic tone that noodles impart to the guitar, they’re not known for their strength. The epoxy helps keep the noodles in place, focusing their noodly tone.

To add a bit of punch to the look of the guitar, the back and front of the body have UV powder blended in, blue on the front and green on the back. Once the guitar was assembled, a set of UV strings were added as well, to add even more glowy goodness.

In the video (after the break) the build process is shown along with the simplified, volume only, wiring. At the end, [_forwardaudio_] noodles around on the guitar a bit.

I’ll show myself out.

If noodles aren’t your thing, maybe you’d prefer 3D printing an extended fretboard for your guitar, or to build yourself a 12 foot long guitar.

Continue reading “Guitar Made From Noodles Glows In The Dark”

This Chiptune Player’s Got What Nintendon’t

When it comes to chiptunes, the original Nintendo Entertainment System and the Game Boy get all the accolades. The OPL synths have all the fun. But there’s another chip out there in dusty old machines that is at least as interesting with a repertoire at least as influential as the Mega Man 2 OST. It’s the YM2612, the chip in the Sega Mega Drive/Genesis.

[natalie] created a portable device capable of playing back the files targeting the sound chips in this venerable machine. It’s the MegaGRRL, and it’s the iPod for the original Genesis sound tracks.

Inside the MegaGRRL is an ESP32 in the form of an ESP-WROOM-32 module. There is, of course a YM2612 chip in there, along with a headphone amplifier and a battery charger. The display is a fairly standard and cheap affair that’s 240 x 320 pixels in full color, and there are seven buttons on this device, because of course you need an A, B, and C button.

Combined with a 3D printed enclosure, the GameGRRL does exactly what it says it will: it plays all the music from old Sega games. Now, when you’re in the inevitable argument with someone over the fact that Michael Jackson wrote the Sonic 3 soundtrack, the proof is right in your pocket. Of if you want to jam out on the Toe Jam And Earl soundtrack, that’s right there too. You can check out the video demos below.

Continue reading “This Chiptune Player’s Got What Nintendon’t”

MIDI-Gurdy, MIDI-Gurdy, MIDI-Gurdy Man

The hurdy gurdy is the perfect musical instrument. It’s an instrument with a crank, and a mechanical wonderment of drone strings and weird chromatic keyboards. No other musical instrument combines the sweet drone of bagpipes with the aural experience of an eight-year-old attempting to play Hot Cross Buns on a poorly tuned violin.

Now, the hurdy gurdy is going digital. The Digi-Gurdy is [XenonJohn]’s entry into this year’s Hackaday Prize, and it’s exactly what it says on the tin: it’s a musical instrument that drones on and on, with keys plunking out a melody.

If you’re not familiar with a hurdy gurdy, this video is a varily good introduction. It’s a box with somewhere between four and six strings mounted on the outside. The strings vibrate by means of a wooden wheel powered by a crank. There’s a keyboard of sorts along the body of the instrument that ‘fret’ a single string providing the melody; all the other strings are drone strings that sound continuously. I think it was in, like, a Led Zeppelin video, man.

While it’s a slightly complicated build to make an analog hurdy gurdy, delving into the digital domain is easy: [XenonJohn] is building a hurdy gurdy that simply outputs MIDI commands with some buttons and a Teensy 3.6 microcontroller. The parts are 3D printed, and since this hurdy gurdy is completely digital, you can change the tuning of the drone strings without actually tuning them. Awesome.

This MDF Sound Bar Sounds Great

Everyone should build a speaker cabinet at least once in their life, if only so they can realize how much thought goes into building a simple box. [John] of ibuildit.ca wanted a sound bar for his home theater setup, and that means building a sound bar. The result is beautiful, and a demonstration of how much you can do with just a router and a table saw.

[John] built this sound bar almost entirely out of MDF, which isn’t the best material but it works well enough for a speaker cab that’s meant to be mounted to a wall. The sides were constructed first, with a rabbet holding the front and back on. Both the woofer and tweeter are inset into the front, and a standard piece of plumbing pipe serves as the bass port. Slap a round over bit into the router and do some light sanding, and everything looks great with a coat of black paint.

As with any speaker enclosure, the design is effectively parametric, designed entirely around the drivers being used. In this case, [John] is using a spreadsheet named ‘Unibox’ that gives you all the formulas and graphs for designing a speaker enclosure.

With the box built and the speakers installed, the only matter left were a few aesthetic choices. [John] went with a standard black finish with a very nice wooden grille held onto the front with magnets. It’s a design that pops, but the true test of a speaker is how it sounds. That’s a bit hard to convey over the Internet, but [John] included a few sound samples at the end of the build video, available below.

Continue reading “This MDF Sound Bar Sounds Great”

A Baby Named DJ

Some of us are guilty of picking up questionable hardware from garage sales, fleamarkets, and well-meaning relatives. There is a balance between turning down a good investment and hoarding, and if we figure out how to tell the difference you will be the first to know. [Clem Mayer] may start on the side of unwise acquisition, but he pushes a broken fetal detector into the realm of awesome by converting it to an analog synthesizer, born to headline at an Eastern European dance party.

He starts with a basic teardown, and we get to see how old hardware was serviceable with only two standard screws. It is a good thing too, because the nickel-cadmium batteries are older than some of you and they are in need of replacement. New nickel-metal hydride batteries got it up and running but [Clem] does not have a baby bump so its functionality turned to Pink Floyd era synthesizer circuit bending. Circuit bending involves modifying a circuit for sound it was not intended to make.

Continue reading “A Baby Named DJ”

DIY Raspberry Pi Multi FX Stomp Box

From building your own analog effects pedal to processing audio through micro controllers, a lot of musicians love building their own boxes of sound modification. In his entry for the 2019 Hackaday Prize, [Craig Hissett] has a project to build an all-in-one multi-effects stomp box.

At the center of the box is a Raspberry Pi with an AudioInjector stereo sound card.  The card takes care of stereo in and out, and passing the signal to the Pi. The software is Modep, an open source audio processor that allows the setup of a chain of digital effects plugins to be run on the Pi. After finding some foot switches, [Craig] connected them to an Arduino Pro Micro which he set up as a MIDI device that sends MIDI messages to the Modep software running on the Pi.

There are still a few steps to go, but [Craig] has the basic layout covered. Next up is wiring it up and building a proper case for it, as well as working on latency. A few years ago, another multi-effects stomp box was featured in the Hackaday Prize, and last year, this multi-effects controller was featured.