Web Connected Treat Dispenser Appeases The Pets

web-connected-treat-dispenser

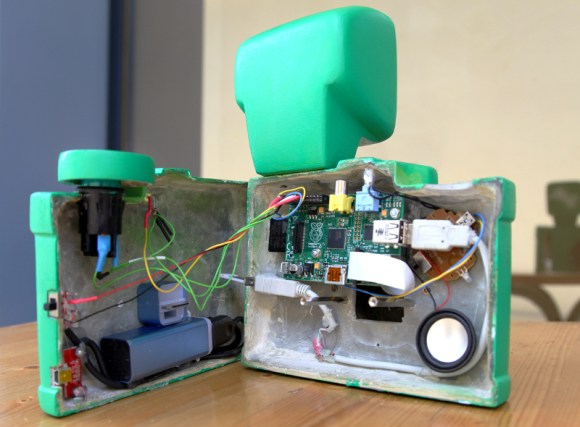
[John] was looking for a project for his newly acquired Raspberry Pi and decided to include his dog in the fun. although his finished project looks a lot like an old time camera, it’s actually a web-connected treat dispenser that uses his dog’s email address for dispensation.

Let’s take a look at the hardware from top to bottom. There’s a camera with a eagle’s eye shot of his furry friend waiting for treats. The cylinder below that is the motor which drives the treat dispenser. You can see the chain tensioner on the back which connects the motor to the tube dispenser in the center of the box. Just above that outlet is the character display which gives feedback to anyone watching the dispenser. Nearing the bottom is a hopper that catches the treats, then flips over to dump them onto the floor. And finally at the bottom is a slot for the Raspberry Pi which drives everything.

Most of [John’s] projects revolve around CNC work. In addition to the demo video found after the break there’s a second that focuses on CAD design. About half way through that clip he gives us a close-up tour of all the hardware.

Continue reading “Web Connected Treat Dispenser Appeases The Pets”

Easy Web Interface With GPIO Access Runs On Raspberry Pi

Here’s a Raspberry Pi hack that adds web control using PHP and MySQL. As you can see in the image, it serves up a webpage (using the Apache2 server) which allows you to change the state of the GPIO pins. It’s not super-complicated, but it is nice to see a step-by-step guide for installing and configuring the package.

Web interface GPIO control is one of the features we loved about the Adafruit Web IDE. But this offering is loaded completely from the RPi (the Adafruit package uses cloud based code) and utilizes the tools most Linux network admins will be used to. A MySQL database manages the connection between GUI commands and GPIO modification. The webpage is served up by a PHP script which takes care of polling and changing database values. Configuration requires a new database, plus the username and password which has access to it.

Controlling A Raspberry Pi With Real Life Redstone

minepi

We’ve seen computers built in Minecraft out of redstone, the game’s version of electricity, circuits, and digital logic. We’ve even seen a few redstone contraptions controlling real-world devices. [Angus]’ build, though, takes things to a whole new level. He’s created a bridge between Minecraft circuits and their real life counterparts using a Raspberry Pi.

[Angus]’ build relies on a mod for Minecraft servers running as a Bukkit plugin. Blocks powered by redstone are labeled with an in-game sign, and messages regarding the state of a block are passed over the network using the MQTT protocol.

The hardware side of the build is a Raspberry Pi with a PiFace expansion board. With this setup, [Angus] can control LEDs on the PiFace by toggling Minecraft levers, or light up redstone lamps using the PiFace’s buttons.

If you’d like to try this out for yourself, you can grab the Bukkit plugin over on [Angus]’s git. Check out the video of the real life redstone in action after the break.

Continue reading “Controlling A Raspberry Pi With Real Life Redstone”

Raspberry Pi Becomes A Guitar Effects Processor

One of the more interesting use cases for the Raspberry Pi is exploiting its DSP capabilities in interesting ways. There’s a lot of horsepower inside the Raspberry Pi, more than enough to do some very interesting things with audio, all while being powered by a small wall wart adapter. [Pierre] over on the Pure Data mailing list has a proof-of-concept working that uses the Raspi as a guitar effects processor. The results are very encouraging – [Pierre] is able to use his Raspi as a delay, pitch shifter, and of course a classic flanger, phaser, and chorus with a latency of about 16 ms.

There are a few steps necessary to get low latency with the Raspi’s audio interface. [Pierre] is running his Pi headless, and allocated more RAM to the CPU.

If you’d like to try this out for yourself, [Pierre] has a tutorial for setting up Pure Data with the Raspberry Pi. He’ll be updating his blog soon with more tutorials and verified USB audio interfaces later.

Check out the processor in action after the break.

Continue reading “Raspberry Pi Becomes A Guitar Effects Processor”

Raspberry Pi Used As A Beacon Transmitter

rpi-beacon-transmitter

[m0xpd] got his hands on an inexpensive AD9850 DDS Module from eBay but needed a way to control it. He took inspiration from the projects that used a PIC microcontroller, but decided to add his own twist by using a Raspberry Pi to build a multi-mode beacon transmitter.

At the center of this breadboarded circuit lies the green AD9850 module. To its left is a level converter he built to get the 3.3V levels from the RPi board to work with the rest of the 5V hardware. The signal then feeds into a QRP amplifier and a low pass filter.

He didn’t start from square one when it came time to write the code for the RPi. Instead he grabbed an Arduino sketch for the very same DDS and ported it over to Python. The first test signal was his call sign sent in Morse code at QRSS speeds. But he also managed to get Hellschreiber messages working, making it a multiple-mode device.

[via Solder Smoke]

Building Your Own Model A Raspberry Pi

A

When the Model A Raspberry Pi is released in the coming weeks or months, you’ll have the opportunity to buy an even cheaper ARM Linux computer that will draw 1/3rd the power of the classic Model B. Some people just can’t wait a month to get their hands on it, so [Blair] decided to make his own.

The Model A Raspberry Pi is nearly the same as the Model B; the only things missing are an Ethernet port, a single USB port, and the associated chips required to drive these ports. In a brave bit of desoldering, [Blair] removed the Ethernet/USB controller with a butane torch.

In part two of [Blair]’s adventures, he removed the Ethernet connector and replaced the two-high USB ports with a single port, greatly decreasing the height of the Raspberry Pi.

As of right now, this is just about the only way to get your hands on the lower power, more compact Raspberry Pi. We can’t wait, though, for the eventual tutorial of how to turn a Model A into a Model B. That’ll be an awesome demonstration of god-like soldering skills.

Raspberry Pi Becomes A Torrent Box

If you’re making a media server out of a Raspberry Pi, why not add an interface to the biggest torrent sites on the Internet? That’s what [Alan] did when he wanted an automated media downloader that can stream movies and TV shows to any device.

[Alan]’s torrent box is basically a web app running on a Raspberry Pi. By accessing the Pi from the browser of a desktop or mobile device, he can search a collection of torrent sites and download just about everything to the Pi with a touch of a button. Once the files are downloaded, the Pi is able to move them to any directory, either locally or on a network, or just serve them up on a TV with a media player.

While we’re not endorsing  file sharing, we can’t think of a simpler way to set up a seedbox that draws a minuscule amount of power. It’s a great addition to any media server, and a great way to get the latest season of <<Linux Distribution>> streaming to your TV.