Using A Raspberry Pi As Your Travel Computer

Do you think you could travel for the entire summer and leave your laptop at home? [Gef] did just that. With the help of his Kindle he used a Raspberry Pi as his travel computer. This was an easy association to think up, since he planned to bring the Kindle along as his reading material anyway. All it was going to take was some creative hacking to get it working as a display for the single-board computer.

The Kindle is merely connecting to the Raspberry Pi through a terminal emulator. This happens via USB, and requires that you Jailbreak the kindle and install a package called USBnetwork. The problem with the technique is that you’re going to go crazy trying to use the tiny keyboard that is built into the eBook reader. [Gef] decided to take a USB keyboard along with him, but how is he going to use it to control the terminal screen on the Kindle? The answer is the ‘screen’ application. We’ve used it a lot to keep programs running on a machine after we’ve exited from an SSH session. It turns out it can also be used to host multiple users on the same terminal session. Pretty neat!

[via Make]

Getting Around The Raspi’s USB Host Current Limit

For being such a revolutionary device, there are still a few problems with the Raspberry Pi. For one, the USB host ports are only able to source 140 mA per port, while the USB ports on your desktop, laptop, and even tablet are able to send a full 500 mA per port.

The official ‘fix’ for this problem is to use a powered USB port for any device that requires more than 140 mA,  something that didn’t sit well with [Manis]. He came up with an easy fix , though, that only requires a few bits of wire and a soldering iron.

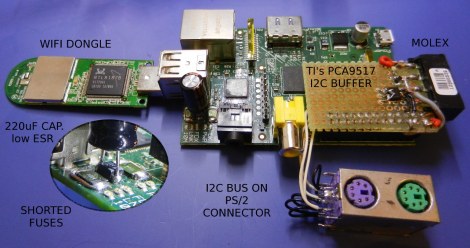
The USB ports on the Raspi are current limited to 140 mA by a pair of polyfuses. [Manis] bridged these fuses, effectively taking them out of the circuit with a short length of wire. This allowed him to use a USB hard drive (powered by USB, of course) with the Raspi.

There’s one small problem with sending that much current through the Raspi’s USB port. Sometimes, when the high-power USB device is powered on, the voltage will sag, resetting the SoC and rebooting the system. [Manis] did his homework and discovered USB 2.0-spec ports should use a 120 μF, low-ESR capacitor to prevent this. The Raspi comes stock with a 47 μF cap used for this purpose. Replacing this cap (C32) might be a good idea if you’re planning on using high-power devices with your Raspi.

Problems Powering Raspberry Pi From GPIO Header

[Zaion] grabbed an ATX power supply to source the 5V the Raspberry Pi needs to run. The common problem when it comes to RPi supplies is a shortfall in how much current a USB wall adapter can source. The ATX shouldn’t have this problem, but none-the-less he found that the USB ports were only reading about 5V. Strange. He grabbed the soldering iron and fixed the issue with a piece of jumper wire (English translation found in the second half of his post).

The problem was discovered when trying to get a WiFi dongle to work on one of the RPi’s USB ports. It simply wouldn’t show up, and after going down the blind alley of assuming it was a driver problem he started to investigate the hardware. After discovering the below-nominal voltage [Zaion] measured the resistance between the 5V pin on the GPIO header and the one on the USB port. It reads 3-4 Ohms and he concluded that the trace is too thin. We took a quick look at the schematic for the board and see no reason for the voltage drop. His jumper wire fixed the issue but it leaves us wondering, is this an isolated case, or a design flaw? Tell us what you think in the comments section.

Raspberry Pi - rpi

Operating Systems Development With The Raspberry Pi

Even though the Raspberry Pi has, from the very beginning, been touted as an educational computer, we’ve seen neither hide nor hare of coursework, lesson plans, or even computer sciencey tutorials using the Raspi. We’re guessing academia works at a much slower pace than the average hardware hacker, but [Alex Chadwick] at Cambridge University has managed to put together an online tutorial on developing an operating system from scratch for the Raspi.

The goal of this tutorial is to throw a budding Raspi tinkerer into the strange and confusing world of registers, hexadecimal, and ARMv6 assembly. After going through the necessary toolchain, [Alex]’s tutorials cover blinking the ‘OK’ LED on the Raspberry Pi using only assembly.

The OS development guide goes on from there to include drawing graphics on the screen and even accepting input from a USB keyboard.

It’s important to point out what [Alex]’s tutorial isn’t; even though this series of tutorials goes through manipulating the bare metal of the Raspberry Pi, don’t expect to be porting UNIX to the Raspi after going through these guides. That being said, after completing these tutorials, you’ll be in a fabulous position for building your own homebrew OS on the Raspberry Pi.

What You Can Do When A Raspberry Pi Teams Up With An Arduino

We thought that connecting an Arduino to a Raspberry Pi was overkill, but one thing caught our attention. [Jan Stevens] mentions that the RPi is less expensive than the Ethernet Shield. Interesting. As we looked into his writeup a bit more we began to think he’s onto something. [Jan] uses the PHP serial class to communicate between the RPi and Arduino (dead link; Internet Archive). This ends up being a very inexpensive way to bring some of the more powerful web programming options to your hardware devices.

Sure, he’s just driving three RGB LEDs. But the demo video after the break gives us a glimpse as some of the interface options that become available when an embedded Linux machine is in play. He’s using jQuery, AJAX, PHP, and JSON to name a few. If you want to give this a try yourself you can grab the code from his Github repo. Of course we’re going to want to hear about any projects you develop from this starting point!

Continue reading “What You Can Do When A Raspberry Pi Teams Up With An Arduino”

Raspberry Pi Synth Gives A Softsynth Dedicated Hardware

For all the musicians out there, here’s a great use for your Raspberry Pi. All the features you would expect from a nice analog synth are implemented in a Raspberry Pi-based polysynth – dual oscillators, LFOs, and phasers – and it looks like there will be a few more features added before the Raspi synth is released.

Even though the ‘synthesis’ part of the Raspi synth already sounds wonderful, getting MIDI on the Rasberry Pi leaves much to be desired. The creator of the Raspi synth thought about using the GPIO pins as a MIDI interface, but because the GPIO pins cannot run natively at 31250 bps (the MIDI spec), the Raspberry Pi has to waste most of its CPU cycles just listening for MIDI traffic.

Right now the Raspberry Pi synth is controlled by a USB-connected MIDI interface, and as you can hear after the break, sounds wonderful. We can’t wait to hear what this synth will be able to do in a few months’ time.

Continue reading “Raspberry Pi Synth Gives A Softsynth Dedicated Hardware”

Party Photo Printer Built Around A Raspberry Pi

We think [Brian Delacruz] latched on to a good idea with this photo printer project. Instead of building a big photo booth for his party he developed a Raspberry Pi based WiFi photo printer. Right now it’s a prototype that lacks the kind of polish necessary to make a true user-friendly device. But the idea is solid and just waiting for you to improve upon it.

In addition to the RPi he’s using a quality photo printer and a small wireless router. The router simply provides WiFi capabilities for the RPi which is running a web server, mySQL, and FTP. This provides a wide range of upload options which he can work with. Watch the video after the break to see him print a smart phone photo wirelessly.

This can be simplified by using a package like hostapd to use a USB WiFi dongle as an access point. Or if the venue already has Internet access a server could be set up with a QR code to guide people to it. The party starts off with an empty bulletin board and guests would be invited to print and hang their own photos which will go into the host’s guest book/scrap book to remember the event.